PREPARATION FOR USE
1 Check contents
Make sure the package contains all of the accessories listed in "as below".
SUPPLIED ACCESSORIES
ACCESSORIES | PART NO. |
Coaxial Cable | WPZ0901TM002 |
Remote Control Unit | NA301UD/NA351UD |
Batteries | AA x 2 |
2Situate VCR
Place the VCR in a stable, horizontal surface.
3 Connect VCR to TV
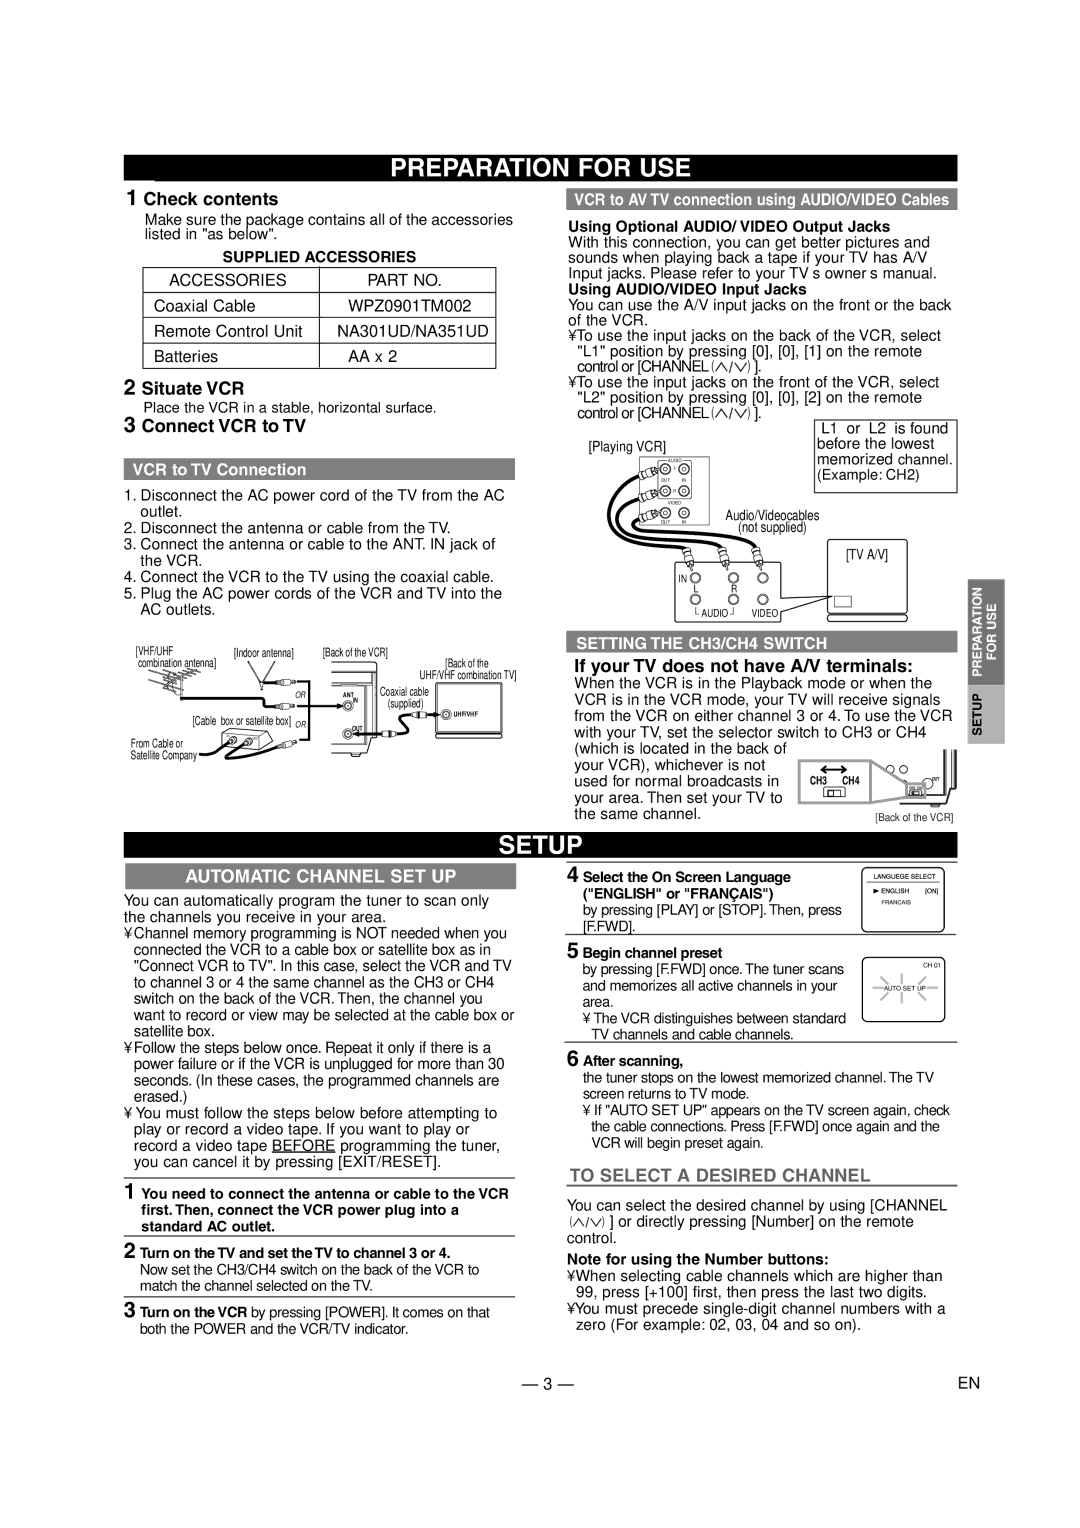
VCR to TV Connection
1.Disconnect the AC power cord of the TV from the AC outlet.
2.Disconnect the antenna or cable from the TV.
3.Connect the antenna or cable to the ANT. IN jack of the VCR.
4.Connect the VCR to the TV using the coaxial cable.
5.Plug the AC power cords of the VCR and TV into the AC outlets.
[VHF/UHF | [Indoor antenna] | [Back of the VCR] | |
combination antenna] |
|
| [Back of the |
|
|
| UHF/VHF combination TV] |
| OR | ANT | Coaxial cable |
|
| IN | (supplied) |
|
|
| |
[Cable | box or satellite box] OR |
| UHF/VHF |
OUT |
| ||
|
|
| |
From Cable or |
|
|
|
Satellite Company |
|
|
|
VCR to AV TV connection using AUDIO/VIDEO Cables
Using Optional AUDIO/ VIDEO Output Jacks
With this connection, you can get better pictures and sounds when playing back a tape if your TV has A/V Input jacks. Please refer to your TV’s owner’s manual.
Using AUDIO/VIDEO Input Jacks
You can use the A/V input jacks on the front or the back of the VCR.
•To use the input jacks on the back of the VCR, select "L1" position by pressing [0], [0], [1] on the remote
control or [CHANNEL (![]() ) ].
) ].
•To use the input jacks on the front of the VCR, select "L2" position by pressing [0], [0], [2] on the remote
control or [CHANNEL (![]() ) ].
) ].
|
|
| “L1” or “L2” is found |
[Playing VCR] |
|
| before the lowest |
AUDIO |
|
| memorized channel. |
L |
|
| (Example: CH2) |
OUT | IN |
| |
R |
|
|
|
VIDEO |
|
|
|
OUT | IN | Audio/Videocables | |
|
|
| (not supplied) |
|
|
| [TV A/V] |
IN |
|
| |
| L |
| R |
|
| AUDIO | VIDEO |
SETTING THE CH3/CH4 SWITCH
If your TV does not have A/V terminals:
When the VCR is in the Playback mode or when the VCR is in the VCR mode, your TV will receive signals from the VCR on either channel 3 or 4. To use the VCR with your TV, set the selector switch to CH3 or CH4
(which is located in the back of |
|
|
your VCR), whichever is not |
|
|
used for normal broadcasts in | CH3 CH4 | OUT |
CH3 CH4 | ||
your area. Then set your TV to |
|
|
the same channel. |
| [Back of the VCR] |
PREPARATION | FOR USE |
SETUP |
|
SETUP
AUTOMATIC CHANNEL SET UP
You can automatically program the tuner to scan only the channels you receive in your area.
•Channel memory programming is NOT needed when you connected the VCR to a cable box or satellite box as in "Connect VCR to TV". In this case, select the VCR and TV to channel 3 or 4 the same channel as the CH3 or CH4 switch on the back of the VCR. Then, the channel you want to record or view may be selected at the cable box or satellite box.
•Follow the steps below once. Repeat it only if there is a power failure or if the VCR is unplugged for more than 30 seconds. (In these cases, the programmed channels are erased.)
•You must follow the steps below before attempting to play or record a video tape. If you want to play or record a video tape BEFORE programming the tuner, you can cancel it by pressing [EXIT/RESET].
1 You need to connect the antenna or cable to the VCR first. Then, connect the VCR power plug into a standard AC outlet.
2 Turn on the TV and set the TV to channel 3 or 4. Now set the CH3/CH4 switch on the back of the VCR to match the channel selected on the TV.
3 Turn on the VCR by pressing [POWER]. It comes on that both the POWER and the VCR/TV indicator.
4 Select the On Screen Language ("ENGLISH" or "FRANÇAIS")
by pressing [PLAY] or [STOP]. Then, press [F.FWD].
5 Begin channel preset
by pressing [F.FWD] once. The tuner scans and memorizes all active channels in your area.
•The VCR distinguishes between standard TV channels and cable channels.
6 After scanning,
the tuner stops on the lowest memorized channel. The TV screen returns to TV mode.
•If "AUTO SET UP" appears on the TV screen again, check the cable connections. Press [F.FWD] once again and the VCR will begin preset again.
TO SELECT A DESIRED CHANNEL
You can select the desired channel by using [CHANNEL
(![]() ) ] or directly pressing [Number] on the remote control.
) ] or directly pressing [Number] on the remote control.
Note for using the Number buttons:
•When selecting cable channels which are higher than 99, press [+100] first, then press the last two digits.
•You must precede
– 3 – | EN |