HOOKUPS
DVD/VCR TO TV CONNECTION | SETTING THE CH3/CH4 | |
SWITCH | ||
|
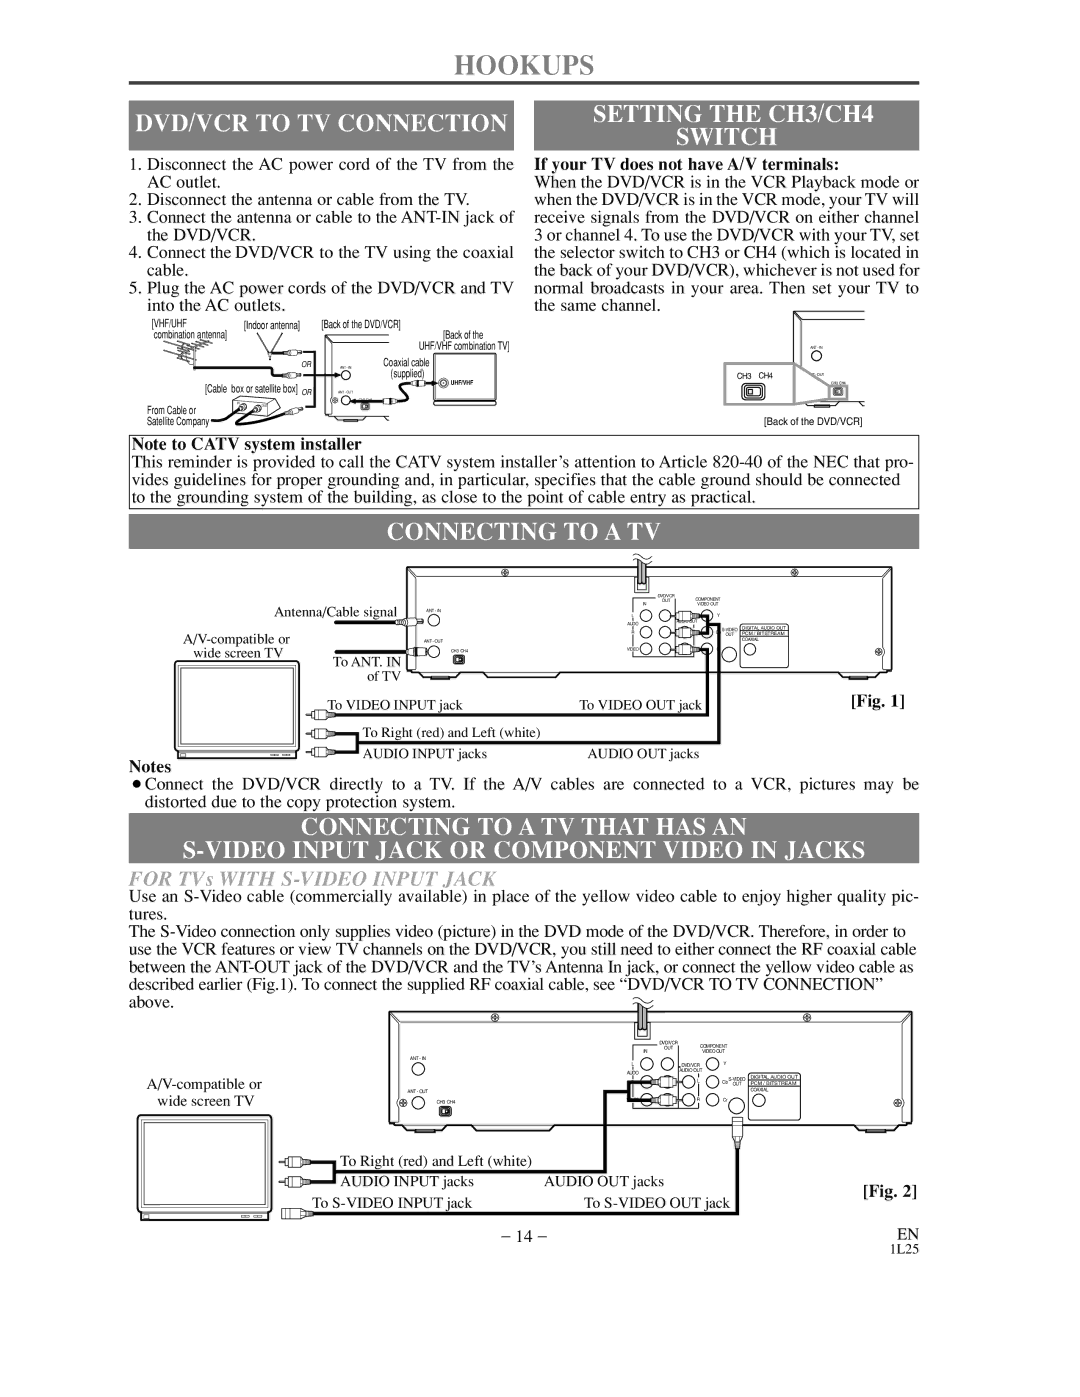
1.Disconnect the AC power cord of the TV from the AC outlet.
2.Disconnect the antenna or cable from the TV.
3.Connect the antenna or cable to the
4.Connect the DVD/VCR to the TV using the coaxial cable.
5.Plug the AC power cords of the DVD/VCR and TV into the AC outlets.
[VHF/UHF | [Indoor antenna] | [Back of the DVD/VCR] | |
combination antenna] |
|
| [Back of the |
|
|
| UHF/VHF combination TV] |
| OR | ANT - IN | Coaxial cable |
|
|
| (supplied) |
[Cable | box or satellite box] OR |
| UHF/VHF |
ANT - OUT |
| ||
|
|
| CH3 CH4 |
From Cable or |
|
|
|
Satellite Company |
|
|
|
If your TV does not have A/V terminals:
When the DVD/VCR is in the VCR Playback mode or when the DVD/VCR is in the VCR mode, your TV will receive signals from the DVD/VCR on either channel 3 or channel 4. To use the DVD/VCR with your TV, set the selector switch to CH3 or CH4 (which is located in the back of your DVD/VCR), whichever is not used for normal broadcasts in your area. Then set your TV to the same channel.
ANT - IN
CH3 | CH4 | - OUT |
CH3 CH4
[Back of the DVD/VCR]
Note to CATV system installer
This reminder is provided to call the CATV system installer’s attention to Article
CONNECTING TO A TV
|
|
| DVD/VCR | COMPONENT |
| |
|
|
| OUT |
| ||
Antenna/Cable signal |
| IN | VIDEO OUT |
| ||
ANT - IN | L | DVD/VCR | Y |
| ||
|
|
| AUDO | AUDIO OUT |
|
|
|
|
|
| Cb | DIGITAL AUDIO OUT | |
|
| R | L | |||
|
|
|
| OUT | PCM / BITSTREAM | |
| ANT - OUT |
|
|
| COAXIAL | |
wide screen TV |
| CH3 CH4 | VIDEO | R | Cr |
|
To ANT. IN |
|
|
|
|
| |
|
|
|
|
|
| |
| of TV |
|
|
|
|
|
| To VIDEO INPUT jack | To VIDEO OUT jack |
| [Fig. 1] | ||
| To Right (red) and Left (white) |
|
|
|
| |
| AUDIO INPUT jacks | AUDIO OUT jacks |
|
| ||
Notes
¡Connect the DVD/VCR directly to a TV. If the A/V cables are connected to a VCR, pictures may be distorted due to the copy protection system.
CONNECTING TO A TV THAT HAS AN
FOR TVs WITH S-VIDEO INPUT JACK
Use an
The ![]()
![]()
|
| DVD/VCR |
| COMPONENT |
|
|
| OUT |
|
| |
|
| IN |
| VIDEO OUT |
|
| ANT - IN | L |
| Y |
|
|
| DVD/VCR |
| ||
|
| AUDO | AUDIO OUT |
| |
|
|
| DIGITAL AUDIO OUT | ||
| R | L | Cb | ||
|
| ||||
|
|
|
| OUT PCM / BITSTREAM | |
wide screen TV | ANT - OUT |
|
|
| COAXIAL |
CH3 CH4 | VIDEO | R | Cr |
| |
|
|
|
|
| |
| To Right (red) and Left (white) |
|
|
| |
| AUDIO INPUT jacks | AUDIO OUT jacks |
|
| [Fig. 2] |
| To | To | |||
|
| ||||
|
| – 14 – |
|
| EN |
1L25
