TV/VCR SECTION

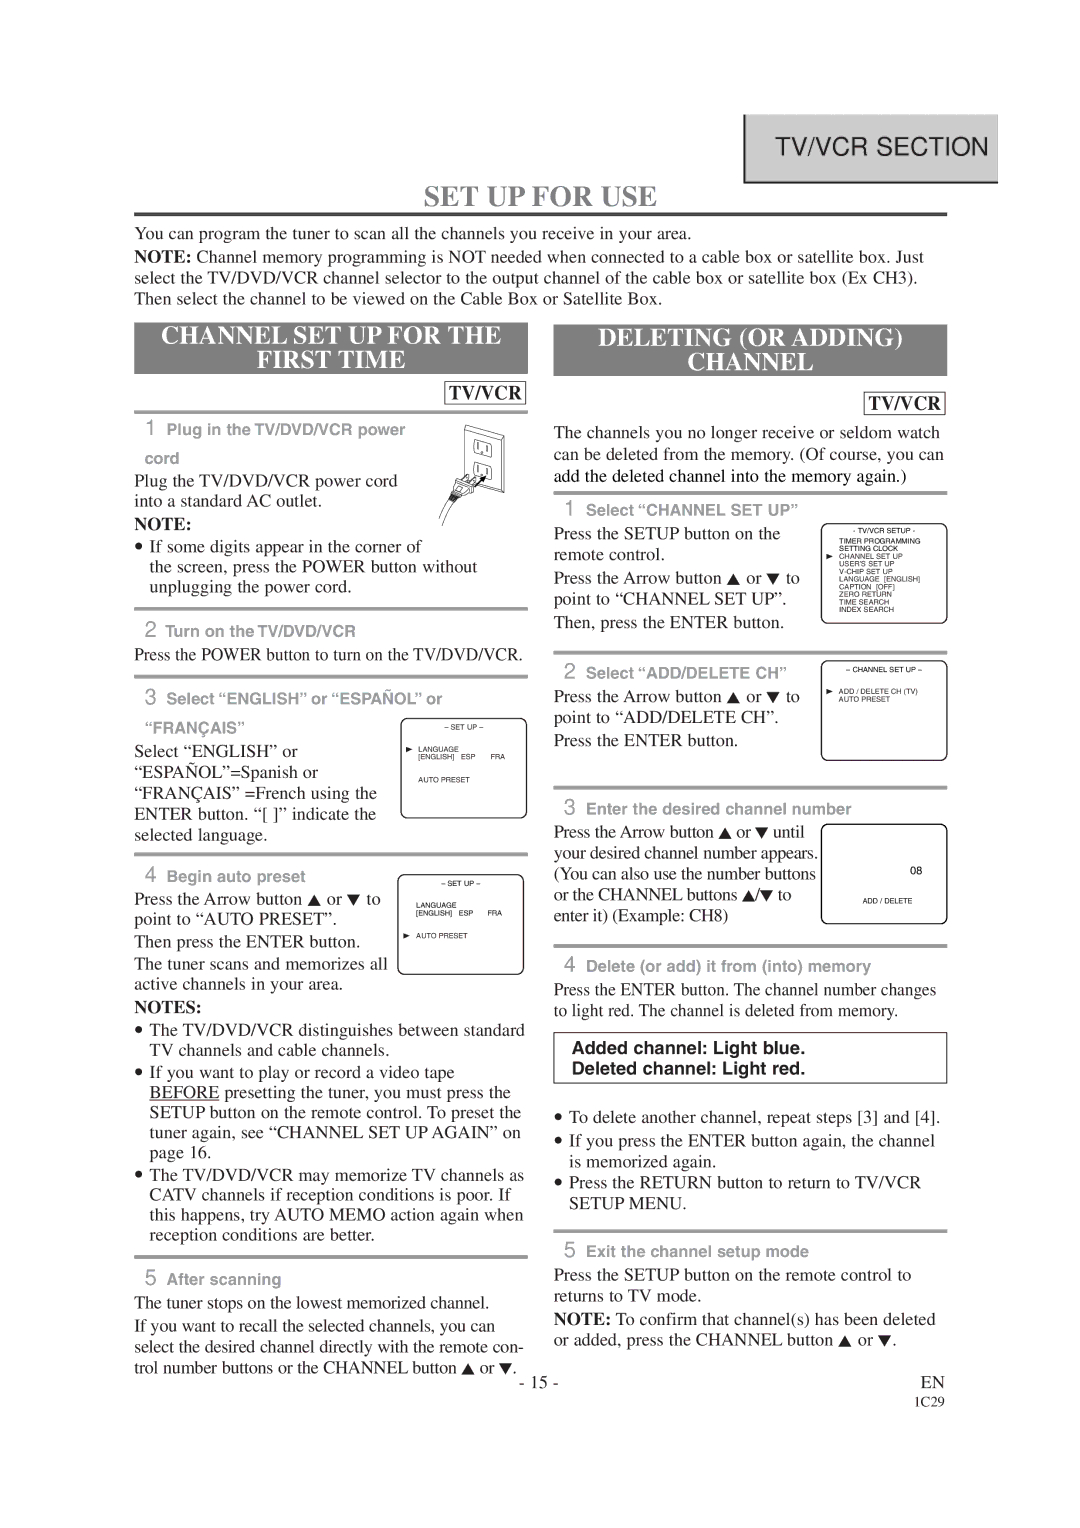
SET UP FOR USE

You can program the tuner to scan all the channels you receive in your area.

NOTE: Channel memory programming is NOT needed when connected to a cable box or satellite box. Just select the TV/DVD/VCR channel selector to the output channel of the cable box or satellite box (Ex CH3). Then select the channel to be viewed on the Cable Box or Satellite Box.

CHANNEL SET UP FOR THE

FIRST TIME

TV/VCR

1Plug in the TV/DVD/VCR power

cord

Plug the TV/DVD/VCR power cord into a standard AC outlet.

NOTE:

If some digits appear in the corner of

the screen, press the POWER button without unplugging the power cord.

DELETING (OR ADDING)

CHANNEL

TV/VCR

The channels you no longer receive or seldom watch can be deleted from the memory. (Of course, you can add the deleted channel into the memory again.)

1 Select “CHANNEL SET UP”


Press the SETUP button on the

TIMER PROGRAMMING


- TV/VCR SETUP -

remote control.

SETTING CLOCK

B CHANNEL SET UP


USER’S SET UP

Press the Arrow button K or L to

V-CHIP SET UP

LANGUAGE [ENGLISH]

point to “CHANNEL SET UP”.

CAPTION [OFF]

ZERO RETURN

TIME SEARCH


INDEX SEARCH

2Turn on the TV/DVD/VCR

Press the POWER button to turn on the TV/DVD/VCR.

3Select “ENGLISH” or “ESPAÑOL” or

“FRANÇAIS”

– SET UP –


Select “ENGLISH” or

B LANGUAGE


[ENGLISH] ESP

FRA

“ESPAÑOL”=Spanish or

AUTO PRESET


“FRANÇAIS” =French using the


ENTER button. “[ ]” indicate the


selected language.


4 Begin auto preset

– SET UP –


Press the Arrow button K or L to

LANGUAGE


point to “AUTO PRESET”.

[ENGLISH] ESP

FRA


Then press the ENTER button.

B AUTO PRESET


The tuner scans and memorizes all


active channels in your area.


NOTES:


The TV/DVD/VCR distinguishes between standard TV channels and cable channels.

If you want to play or record a video tape BEFORE presetting the tuner, you must press the SETUP button on the remote control. To preset the tuner again, see “CHANNEL SET UP AGAIN” on page 16.

The TV/DVD/VCR may memorize TV channels as CATV channels if reception conditions is poor. If this happens, try AUTO MEMO action again when reception conditions are better.

Then, press the ENTER button.

2 Select “ADD/DELETE CH”

– CHANNEL SET UP –


Press the Arrow button K or L to

B ADD / DELETE CH (TV)

AUTO PRESET

point to “ADD/DELETE CH”.


Press the ENTER button.


3Enter the desired channel number

Press the Arrow button K or L until your desired channel number appears.

(You can also use the number buttons

08


or the CHANNEL buttons K/L to

ADD / DELETE

enter it) (Example: CH8)


4Delete (or add) it from (into) memory

Press the ENTER button. The channel number changes to light red. The channel is deleted from memory.

Added channel: Light blue.

Deleted channel: Light red.

To delete another channel, repeat steps [3] and [4].

If you press the ENTER button again, the channel is memorized again.

Press the RETURN button to return to TV/VCR SETUP MENU.

5Exit the channel setup mode

5 After scanning


Press the SETUP button on the remote control to


The tuner stops on the lowest memorized channel.


returns to TV mode.


NOTE: To confirm that channel(s) has been deleted

If you want to recall the selected channels, you can


or added, press the CHANNEL button K or L.


select the desired channel directly with the remote con-


trol number buttons or the CHANNEL button K or L.

- 15 -

EN


1C29

Page 15
Image 15
Sylvania SRCD223B, SRCD227B owner manual SET UP for USE, Channel SET UP for First Time, Deleting or Adding Channel

SRCD223B, SRCD223B, SRCD227B specifications

The Sylvania SRCD223B and SRCD227B are portable CD players that have gained recognition for their combination of classic functionality and modern features. These models are particularly appealing to users who appreciate the nostalgia of CDs while enjoying the convenience of contemporary technology.

One of the main features of the Sylvania SRCD223B is its user-friendly interface. The device includes a large LCD display, making it easy to navigate through tracks and settings. The simple controls allow for straightforward operation, catering to those who may not be tech-savvy. The SRCD227B, while similar in many respects, adds a few extra functionalities, such as a programmable CD feature that lets users create custom playlists from their CD library.

Another standout technology in these models is the built-in speaker system, which offers decent sound quality for a portable player. Users can enjoy their favorite music without the need for headphones, although both models do include a headphone jack for personal listening. The speakers provide a warm sound profile, ensuring that users can enjoy a rich audio experience whether at home, in the car, or on the go.

Both the SRCD223B and SRCD227B come equipped with features like anti-shock protection, which is designed to prevent skips and interruptions during playback, particularly useful if the player is moved while in use. The anti-shock system enhances user experience, making them perfect for active environments.

The design of these CD players is another highlight, featuring a sleek and portable design that makes them easy to carry. They are lightweight, fitting comfortably into bags or backpacks, and come in a variety of colors to suit personal tastes.

Furthermore, the Sylvania CD players are compatible with various disc formats, including CD, CD-R, and CD-RW, providing versatility for users with extensive CD collections.

In conclusion, the Sylvania SRCD223B and SRCD227B blend retro appeal with modern functionality. With their user-friendly features, decent sound quality, and portable design, they cater to both nostalgic users and those looking to enjoy a simple music playback experience on the go.