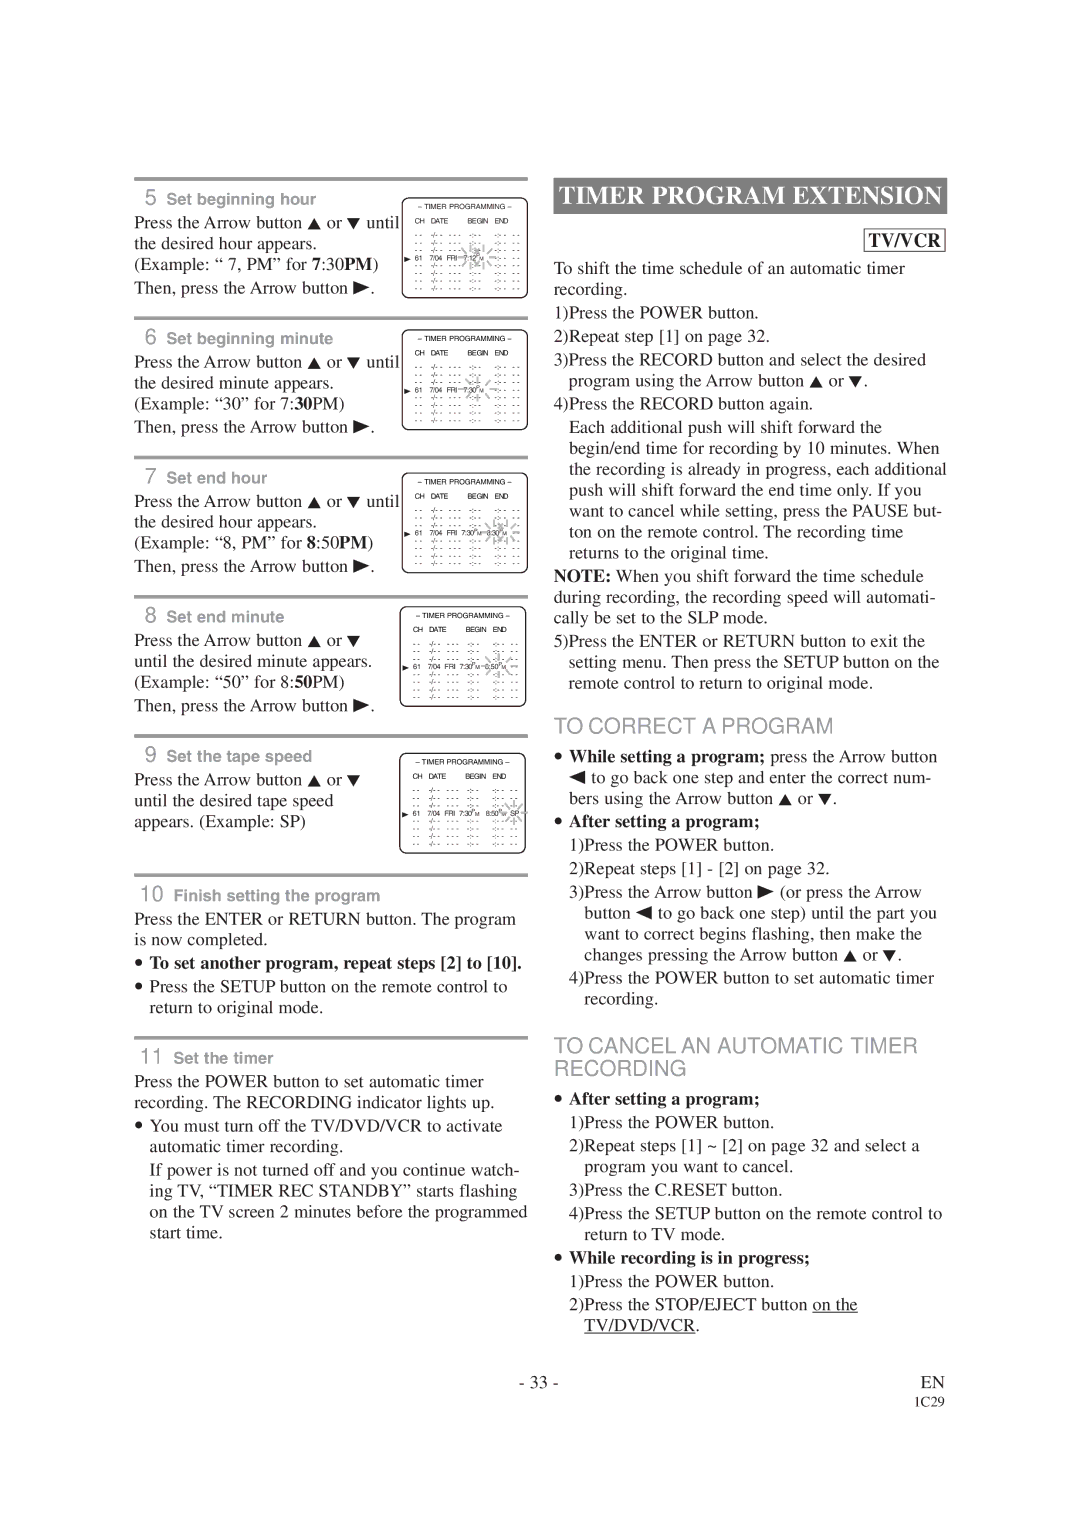
5 Set beginning hour

– TIMER PROGRAMMING –

Press the Arrow button K or L until

CH DATE

BEGIN END

the desired hour appears.

- -

-/- - - - -

-:- -

-:- - - -

- -

-/- - - - -

-:- -

-:- - - -


- -

-/- - - - -

-:- -

-:- - - -

(Example: “ 7, PM” for 7:30PM)

B 61

7/04 FRI 7:12PM

-:- - - -

- -

-/- - - - -

-:- -

-:- - - -


- -

-/- - - - -

-:- -

-:- - - -

Then, press the Arrow button B.

- -

-/- - - - -

-:- -

-:- - - -

- -

-/- - - - -

-:- -

-:- - - -


6 Set beginning minute

– TIMER PROGRAMMING –

Press the Arrow button K or L until

CH DATE

BEGIN END

- -

-/- - - - -

-:- -

-:- - - -

the desired minute appears.

- -

-/- - - - -

-:- -

-:- - - -

B 61

7/04 FRI 7:30PM

-:- - - -


- -

-/- - - - -

-:- -

-:- - - -

(Example: “30” for 7:30PM)

- -

-/- - - - -

-:- -

-:- - - -

- -

-/- - - - -

-:- -

-:- - - -


- -

-/- - - - -

-:- -

-:- - - -

Then, press the Arrow button B.

- -

-/- - - - -

-:- -

-:- - - -


7 Set end hour

– TIMER PROGRAMMING –

Press the Arrow button K or L until

CH DATE

BEGIN END

the desired hour appears.

- -

-/- - - - -

-:- -

-:- - - -

- -

-/- - - - -

-:- -

-:- - - -

- -

-/- - - - -

-:- -

-:- - - -

(Example: “8, PM” for 8:50PM)

B 61

7/04 FRI 7:30PM

8:30PM - -

- -

-/- - - - -

-:- -

-:- - - -


- -

-/- - - - -

-:- -

-:- - - -

Then, press the Arrow button B.

- -

-/- - - - -

-:- -

-:- - - -

- -

-/- - - - -

-:- -

-:- - - -


8 Set end minute

– TIMER PROGRAMMING –

Press the Arrow button K or L

CH

DATE

BEGIN END

- -

-/- - - - -

-:- -

-:- - - -

until the desired minute appears.

- -

-/- - - - -

-:- -

-:- - - -

B 61

7/04 FRI 7:30PM

8:50PM - -


- -

-/- - - - -

-:- -

-:- - - -

(Example: “50” for 8:50PM)

- -

-/- - - - -

-:- -

-:- - - -

- -

-/- - - - -

-:- -

-:- - - -


- -

-/- - - - -

-:- -

-:- - - -

Then, press the Arrow button B.

- -

-/- - - - -

-:- -

-:- - - -


9 Set the tape speed

– TIMER PROGRAMMING –

Press the Arrow button K or L

CH

DATE

BEGIN END

until the desired tape speed

- -

-/- - - - -

-:- -

-:- - - -

- -

-/- - - - -

-:- -

-:- - - -


- -

-/- - - - -

-:- -

-:- - - -

appears. (Example: SP)

B 61

7/04 FRI 7:30PM

8:50PM SP

- -

-/- - - - -

-:- -

-:- - - -


- -

-/- - - - -

-:- -

-:- - - -


- -

-/- - - - -

-:- -

-:- - - -


- -

-/- - - - -

-:- -

-:- - - -

10Finish setting the program

Press the ENTER or RETURN button. The program is now completed.

To set another program, repeat steps [2] to [10].

Press the SETUP button on the remote control to return to original mode.

11Set the timer

Press the POWER button to set automatic timer recording. The RECORDING indicator lights up.

You must turn off the TV/DVD/VCR to activate automatic timer recording.

If power is not turned off and you continue watch- ing TV, “TIMER REC STANDBY” starts flashing on the TV screen 2 minutes before the programmed start time.

TIMER PROGRAM EXTENSION

TV/VCR

To shift the time schedule of an automatic timer recording.

1)Press the POWER button. 2)Repeat step [1] on page 32.

3)Press the RECORD button and select the desired program using the Arrow button K or L.

4)Press the RECORD button again.

Each additional push will shift forward the begin/end time for recording by 10 minutes. When the recording is already in progress, each additional push will shift forward the end time only. If you want to cancel while setting, press the PAUSE but- ton on the remote control. The recording time returns to the original time.

NOTE: When you shift forward the time schedule during recording, the recording speed will automati- cally be set to the SLP mode.

5)Press the ENTER or RETURN button to exit the setting menu. Then press the SETUP button on the remote control to return to original mode.

TO CORRECT A PROGRAM

While setting a program; press the Arrow button s to go back one step and enter the correct num- bers using the Arrow button K or L.

After setting a program; 1)Press the POWER button. 2)Repeat steps [1] - [2] on page 32.

3)Press the Arrow button B (or press the Arrow button s to go back one step) until the part you want to correct begins flashing, then make the changes pressing the Arrow button K or L.

4)Press the POWER button to set automatic timer recording.

TO CANCEL AN AUTOMATIC TIMER RECORDING

After setting a program; 1)Press the POWER button.

2)Repeat steps [1] ~ [2] on page 32 and select a program you want to cancel.

3)Press the C.RESET button.

4)Press the SETUP button on the remote control to return to TV mode.

While recording is in progress; 1)Press the POWER button.

2)Press the STOP/EJECT button on the TV/DVD/VCR.

- 33 -

EN

1C29

Page 33
Image 33
Sylvania SRCD223B owner manual Timer Program Extension, To Correct a Program, To Cancel AN Automatic Timer Recording

SRCD223B, SRCD223B, SRCD227B specifications

The Sylvania SRCD223B and SRCD227B are portable CD players that have gained recognition for their combination of classic functionality and modern features. These models are particularly appealing to users who appreciate the nostalgia of CDs while enjoying the convenience of contemporary technology.

One of the main features of the Sylvania SRCD223B is its user-friendly interface. The device includes a large LCD display, making it easy to navigate through tracks and settings. The simple controls allow for straightforward operation, catering to those who may not be tech-savvy. The SRCD227B, while similar in many respects, adds a few extra functionalities, such as a programmable CD feature that lets users create custom playlists from their CD library.

Another standout technology in these models is the built-in speaker system, which offers decent sound quality for a portable player. Users can enjoy their favorite music without the need for headphones, although both models do include a headphone jack for personal listening. The speakers provide a warm sound profile, ensuring that users can enjoy a rich audio experience whether at home, in the car, or on the go.

Both the SRCD223B and SRCD227B come equipped with features like anti-shock protection, which is designed to prevent skips and interruptions during playback, particularly useful if the player is moved while in use. The anti-shock system enhances user experience, making them perfect for active environments.

The design of these CD players is another highlight, featuring a sleek and portable design that makes them easy to carry. They are lightweight, fitting comfortably into bags or backpacks, and come in a variety of colors to suit personal tastes.

Furthermore, the Sylvania CD players are compatible with various disc formats, including CD, CD-R, and CD-RW, providing versatility for users with extensive CD collections.

In conclusion, the Sylvania SRCD223B and SRCD227B blend retro appeal with modern functionality. With their user-friendly features, decent sound quality, and portable design, they cater to both nostalgic users and those looking to enjoy a simple music playback experience on the go.