Section 4 - Receiver Display Screens and Functions
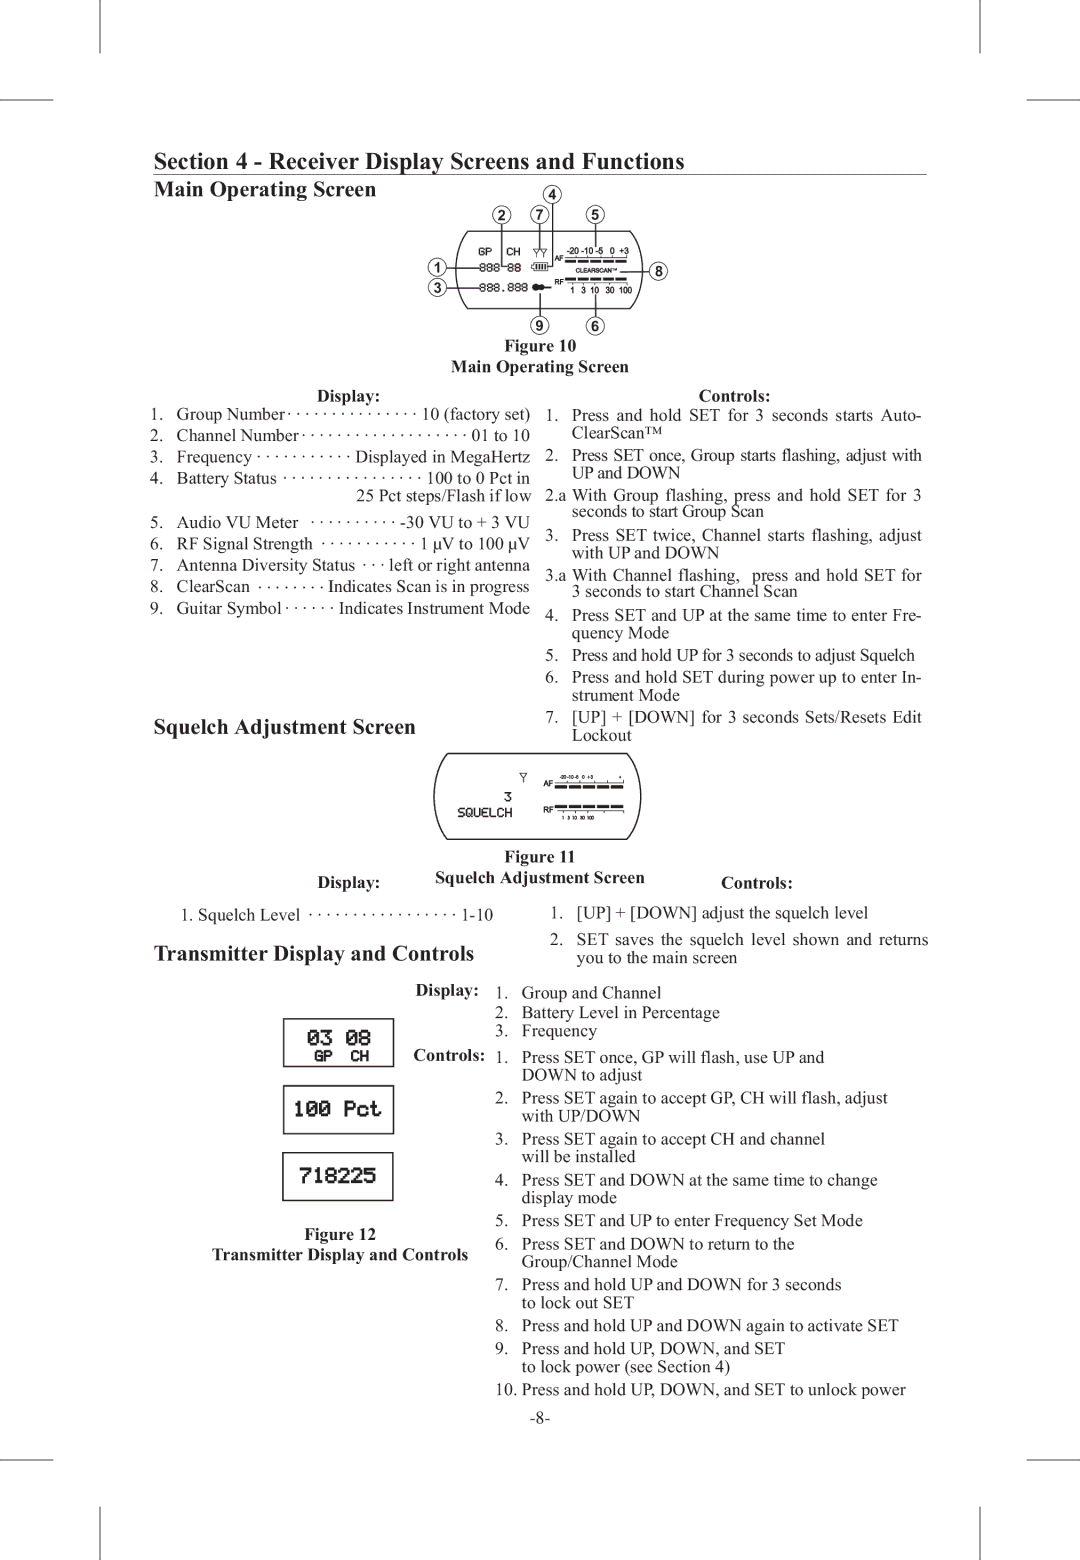
Main Operating Screen
| 7 | 4 | 5 |
|
|
2 |
|
|
| ||
|
| +3 | |||
1 |
| AF |
|
| 8 |
| RF | CLEARSCAN T M | |||
3 |
| 3 10 | 30 | 100 | |
| 1 | ||||
9 6
Figure 10
Main Operating Screen
Display:
1.Group Number · · · · · · · · · · · · · · · 10 (factory set)
2.Channel Number · · · · · · · · · · · · · · · · · · · 01 to 10
3.Frequency · · · · · · · · · · · Displayed in MegaHertz
4.Battery Status · · · · · · · · · · · · · · · · 100 to 0 Pct in 25 Pct steps/Flash if low
5. Audio VU Meter · · · · · · · · · ·
6.RF Signal Strength · · · · · · · · · · · 1 µV to 100 µV
7.Antenna Diversity Status · · · left or right antenna
8.ClearScan · · · · · · · · Indicates Scan is in progress
9.Guitar Symbol · · · · · · Indicates Instrument Mode
Squelch Adjustment Screen
Controls:
1.Press and hold SET for 3 seconds starts Auto- ClearScan™
2.Press SET once, Group starts flashing, adjust with UP and DOWN
2.a With Group flashing, press and hold SET for 3 seconds to start Group Scan
3.Press SET twice, Channel starts flashing, adjust with UP and DOWN
3.a With Channel flashing, press and hold SET for
3 seconds to start Channel Scan
4.Press SET and UP at the same time to enter Fre- quency Mode
5.Press and hold UP for 3 seconds to adjust Squelch
6.Press and hold SET during power up to enter In- strument Mode
7.[UP] + [DOWN] for 3 seconds Sets/Resets Edit Lockout
AF ![]()
![]()
![]()
![]()
![]()
RF ![]()
![]()
![]()
![]()
![]()
![]()
1 3 10 30 100
| Figure 11 |
|
Display: | Squelch Adjustment Screen | Controls: |
1. Squelch Level · · · · · · · · · · · · · · · · ·
Transmitter Display and Controls
Display:
Controls:
Figure 12
Transmitter Display and Controls
1.[UP] + [DOWN] adjust the squelch level
2.SET saves the squelch level shown and returns you to the main screen
1.Group and Channel
2.Battery Level in Percentage
3.Frequency
1.Press SET once, GP will flash, use UP and DOWN to adjust
2.Press SET again to accept GP, CH will flash, adjust with UP/DOWN
3.Press SET again to accept CH and channel will be installed
4.Press SET and DOWN at the same time to change display mode
5.Press SET and UP to enter Frequency Set Mode
6.Press SET and DOWN to return to the Group/Channel Mode
7.Press and hold UP and DOWN for 3 seconds to lock out SET
8.Press and hold UP and DOWN again to activate SET
9.Press and hold UP, DOWN, and SET to lock power (see Section 4)
10.Press and hold UP, DOWN, and SET to unlock power
