Figure 31

-Ignition Controller Location

Ignition Controller for Spark Pilot

34. Burner Orifices

Heaters are shipped with orifices of proper size and type for gas and altitude specified on the order. When ordering replacement orifices, give BTUH content, specific gravity of gas, and altitude, as well as model and serial number of the heater.

Main Burner Orifices (sea level)

Model

Natural Gas


Propane Gas


Size

Drill

Orifice


Qty

Drill Size

Orifice

Qty


Size

P/N


P/N


25

51

39650


2

60

95936

2

50

47

84853


3

1.2MM

63003

3

75

45

38678


4

1.3MM

64676

4

100

44

11833


5

55

11830

5

125

44

11833


6

55

11830

6

165

35

11831


5

1.65MM

96344

5

200

35

11831


6

1.65MM

96344

6

250

35

11831


8

1.65MM

96344

8

300

35

11831


9

1.65MM

96344

9

400

35

11831


12

1.65MM

96344

12


Pilot

Natural - P/N 103034

Propane - P/N 98695

Orifice


WARNING: Do not use this table for gas conversion. Additional parts are required; contact your Reznor Distributor.

35. Flash Carryover

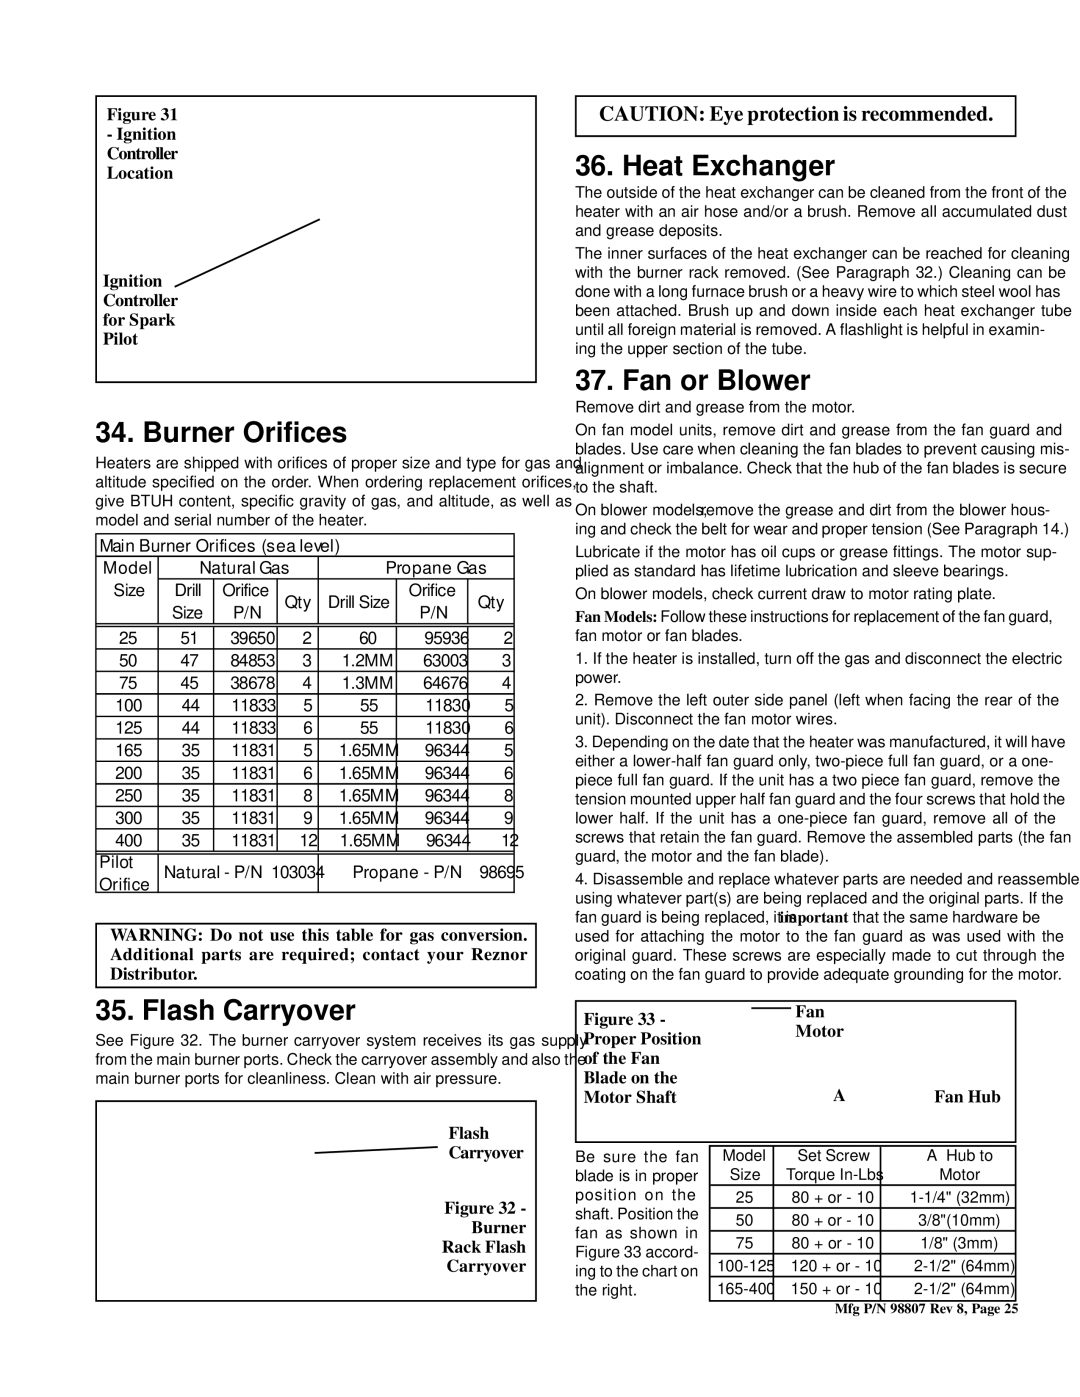
See Figure 32. The burner carryover system receives its gas supply from the main burner ports. Check the carryover assembly and also the main burner ports for cleanliness. Clean with air pressure.

Flash

CAUTION: Eye protection is recommended.

36. Heat Exchanger

The outside of the heat exchanger can be cleaned from the front of the heater with an air hose and/or a brush. Remove all accumulated dust and grease deposits.

The inner surfaces of the heat exchanger can be reached for cleaning with the burner rack removed. (See Paragraph 32.) Cleaning can be done with a long furnace brush or a heavy wire to which steel wool has been attached. Brush up and down inside each heat exchanger tube until all foreign material is removed. A flashlight is helpful in examin- ing the upper section of the tube.

37. Fan or Blower

Remove dirt and grease from the motor.

On fan model units, remove dirt and grease from the fan guard and blades. Use care when cleaning the fan blades to prevent causing mis- alignment or imbalance. Check that the hub of the fan blades is secure to the shaft.

On blower models, remove the grease and dirt from the blower hous- ing and check the belt for wear and proper tension (See Paragraph 14.)

Lubricate if the motor has oil cups or grease fittings. The motor sup- plied as standard has lifetime lubrication and sleeve bearings.

On blower models, check current draw to motor rating plate.

Fan Models: Follow these instructions for replacement of the fan guard, fan motor or fan blades.

1.If the heater is installed, turn off the gas and disconnect the electric power.

2.Remove the left outer side panel (left when facing the rear of the unit). Disconnect the fan motor wires.

3.Depending on the date that the heater was manufactured, it will have either a lower-half fan guard only, two-piece full fan guard, or a one- piece full fan guard. If the unit has a two piece fan guard, remove the tension mounted upper half fan guard and the four screws that hold the lower half. If the unit has a one-piece fan guard, remove all of the screws that retain the fan guard. Remove the assembled parts (the fan guard, the motor and the fan blade).

4.Disassemble and replace whatever parts are needed and reassemble using whatever part(s) are being replaced and the original parts. If the fan guard is being replaced, it is important that the same hardware be used for attaching the motor to the fan guard as was used with the original guard. These screws are especially made to cut through the coating on the fan guard to provide adequate grounding for the motor.

Figure 33 -


Fan


Motor


Proper Position


of the Fan


Blade on the


A

Fan Hub

Motor Shaft


Carryover

Figure 32 -

Burner

Rack Flash

Carryover

Be sure the fan blade is in proper position on the shaft. Position the fan as shown in Figure 33 accord- ing to the chart on the right.

Model

Set Screw

“A” Hub to

Size

Torque In-Lbs

Motor

25

80 + or - 10

1-1/4" (32mm)

50

80 + or - 10

3/8"(10mm)

75

80 + or - 10

1/8" (3mm)

100-125

120 + or - 10

2-1/2" (64mm)

165-400

150 + or - 10

2-1/2" (64mm)


Mfg P/N 98807 Rev 8, Page 25

Page 25
Image 25
Thomas & Betts BE, FE warranty Burner Orifices, Flash Carryover, Heat Exchanger, Fan or Blower

BE, FE specifications

Thomas & Betts, a subsidiary of ABB, is renowned for its innovative electrical products and solutions, particularly in the fields of connectors, terminals, and wiring devices. Among its extensive product lineup, the FE and BE series stand out for their exceptional performance and versatility in various applications.

The FE (Flat Eye) and BE (Blank Eye) connectors are designed to provide reliable electrical connections in demanding environments. These connectors are particularly well-suited for industrial, commercial, and residential applications, ensuring that they meet the rigorous standards required in these fields.

One of the key features of the FE and BE connectors is their robust construction. Made from high-quality materials, they are resistant to corrosion, moisture, and other environmental factors that could compromise the integrity of the connection. The connectors are engineered to withstand high temperatures and mechanical stress, making them ideal for use in harsh conditions where reliability is essential.

Moreover, the design of FE and BE connectors facilitates easy installation and maintenance. The connectors come with user-friendly features such as a clear labeling system and intuitive locking mechanisms, ensuring a secure fit and minimizing the risk of connection failure. Additionally, these connectors are compatible with various wire sizes, offering flexibility for different projects.

Technologically, Thomas & Betts has integrated advanced manufacturing processes to ensure precision and consistency in the production of FE and BE connectors. This attention to detail results in products that not only meet but often exceed industry standards, providing customers with peace of mind regarding their electrical systems.

In terms of performance, the FE and BE connectors deliver exceptional conductivity, which is critical for minimizing energy loss and ensuring efficient operation in electrical systems. This characteristic is especially important in applications where energy efficiency and reliability are paramount.

In summary, Thomas & Betts FE and BE connectors embody a perfect blend of durability, ease of use, and technological advancement. Their robust design, compatibility with various wire sizes, and resistance to environmental stressors make them a preferred choice for professionals in the electrical industry. With a commitment to quality and innovation, Thomas & Betts continues to set the standard in electrical connectivity solutions, ensuring that their products remain at the forefront of the industry.