Drain the gasoline from the snow thrower, or place a piece of plastic film under the gas cap.

Tip the snow thrower up and forward so that it rests on its auger housing. Refer to Figure 9.

Remove the six self-tapping screws from the frame cover underneath the snow thrower.

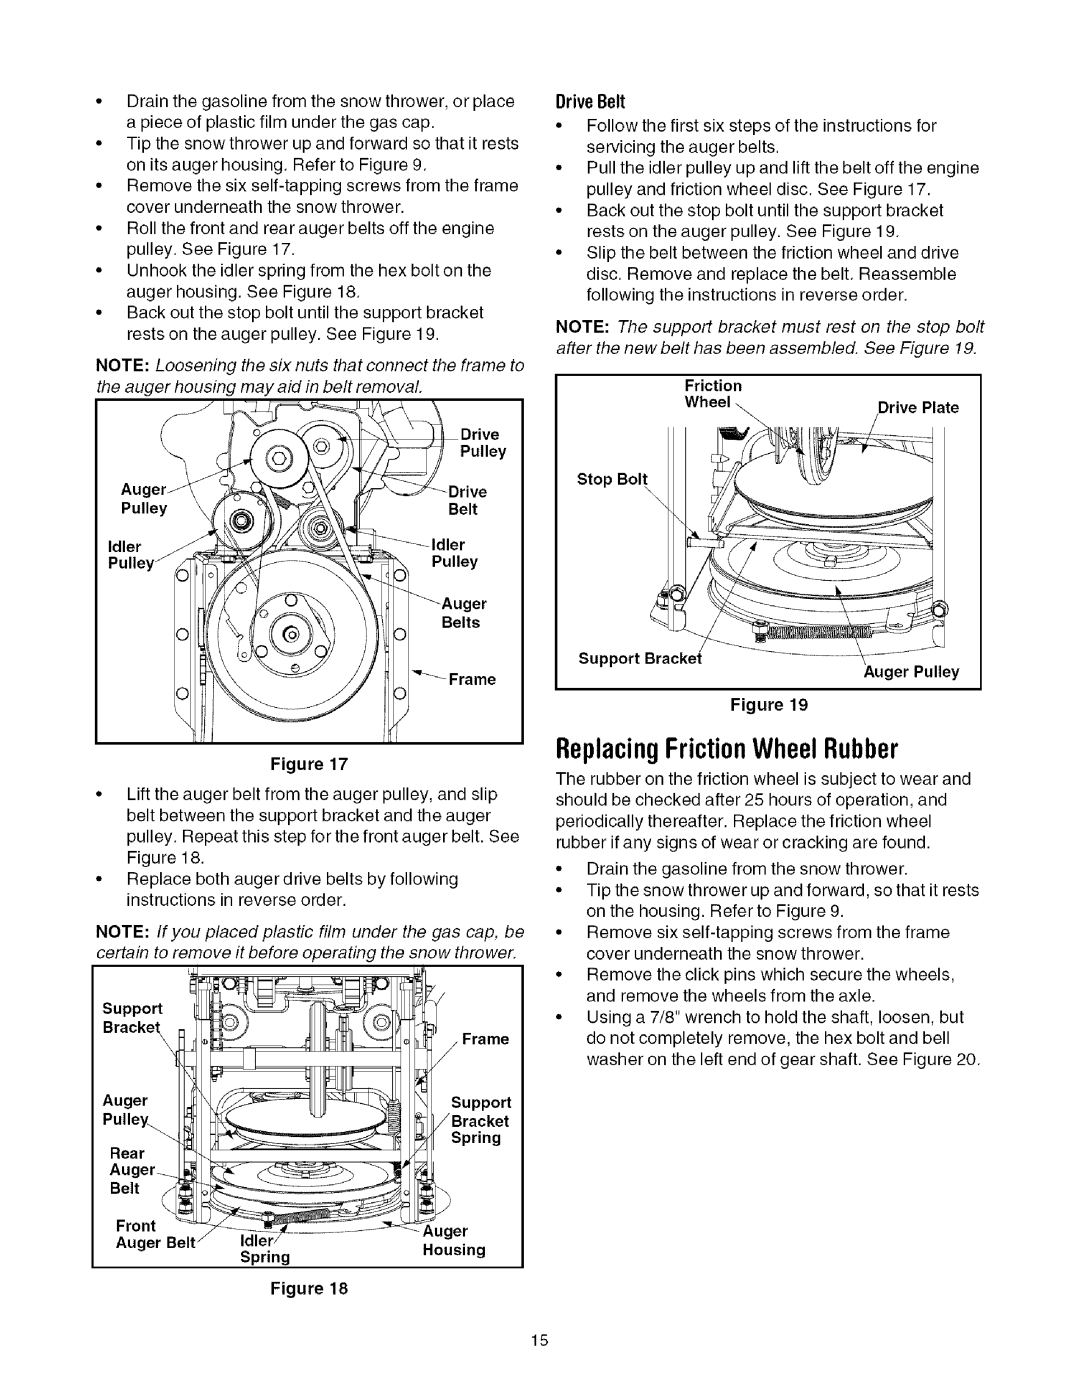
Roll the front and rear auger belts off the engine pulley. See Figure 17.

Unhook the idler spring from the hex bolt on the auger housing. See Figure 18.

Back out the stop bolt until the support bracket rests on the auger pulley. See Figure 19.

NOTE: Loosening the six nuts that connect the frame to the auger housing may aid in belt removal.


Pulley


Drive

Pulley

Belt

Idler


Pulley


Belts

Frame

/

Figure 17

Lift the auger belt from the auger pulley, and slip belt between the support bracket and the auger pulley. Repeat this step for the front auger belt. See Figure 18.

Replace both auger drive belts by following instructions in reverse order.

NOTE: If you placed plastic film under the gas cap, be certain to remove it before operating the snow thrower.

Support


Bracket

\

/ Frame


Auger


Support

Pulley_


/Bracket

Rear


Spring


Auger-_


Belt

(


Front

Belt / >z__

_-_--_-Z--_-_ Auger

Auger


Spring

Housing

Figure 18

DriveBelt

Follow the first six steps of the instructions for servicing the auger belts.

Pull the idler pulley up and lift the belt off the engine pulley and friction wheel disc. See Figure 17.

Back out the stop bolt until the support bracket rests on the auger pulley. See Figure 19.

Slip the belt between the friction wheel and drive disc. Remove and replace the belt. Reassemble following the instructions in reverse order.

NOTE: The support bracket must rest on the stop bolt after the new belt has been assembled. See Figure 19.

Friction


Wheel _

Drive Plate

Stop Bolt

Support Bracket

Auger Pulley

Figure 19

ReplacingFrictionWheelRubber

The rubber on the friction wheel is subject to wear and should be checked after 25 hours of operation, and periodically thereafter. Replace the friction wheel rubber if any signs of wear or cracking are found.

Drain the gasoline from the snow thrower.

Tip the snow thrower up and forward, so that it rests on the housing. Refer to Figure 9.

Remove six self-tapping screws from the frame cover underneath the snow thrower.

Remove the click pins which secure the wheels, and remove the wheels from the axle.

Using a 7/8" wrench to hold the shaft, loosen, but do not completely remove, the hex bolt and bell washer on the left end of gear shaft. See Figure 20.

15

Page 15
Image 15
Toro 1028, 1130 manual ReplacingFrictionWheelRubber

1028, 1130 specifications

The Toro 1130 and 1028 snow throwers are robust machines designed to tackle winter's challenges with ease and efficiency. These models stand out for their power, innovative technologies, and user-friendly features, making them ideal choices for homeowners and professionals alike.

One of the primary features of both the Toro 1130 and 1028 is their powerful engine. The 1130 is equipped with a reliable 302cc engine, while the 1028 boasts a 250cc engine, providing ample power to clear deep snow quickly and effectively. The engines are designed for ease of starting, even in frigid temperatures, thanks to features like the electric start option.

Both models feature Toro's exceptional ClearOut technology, which enhances the snow throwers’ performance by improving the throwing distance and reducing clogging. This technology allows users to tackle heavy, wet snow and create a clear path efficiently. The 11-inch impeller and the rugged auger system are engineered to handle a variety of snow conditions, ensuring optimal clearing performance.

The Toro 1130 and 1028 are designed with user comfort in mind. Both models feature adjustable handle heights, allowing operators of different sizes to find the most comfortable position. The ergonomic handles are equipped with rubber grips that reduce fatigue during extended use. Additionally, their compact design makes them easy to maneuver in tight spaces, such as between cars and along walkways.

Another significant characteristic of these snow throwers is their intuitive controls. The one-hand operation feature allows users to easily control the chute direction and speed while managing the throttle. This functionality provides greater control and efficiency, allowing users to maintain focus on the task at hand.

Durability is also a hallmark of the Toro 1130 and 1028. Constructed from high-quality materials, these machines are built to withstand the rigors of winter. The heavy-duty housing and well-designed components ensure that they can handle tough conditions without compromising performance.

In summary, the Toro 1130 and 1028 snow throwers combine power, technology, and user-friendly features to deliver outstanding snow-clearing capabilities. With reliable engines, innovative throwing technology, ergonomic designs, and durability, these models are excellent choices for anyone looking to conquer winter's worst. Whether for residential or commercial use, Toro's commitment to quality makes these snow throwers a trusted option for snow management.