IMPORTANT: The engine may overheat and/or damage may result if the oil level is below the ADD or over the FULL on the dipstick.

Reinstall the oil fill cap/dipstick securely onto the oil fill tube.

IMPORTANT: The oil fill cap/dipstick must be installed securely onto the tube at all times when the engine is operating. Severe engine damage could result from failure to do so.

Changing the Engine Oil

The engine oil and oil filter should be changed after the first 24 hours of operation, and after every 100 hours of operation thereafter.

WARNING: If the engine has been recently run, the engine, muffler and surrounding metal surfaces will be hot and can cause burns to the skin. Allow the tractor to cool and use caution when removing

IMPORTANT: The oil filter should be changed at every oil change interval.

To complete an oil change, proceed as follows:

Draining the Oil

Run the engine for a few minutes to allow the oil in the crankcase to warm up. Warm oil will flow more freely and carry away more of the engine sediment which may have settled at the bottom of the crankcase. Use care to avoid burns from hot oil.

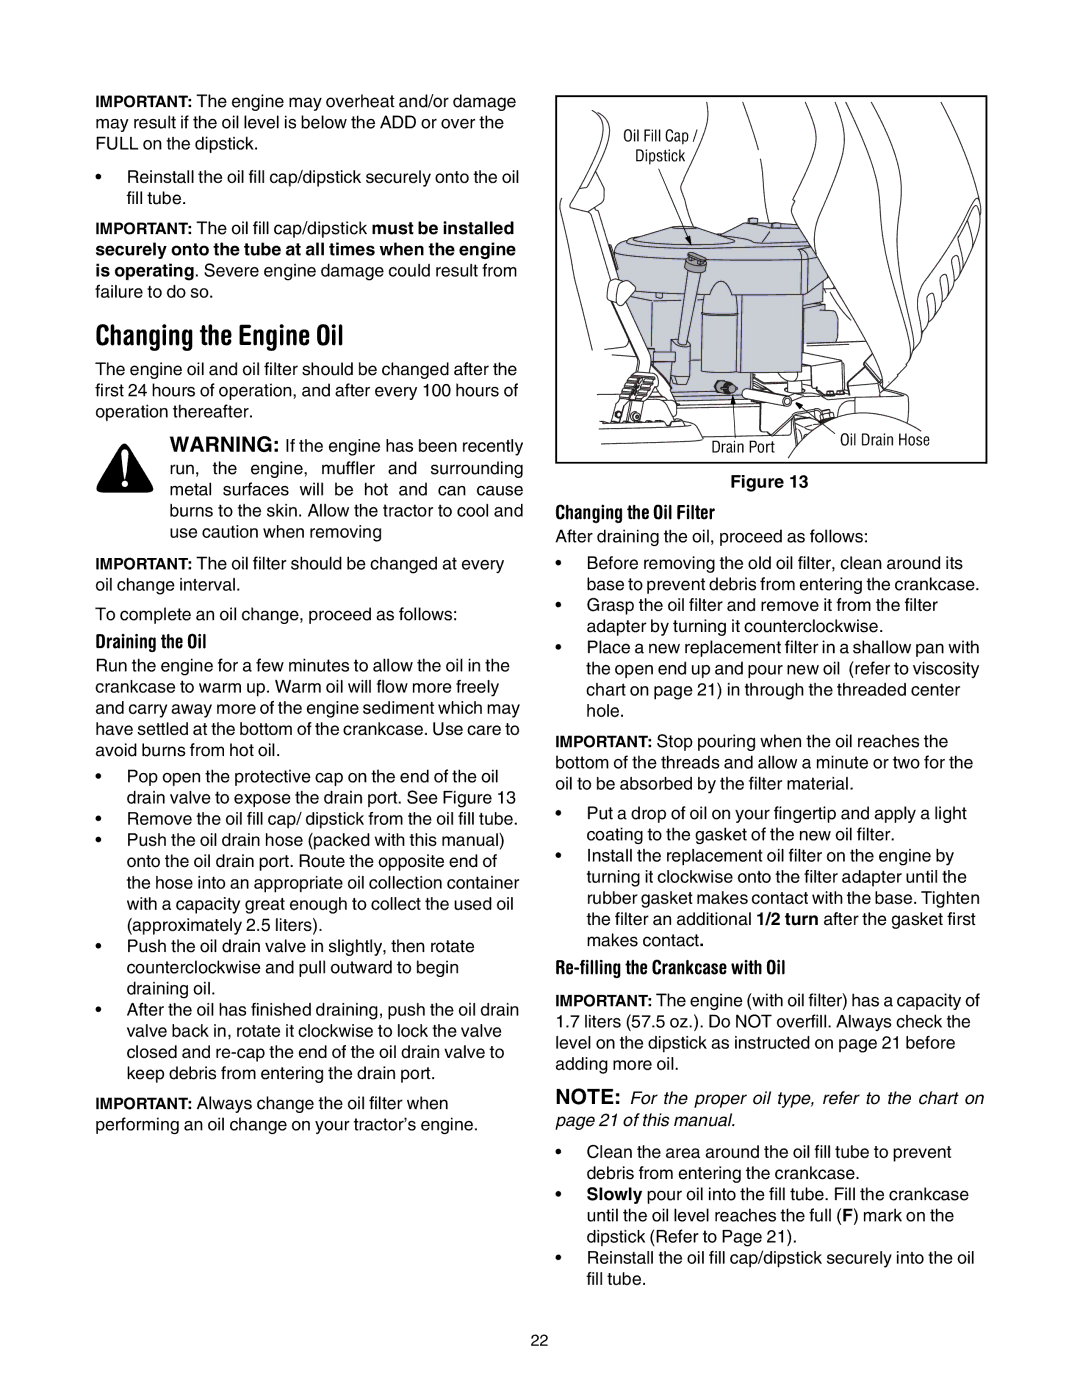
Pop open the protective cap on the end of the oil drain valve to expose the drain port. See Figure 13

Remove the oil fill cap/ dipstick from the oil fill tube.

Push the oil drain hose (packed with this manual) onto the oil drain port. Route the opposite end of the hose into an appropriate oil collection container with a capacity great enough to collect the used oil (approximately 2.5 liters).

Push the oil drain valve in slightly, then rotate counterclockwise and pull outward to begin draining oil.

After the oil has finished draining, push the oil drain valve back in, rotate it clockwise to lock the valve closed and re-cap the end of the oil drain valve to keep debris from entering the drain port.

IMPORTANT: Always change the oil filter when performing an oil change on your tractor’s engine.

Oil Fill Cap /


Dipstick


Drain Port

Oil Drain Hose


Figure 13

Changing the Oil Filter

After draining the oil, proceed as follows:

Before removing the old oil filter, clean around its base to prevent debris from entering the crankcase.

Grasp the oil filter and remove it from the filter adapter by turning it counterclockwise.

Place a new replacement filter in a shallow pan with the open end up and pour new oil (refer to viscosity chart on page 21) in through the threaded center hole.

IMPORTANT: Stop pouring when the oil reaches the bottom of the threads and allow a minute or two for the oil to be absorbed by the filter material.

Put a drop of oil on your fingertip and apply a light coating to the gasket of the new oil filter.

Install the replacement oil filter on the engine by turning it clockwise onto the filter adapter until the rubber gasket makes contact with the base. Tighten the filter an additional 1/2 turn after the gasket first makes contact.

Re-filling the Crankcase with Oil

IMPORTANT: The engine (with oil filter) has a capacity of

1.7liters (57.5 oz.). Do NOT overfill. Always check the level on the dipstick as instructed on page 21 before adding more oil.

NOTE: For the proper oil type, refer to the chart on page 21 of this manual.

Clean the area around the oil fill tube to prevent debris from entering the crankcase.

Slowly pour oil into the fill tube. Fill the crankcase until the oil level reaches the full (F) mark on the dipstick (Refer to Page 21).

Reinstall the oil fill cap/dipstick securely into the oil fill tube.

22

Page 22
Image 22
Toro LX500 manual Changing the Engine Oil, Draining the Oil, Changing the Oil Filter, Re-filling the Crankcase with Oil

LX500 specifications

The Toro LX500 is a highly regarded riding lawn mower that combines power, comfort, and cutting-edge technology to deliver a premium lawn care experience. Designed for homeowners with medium to large yards, the LX500 stands out in the crowded market of garden equipment with its robust features and user-friendly design.

One of the main characteristics of the LX500 is its powerful engine. It typically comes equipped with a reliable 500cc engine, providing more than enough power for tackling tough mowing tasks. The engine is designed for durability, ensuring longevity and efficient performance. Its high output allows users to handle even overgrown grass with ease, making it a versatile option for various lawn conditions.

The cutting deck of the Toro LX500 offers a generous cutting width, often around 50 inches, which enables users to cover more ground in less time. The deck is crafted from high-quality materials, ensuring durability as well as superior cut quality. With multiple cutting height adjustments, users can customize the mower to achieve the desired grass length, enhancing their lawn’s appearance.

Comfort is a significant focus in the design of the LX500, as it features an ergonomic seat equipped with armrests and adjustable settings. This emphasis on user comfort allows for longer mowing sessions without fatigue. Additionally, it incorporates a smooth steering system, making maneuvering around obstacles and tight spaces less challenging.

The Toro LX500 also incorporates advanced technologies, such as the Smart Speed control system, allowing users to adjust the speed of the mower based on the task at hand. This feature ensures maximum efficiency whether mowing, towing, or handling other yard tasks. Furthermore, the mower is designed for easy maintenance, with accessible components for oil changes, filter replacements, and blade sharpening.

Another notable feature is the inclusion of a washout port for the mower deck, which simplifies the cleaning process and helps maintain performance. This ensures that grass clippings and debris don’t accumulate, leading to a clean cut every time.

Overall, the Toro LX500 represents a well-balanced combination of power, efficiency, and comfort, making it a worthy investment for anyone looking to maintain a beautiful lawn efficiently. With its robust features and user-focused design, it is poised to meet the demands of modern lawn care.