SD-V280
Introduction
Location of the required Marking
S3125A
Introduction
Lightning
Heat
Disc
Precautions
Do not use the DVD/VCR when moisture condensation may occur
To obtain a clear picture
Moisture condensation occurs during the following cases
On handling discs Structure of disc contents
On cleaning discs
On storing discs
On Video CDs
Playable discs
DVD
Video
Contents
Identification of Controls
Front panel
Rear panel
Display window
VCR operation Status
DVD operation Status
While watching TV While operating a tape
Remote control
Menu button
Battery precautions
Operation
Antenna connections
Antenna to DVD/VCR connection
Connections
DVD/VCR
Connections Set the TV/CATV menu option to TV mode
Set the TV/CATV menu option to TV mode
DVD/VCR to TV connection
TV with single 75 ohm VHF/UHF antenna input
Catv Cable TV connections
DVD/VCR
Switch
Splitter
Incoming Cable Converter/Descrambler
Connections
Connecting to a TV
Connecting to a TV
OUT
Video
Component video ColorStream outputs/inputs
Connecting to optional equipment
Connecting to an amplifier equipped with a DTS decoder
Connect either Make the following setting
MPEG2 sound
Setting the video channel
Setting the video channel
Basic setup
For a push-button TV tuner
Setting the language
Setting the language
Clock setting
To set auto clock to off
To set standard time To set daylight saving time
Press SET + or to select System SET
UP, then press Enter
Press SET + or -to select ST Andard Time , then Press Enter
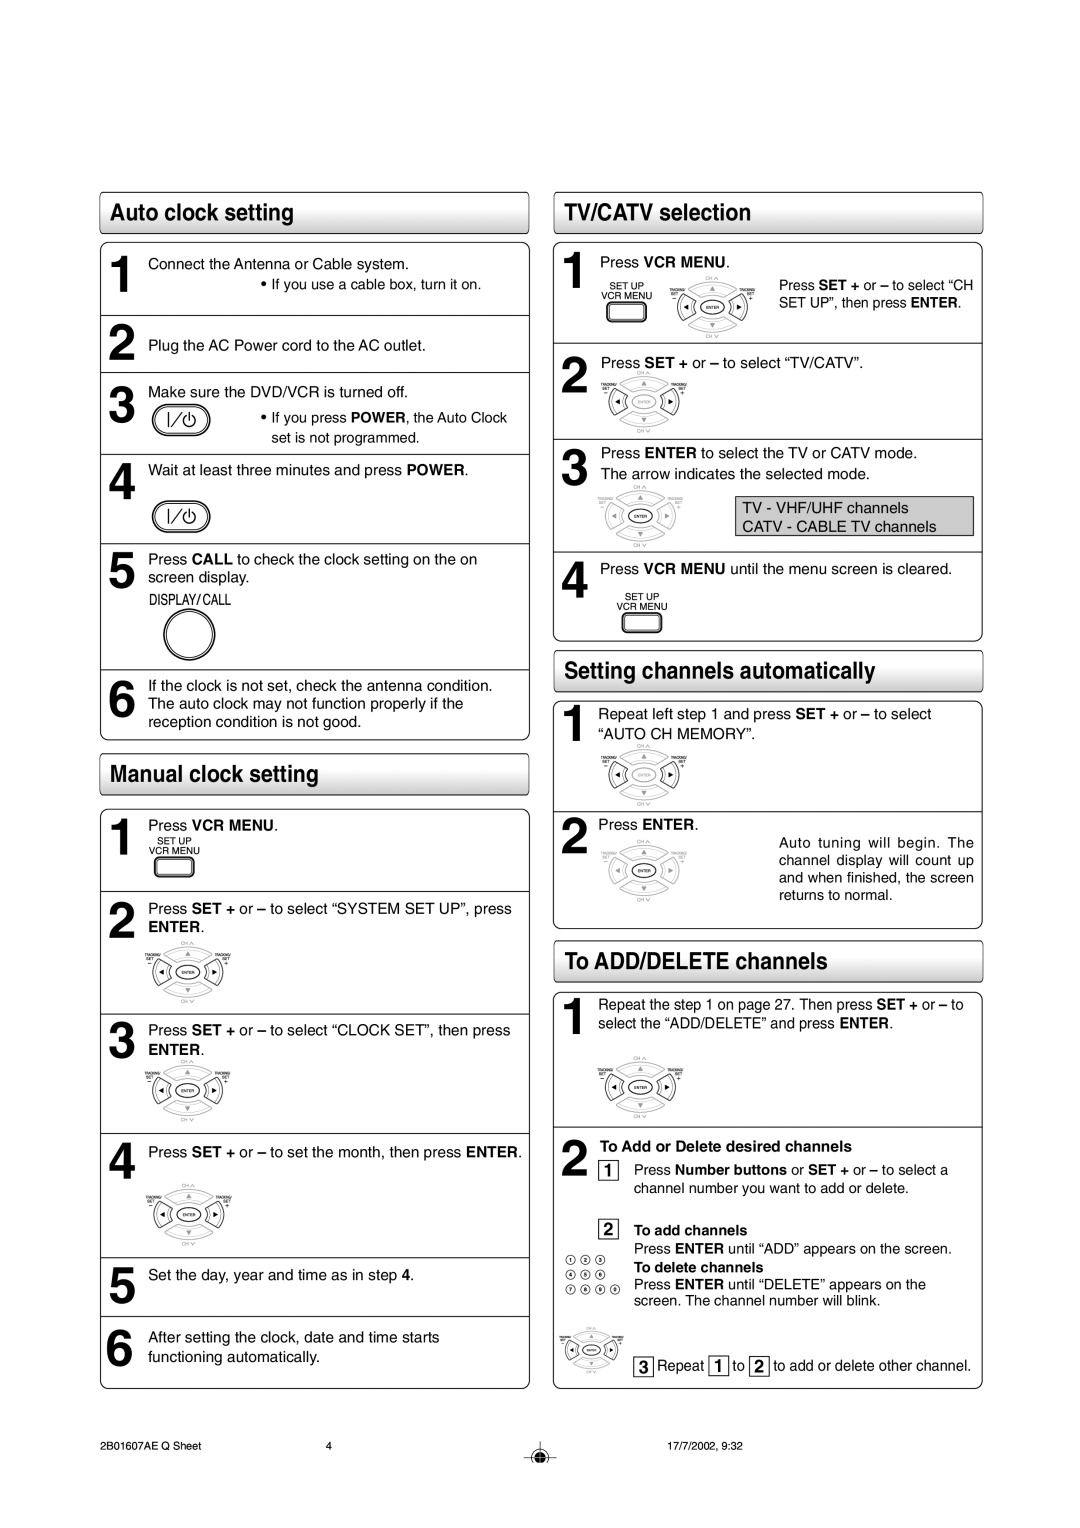
Manual clock setting
Press SET + or to select Clock SET, then press Enter
Press SET + or to set the month, then press
Enter
Tuner setting
Setting channels automatically
TV/CATV selection
To ADD/DELETE channels
Noise elimination
Loading and unloading a cassette tape
Loading
Unloading
To prevent accidental erasure
Cassette tape playback
Playback
Rewind or forward the tape
Special playback
Press Counter Reset at the desired tape position
Convenience function
Repeat playback Zero return function
Repeat
Clock/counter display Video index search system
Sqpb S-VHS Quasi Playback
Counter
Clock
Recording a TV program
Recording a TV program
Recording VCR
VHF/UHF/CATV Channels Catv
To stop recording
To stop recording temporarily
Recording one program while watching another
One-touch Timer Recording OTR
One-touch Timer Recording OTR
To cancel OTR
Set TV or CA TV option to the appropriate position
Timer recording
Timer recording
Press VCR MENU. Select Timer REC SET, then press Enter
To enter other programs, repeat through
To confirm or cancel a program
To confirm Timer program
To cancel Timer program
If the programs overlap another
Stereo recording and playback
Separate Audio Program SAP
Stereo recording and playback Separate Audio Program SAP
Other functions VCR
Duplicating a video tape
Duplicating a video tape
Connection with second video recorder
Recording a DVD/CD disc
Duplicating a DVD or CD disc
Press Play to start playback Press REC to start recording
Disc is Copy Protected
To start playback in the stop mode
Playing a disc
Basic playback
Basic playback DVD
To pause playback still mode
To obtain a higher quality picture
To stop playback
To remove the disc
Playing in fast reverse or fast forward directions
Vcddvd Playing frame by frame
To resume normal playback
Press REW or FWD during playback Press Play
Vcddvd Playing in slow-motion
VCD Resuming playback from the same location
Press Slow during playback
DVD Locating a title using the top menu
Locating a specific title, chapter, or track
Locating a specific chapter or track
Press TOP Menu
Repeat playback / Random playback
Repeat playback and Random playback
Vcdcd Repeating a specific segment
Advanced playback DVD
VCD Setting titles, chapters, or tracks in a favorite order
Playing in a favorite order
Zooming a picture
DVD Zooming a picture
You can magnify areas within a picture
Press Zoom during normal, slow or still playback
Cancel
Selecting the camera angle
Changing the camera angle
To turn off the angle number display
Current subtitle setting is displayed
Selecting subtitles
DVD Selecting a subtitle language
To turn subtitles on or off
Vcddvd Selecting a playback audio setting
Current audio setting is displayed
Selecting a language
Selecting sound channels of Video CDs
VCD Selecting the sound enhancement
To exit the audio enhancement selection
Press / to select the E.A.M icon, then
Sound enhancement menu appears
On-screen display operation
VCD On-screen display operation
Press Display
Press Display again
OFF
CDs. Some characters may not be displayed
Properly depending on the disc
On-screen display turns off
Press SET UP
To return to the previous display
Appears
On-screen display disappears
PBC
Customizing the function settings
Setting details
Function setup DVD
PCM
Karaoke Vocal DVD
Press the Enter button
Audio Language DVD
More clearer when you pause it
Function are rated according to their content.
Blue Blue background Gray Gray background
So that you can make a motionless picture
To change the parental lock level
Follow steps 1
To change your 4-digit security code
Title Stop DVD
Video CD
Table of languages
Table of languages and their abbreviations
Others
Abbreviation Language
Before calling service personnel
Symptoms and correction
Others
Specifications
General / input / output / supplied accessories
Supplied accessories
Input/Output
Limited Ninety 90 Day Warranty
Limited One 1 Year Warranty
Rental Units
Commercial Units
How to Obtain Warranty Service
Important Packing and Shipping Instruction
Quick set-up guide
Important Safeguards
SET UP menu screen in may
Will light
If you use the unit for the first time
Press VCR MENU, instead of the main
Auto clock setting
Screen for about 4 seconds
Timer recording
Basic playback DVD
Fast Forward Playback
Review Playback
Still Playback
Remote control basics
Locating a chapter or track
Inserting Batteries

