Checking the package contents
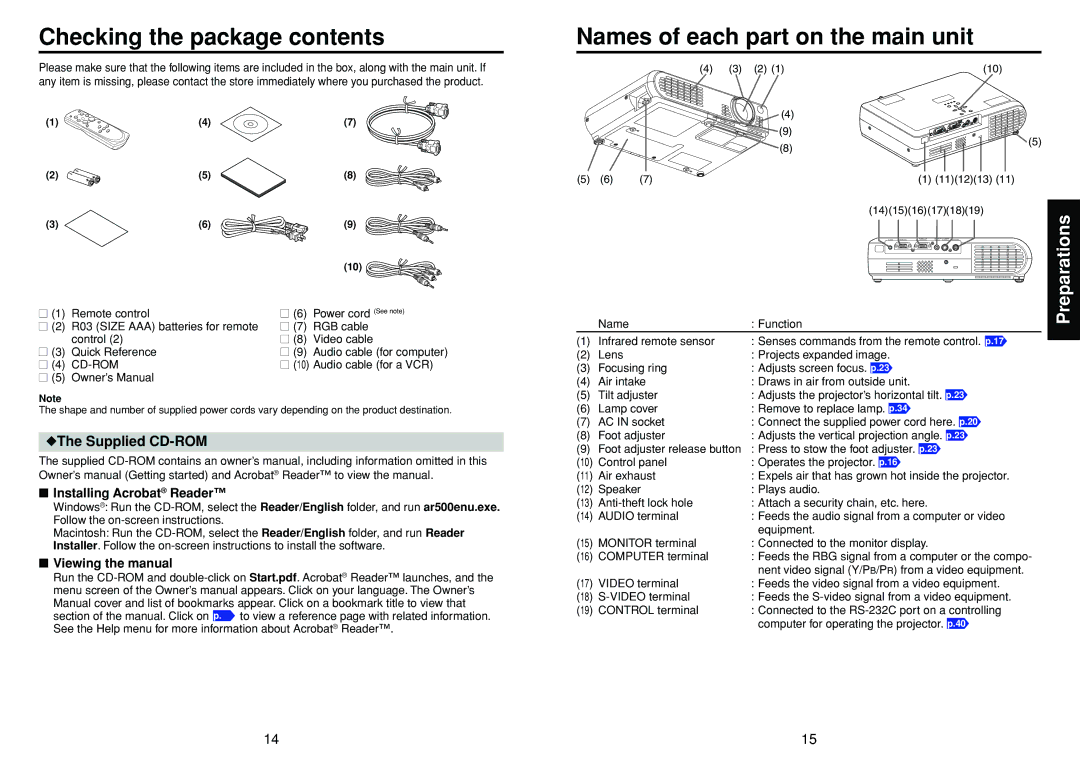
Names of each part on the main unit
Please make sure that the following items are included in the box, along with the main unit. If any item is missing, please contact the store immediately where you purchased the product.
(1) | (4) | (7) |
(2) | (5) | (8) |
(4)(3) (2) (1)
(4)
(9)
(8)
(10)
![]() (5)
(5)
(3) | (6) | (9) |
(10) |
■ (1) | Remote control | ■ (6) | Power cord (See note) |
■ (2) | R03 (SIZE AAA) batteries for remote | ■ (7) | RGB cable |
| control (2) | ■ (8) | Video cable |
■ (3) | Quick Reference | ■ (9) | Audio cable (for computer) |
■ (4) |
| ■ (10) Audio cable (for a VCR) | |
■(5) Owner’s Manual
Note
The shape and number of supplied power cords vary depending on the product destination.
◆The Supplied CD-ROM
The supplied
■Installing Acrobat® Reader™
Windows®: Run the
Macintosh: Run the
■Viewing the manual
Run the
(5) | (6) | (7) | (1) (11)(12)(13) (11) | |
|
| (14)(15)(16)(17)(18)(19) | ||
|
|
| COMPUTER- | VIDEO |
|
| AUDIOMONITOR | ( Y/P /P ) | VIDEO |
| Name | : Function |
(1) | Infrared remote sensor | : Senses commands from the remote control. p.17 |
(2) | Lens | : Projects expanded image. |
(3) | Focusing ring | : Adjusts screen focus. p.23 |
(4) | Air intake | : Draws in air from outside unit. |
(5) | Tilt adjuster | : Adjusts the projector’s horizontal tilt. p.23 |
(6) | Lamp cover | : Remove to replace lamp. p.34 |
(7) | AC IN socket | : Connect the supplied power cord here. p.20 |
(8) | Foot adjuster | : Adjusts the vertical projection angle. p.23 |
(9) | Foot adjuster release button | : Press to stow the foot adjuster. p.23 |
(10) | Control panel | : Operates the projector. p.16 |
(11) | Air exhaust | : Expels air that has grown hot inside the projector. |
(12) | Speaker | : Plays audio. |
(13) | : Attach a security chain, etc. here. | |
(14) AUDIO terminal | : Feeds the audio signal from a computer or video | |
|
| equipment. |
(15) MONITOR terminal | : Connected to the monitor display. | |
(16) COMPUTER terminal | : Feeds the RBG signal from a computer or the compo- | |
|
| nent video signal (Y/PB/PR) from a video equipment. |
(17) VIDEO terminal | : Feeds the video signal from a video equipment. | |
(18) | : Feeds the | |
(19) CONTROL terminal | : Connected to the | |
|
| computer for operating the projector. p.40 |
Preparations
14 | 15 |