Display the Setting display menu
1. Start
Remote Control

Using handy features (Continued)

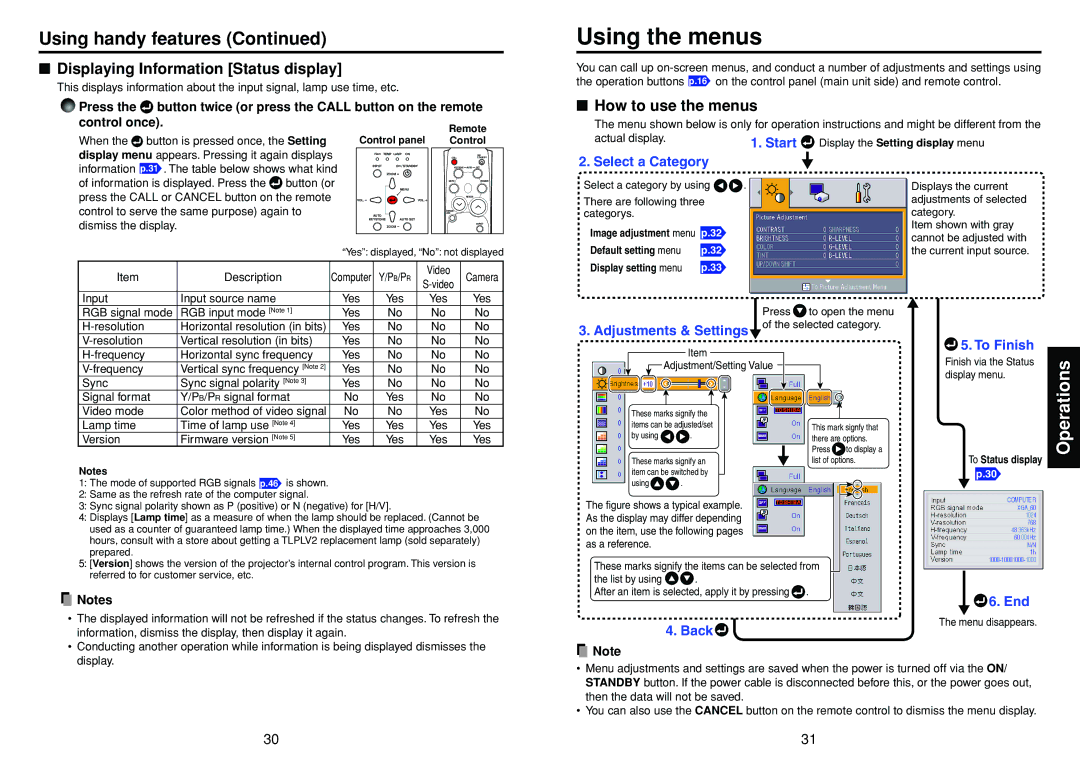
Displaying Information [Status display]

This displays information about the input signal, lamp use time, etc.

Press the button twice (or press the CALL button on the remote control once).

Using the menus

You can call up on-screen menus, and conduct a number of adjustments and settings using the operation buttons p.16 on the control panel (main unit side) and remote control.

How to use the menus

The menu shown below is only for operation instructions and might be different from the

When the button is pressed once, the Setting display menu appears. Pressing it again displays information p.31 . The table below shows what kind

Control panel

FAN TEMP LAMP ON

INPUT

ON / STANDBY


ZOOM +

ON/

CALLSTANDBY

KEYSTONE AUTO SET

actual display.

2. Select a Category

of information is displayed. Press the button (or press the CALL or CANCEL button on the remote control to serve the same purpose) again to dismiss the display.


MENU

VOL. -

VOL. +

AUTO


KEYSTONE

AUTO SET


ZOOM -

MUTE

FREEZE

RESIZE

RESIZE

OFF

INPUT

Select a category by using .

There are following three categorys.

Image adjustment menu p.32

Displays the current adjustments of selected category.

Item shown with gray cannot be adjusted with

“Yes”: displayed, “No”: not displayed

Item

Description

Computer

Y/PB/PR

Video

Camera

S-video


Input

Input source name

Yes

Yes

Yes

Yes

RGB signal mode

RGB input mode [Note 1]

Yes

No

No

No

H-resolution

Horizontal resolution (in bits)

Yes

No

No

No

V-resolution

Vertical resolution (in bits)

Yes

No

No

No

H-frequency

Horizontal sync frequency

Yes

No

No

No

V-frequency

Vertical sync frequency [Note 2]

Yes

No

No

No

Sync

Sync signal polarity [Note 3]

Yes

No

No

No

Signal format

Y/PB/PR signal format

No

Yes

No

No

Default setting menu

p.32

Display setting menu

p.33

Pressto open the menu

3.Adjustments & Settingsof the selected category.

Item

Adjustment/Setting Value

the current input source.

5. To Finish

Finish via the Status display menu.

Operations

Video mode

Color method of video signal

No

No

Yes

No

Lamp time

Time of lamp use [Note 4]

Yes

Yes

Yes

Yes

Version

Firmware version [Note 5]

Yes

Yes

Yes

Yes

Notes

1:

The mode of supported RGB signals p.46 is shown.

2:

Same as the refresh rate of the computer signal.

These marks signify the items can be adjusted/set

by using .

These marks signify an item can be switched by

using .

This mark signfy that there are options.

Press to display a list of options.

To Status display

p.30

3: Sync signal polarity shown as P (positive) or N (negative) for [H/V].

4: Displays [Lamp time] as a measure of when the lamp should be replaced. (Cannot be

used as a counter of guaranteed lamp time.) When the displayed time approaches 3,000

hours, consult with a store about getting a TLPLV2 replacement lamp (sold separately)

prepared.

5: [Version] shows the version of the projector’s internal control program. This version is

referred to for customer service, etc.

Notes

The figure shows a typical example. As the display may differ depending on the item, use the following pages as a reference.

These marks signify the items can be selected from

the list by using .

After an item is selected, apply it by pressing .

6. End

The displayed information will not be refreshed if the status changes. To refresh the


information, dismiss the display, then display it again.

Conducting another operation while information is being displayed dismisses the


display.

4. Back

Note

The menu disappears.

Menu adjustments and settings are saved when the power is turned off via the ON/ STANDBY button. If the power cable is disconnected before this, or the power goes out, then the data will not be saved.

You can also use the CANCEL button on the remote control to dismiss the menu display.

30

31

Page 16
Image 16
Toshiba TLP-T70M, TLP-S40, TLP-T60M owner manual Using the menus, Displaying Information Status display, How to use the menus

TLP-T70M, TLP-T60M, TLP-S40 specifications

Toshiba has been a prominent player in the projector market, offering a range of innovative and high-performance models suitable for various applications, from business presentations to educational settings. Among their standout products are the TLP-S40, TLP-T60M, and TLP-T70M projectors, each designed to meet differing user needs while incorporating advanced technologies.

The Toshiba TLP-S40 is designed for users seeking a compact yet powerful projector. Featuring a brightness of 2,400 ANSI lumens, this model ensures vibrant images even in well-lit environments. Its native SVGA resolution of 800 x 600 makes it ideal for basic presentations and visual content. Importantly, the TLP-S40 employs a 3LCD technology, which enhances color accuracy and delivers a richer visual experience without the issues of color wheel artifacts often seen in DLP projectors. The lightweight and portable nature of the TLP-S40 facilitates easy transportation, making it a popular choice for mobile professionals.

Moving up to the TLP-T60M, Toshiba ramps up performance and flexibility. This model offers a brightness of 3,000 ANSI lumens and an XGA resolution of 1024 x 768, catering to a broader range of presentation materials with sharper clarity. The TLP-T60M also incorporates Toshiba's proprietary “Eco” mode, which extends the lamp life significantly, allowing users to project for longer periods without frequent maintenance. The connectivity options are versatile, including HDMI, VGA, and USB ports, ensuring compatibility with a variety of devices. This projector is particularly favored in corporate environments due to its ability to present detailed graphics and videos clearly.

The TLP-T70M represents the pinnacle of this series, providing enhanced features and performance. With a brightness of 3,500 ANSI lumens, it excels in larger venues and rooms with substantial ambient light. The native WXGA resolution of 1280 x 800 ensures that even complex images and text are rendered with exceptional clarity. The TLP-T70M also incorporates advanced connectivity features, including wireless networking capabilities, allowing for seamless presentations from smartphones and tablets. Additionally, its built-in multimedia player can directly read files from a USB drive, offering added convenience for users who want to present without needing a connected computer.

In summary, the Toshiba TLP-S40, TLP-T60M, and TLP-T70M projectors cater to varying presentation needs, from basic to advanced features. They all leverage Toshiba’s expertise in projection technology, ensuring quality visuals and user-friendly functionality for both professional and educational applications.