TL-WR842ND
300Mbps Multi-Function Wireless N Router
FCC STATEMENT
COPYRIGHT & TRADEMARKS
CE Mark Warning
FCC RF Radiation Exposure Statement
National restrictions
Country
Page
DECLARATION OF CONFORMITY
Product Description 300Mbps Multi-Function Wireless N Router
EN 301 893 EN 300 328 V1.7.1 EN 301 489-1 V1.8.12008& EN 301 489-17
EN623112008
Package Contents
CONTENTS
Chapter 2. Connecting the Router
Chapter 3. Quick Installation Guide
4.7.2
Appendix B Configuring the PCs
Appendix A FAQ
Appendix C Specifications
Appendix D Glossary
TL-WR842ND 300Mbps Multi-Function Wireless N Router
Package Contents
Simple Installation
Flexible Access Control
Chapter 1. Introduction
1.1 Overview of the Router
1.2 Conventions
1.3 Main Features
1.4.1 The Front Panel
1.4 Panel Layout
Name
Status
1.4.2 The Rear Panel
¾ WIFI ON/OFF Press this button to enable or disable Wi-Fi
2.2 Installation Environment Requirements
Chapter 2. Connecting the Router
2.3 Connecting the Router
2.1 System Requirements
Figure 2-1 Hardware Installation
7. Power on your PC and Cable/DSL Modem
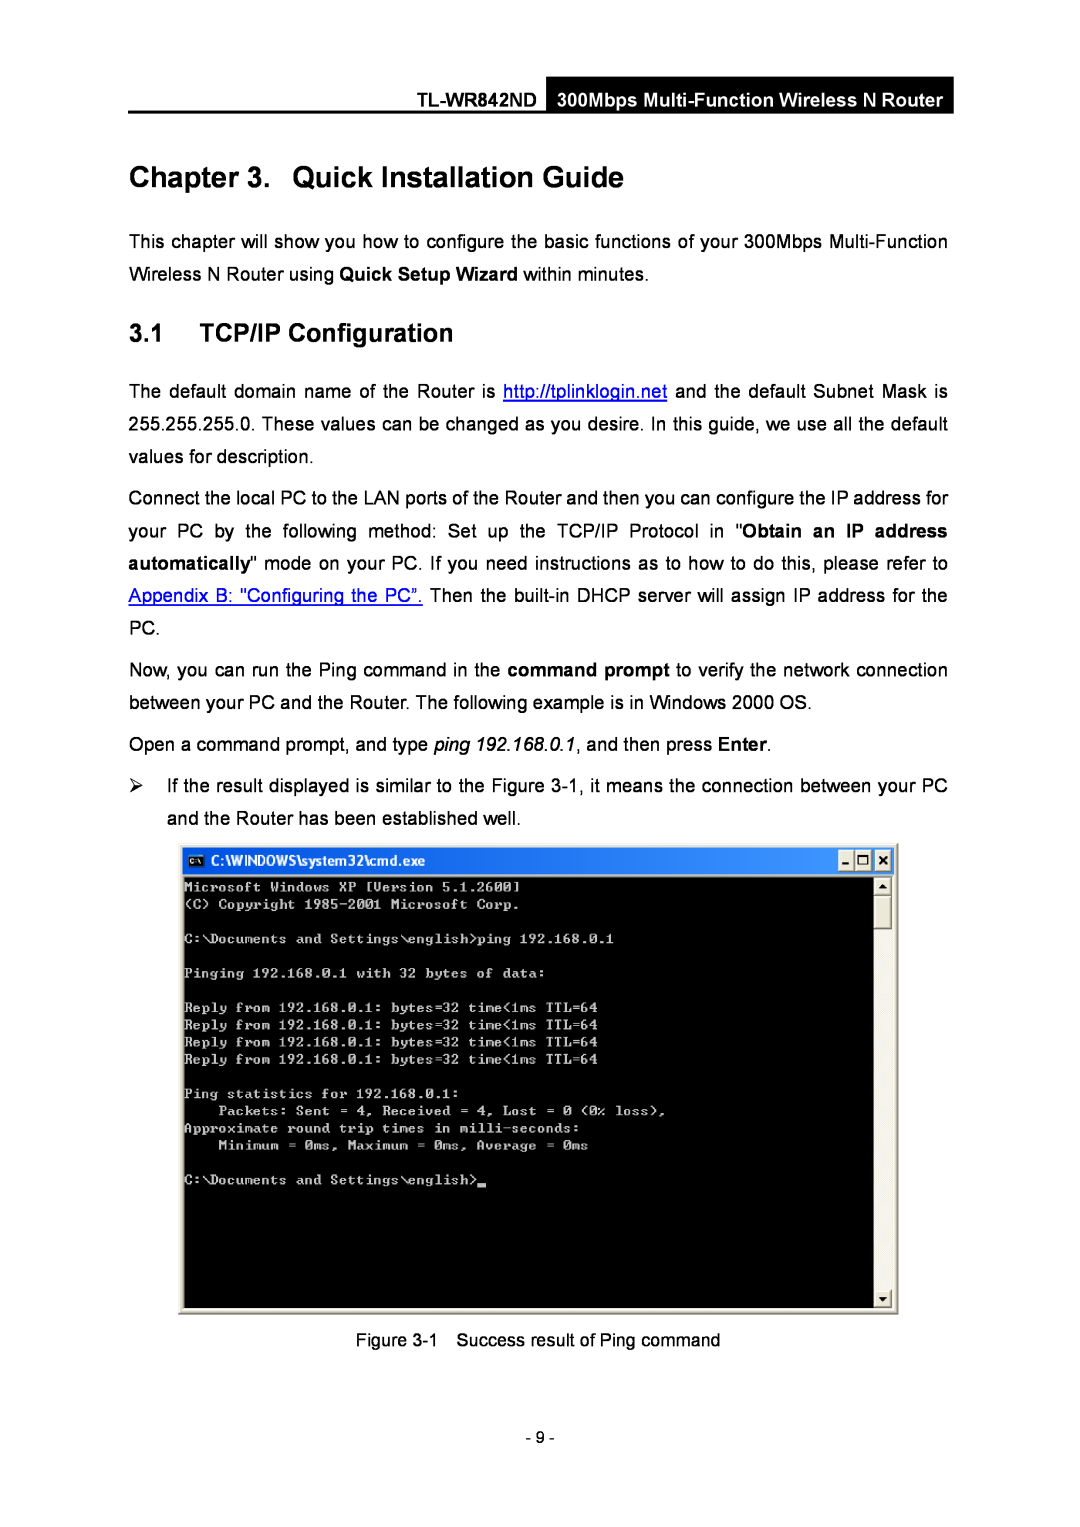
3.1 TCP/IP Configuration
Chapter 3. Quick Installation Guide
Please check the connection following these steps
3.2 Quick Installation Guide
Figure 3-3 Log in the Router
Figure 3-6 WAN Connection Type
Figure 3-5 Quick Setup
Figure 3-8 Quick Setup - MAC Clone
Figure 3-7 Quick Setup - PPPoE
Figure 3-10 Quick Setup - MAC Clone
Figure 3-9 Quick Setup - MAC Clone
Figure 3-11 Find MAC Address
Figure 3-12 Quick Setup - Static IP
Figure 3-13 Quick Setup - Wireless
4.6 Wireless
z PSK Password - You can enter ASCII or Hexadecimal characters
Figure 3-15 Quick Setup - Finish
Figure 3-14 Quick Setup - Finish
4.2 Status
Chapter 4. Configuring the Router
4.1 Login
Figure 4-1 Router Status
4.3 Quick Setup
Please refer to 3.2 Quick Installation Guide
4.4 WPS
I. Use the Wi-Fi Protected Setup Button
II. Enter the client device’s PIN on the Router
300Mbps Multi-Function Wireless N Router
TL-WR842ND
III. Enter the Router’s PIN on your client device
4.5 Network
4.5.1 WAN
Figure 4-6 WAN - Dynamic IP
TL-WR842ND 300Mbps Multi-Function Wireless N Router
Figure 4-8 WAN - PPPoE
down
Figure 4-10 WAN - BigPond Cable
QLD - qld.bigpond.net.au
NSW / ACT - nsw.bigpond.net.au
Figure 4-11 WAN - L2TP/Russia L2TP
TL-WR842ND 300Mbps Multi-Function Wireless N Router
Figure 4-12 PPTP Settings
z Static IP - Connections which use static IP address assignment
4.5.2 LAN
z Dynamic IP - Connections which use dynamic IP address assignment
Figure 4-14 MAC Address Clone
4.5.3 MAC Clone
Figure 4-13 LAN
Only the PC on your LAN can use the MAC Address Clone function
4.6 Wireless
4.6.1 Wireless Settings
Figure 4-16 Wireless Settings
TL-WR842ND 300Mbps Multi-Function Wireless N Router
4.6.2 Wireless Security
¾ SSID - Select the desired SSID from the drop-down list
Encryption - You can select either Automatic, or TKIP or AES
Figure 4-21 WPA/WPA2 - Personal
notice in red as shown in Figure
Figure 4-20 WPA/WPA2 - Enterprise
4.6.3 Wireless MAC Filtering
To modify or delete an existing entry
4.6.4 Wireless Advanced
4.6.5 Wireless Statistics
This page will be refreshed automatically every 5 seconds
4.7.1 DHCP Settings
4.7 DHCP
4.7.2 DHCP Clients List
To Reserve an IP address
4.7.3 Address Reservation
Figure 4-29 Address Reservation
Figure 4-30 Add or Modify an Address Reservation Entry
4.8.1 IKE
4.8 VPN
Figure 4-33 IKE Policy Settings
Figure 4-34 List of IPsec Policy
4.8.2 IPsec
¾ Policy Name - Enter the name for the IPsec Policy
Figure 4-36 List of Security Alliance
4.8.3 Security Alliance List
4.9.1 Storage Sharing
4.9 USB Settings
¾ Used - The used space of the USB driver
4.9.2 FTP Server
To set up your FTP Server, please follow the instructions below
3. The max FTP clients number is
4.9.3 Media Server
To add a new folder, follow the instructions below
To set up your media server, please follow the instructions below
Figure 4-44 Media Server Setting
4.9.4 Print Server
To add a new user account, please follow the steps below
4.9.5 User Accounts
2. Please restart the service for the new settings to take effect
1. The two default user accounts cannot be deleted
4.10.1 Virtual Servers
4.10 Forwarding
Figure 4-52 Add or Modify a Virtual Server Entry
To set up a virtual server entry
To add a new rule, follow the steps below
4.10.2 Port Triggering
Figure 4-54 Add or Modify a Triggering Entry
4.10.3 DMZ
Once the Router is configured, the operation is as follows
4.10.4 UPnP
3. Incoming Ports ranges cannot overlap each other
External Port - The port which the Router opened for the application
4.11.1 Basic Security
4.11 Security
4.11.2 Advanced Security
Figure 4-59 Advanced Security
4.11.3 Local Management
Figure 4-61 Remote Management
4.11.4 Remote Management
To add a new entry, please follow the steps below
4.12 Parental Control
¾ Enable - Check this option to enable a specific entry
7. Click the Save button
4.13.1 Rule
4.13 Access Control
¾ Host - Here displays the host selected in the corresponding rule
There are two methods to add a new rule Method One
If the IP Address is selected, you can see the following item
If the Domain Name is selected, you will see the following items
Method Two
Figure 4-71 Add Internet Access Control Entry
Figure 4-72 Host Settings
4.13.2 Host
4.13.3 Target
Figure 4-76 Add or Modify an Access Target Entry
Figure 4-75 Target Settings
Figure 4-77 Add or Modify an Access Target Entry
To add a new schedule, follow the steps below
4.13.4 Schedule
4.14 Advanced Routing
To add static routing entries
4.14.1 Static Routing List
Figure 4-81 Static Routing
Figure 4-82 Add or Modify a Static Route Entry
4.14.2 System Routing Table
Other configurations for the entries
4.15.2 Rules List
4.15.1 Control Settings
4.15 Bandwidth Control
Figure 4-86 Bandwidth Control Rules List
To add/modify a Bandwidth Control rule, follow the steps below
Figure 4-87 Bandwidth Control Rule Settings
4.16.1 Binding Settings
4.16 IP & MAC Binding Setting
To modify or delete an existing entry, follow the steps below
To add IP & MAC Binding entries, follow the steps below
To find an existing entry, follow the steps below
Figure 4-90 IP & MAC Binding Setting Add & Modify
4.16.2 ARP List
4.17 Dynamic DNS
4.17.1 Comexe.cn DDNS
To set up for DDNS, follow these instructions
Figure 4-94 Dyndns.org DDNS Settings
4.17.2 Dyndns.org DDNS
Figure 4-95 No-ip.com DDNS Settings
4.17.3 No-ip.com DDNS
4.18 System Tools
4.18.1 Time Setting
To set time automatically
To set time manually
To set Daylight Saving
Figure 4-98 Time settings
2. The time will be lost if the router is turned off
4.18.2 Diagnostic
1. Only one user can use the diagnostic tools at one time
4.18.3 Firmware Upgrade
5 The firmware version must correspond to the hardware
To upgrade the Routers firmware, follow these instructions below
All changed settings will be lost when defaults are restored
4.18.4 Factory Defaults
4.18.5 Backup & Restore
4.18.7 Password
4.18.6 Reboot
4.18.8 System Log
Figure 4-107 Mail Account Settings
4.18.9 Statistics
¾ Sorted Rules - Choose how the displayed statistics are sorted
300Mbps Multi-Function Wireless N Router
Statistics Table
Reset
IP/MAC Address
1. How do I configure the Router to access Internet by ADSL users?
Appendix A FAQ
Figure A-3 MAC Clone
3. I want to use Netmeeting, what do I need to do?
Figure A-6 DMZ
Figure A-4 Virtual Servers
Figure A-5 Add or Modify a Virtual server Entry
4. I want to build a WEB Server on the LAN, what should I do?
Figure A-9 Virtual Servers
Figure A-8 Remote Management
5. The wireless stations cannot connect to the Router
1. Install TCP/IP component
Appendix B Configuring the PCs
Figure B-2
Figure B-3
Wireless
Appendix C Specifications
General
Environmental and Physical
Appendix D Glossary
hosts to the Internet over an always-on connection by simulating a dial-up connection