|
|
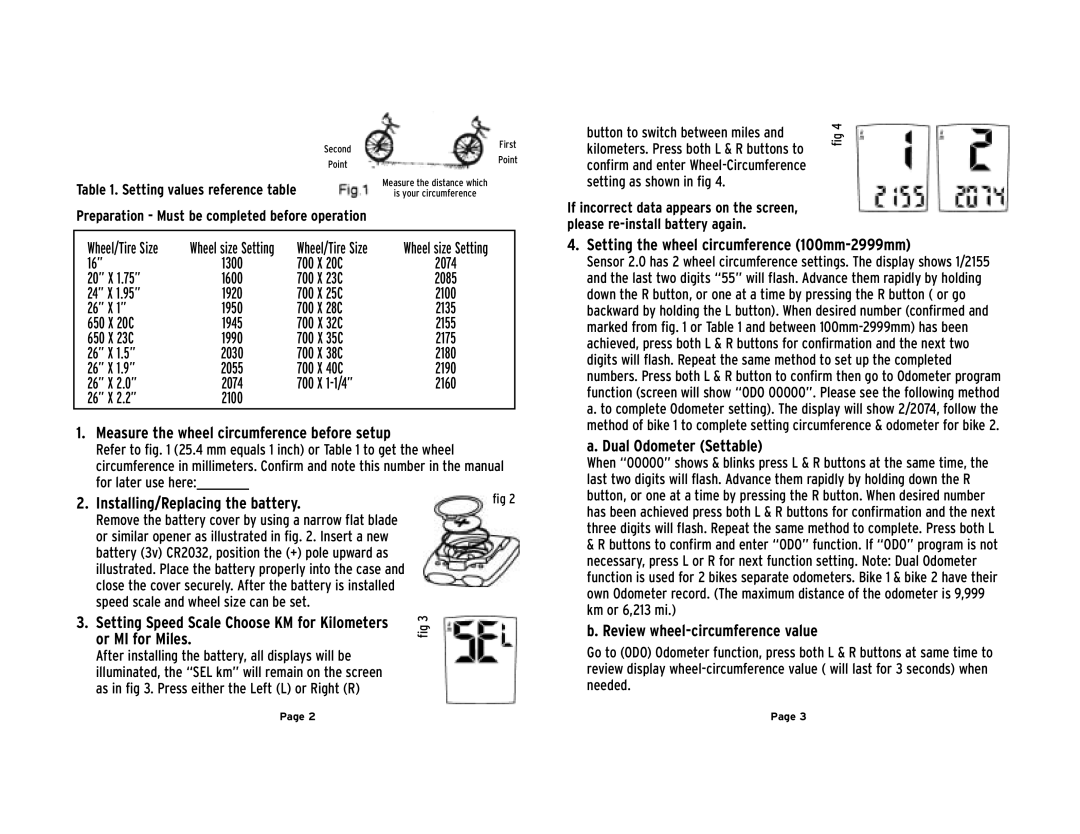
| Second |
| First | |
|
|
|
| Point | ||
|
|
| Point |
| ||
|
|
|
|
|
| |
|
|
|
|
| ||
Table 1. Setting values reference table |
|
| Measure the distance which |
| ||
|
| is your circumference |
| |||
Preparation - Must be completed before operation |
|
|
| |||
|
|
| ||||
|
|
|
|
|
| |
Wheel/Tire Size | Wheel size Setting | Wheel/Tire Size | Wheel size Setting |
| ||
16” | 1300 | 700 | X 20C | 2074 |
|
|
20” X 1.75” | 1600 | 700 | X 23C | 2085 |
|
|
24” X 1.95” | 1920 | 700 | X 25C | 2100 |
|
|
26” X 1” | 1950 | 700 | X 28C | 2135 |
|
|
650 X 20C | 1945 | 700 | X 32C | 2155 |
|
|
650 X 23C | 1990 | 700 | X 35C | 2175 |
|
|
26” X 1.5” | 2030 | 700 | X 38C | 2180 |
|
|
26” X 1.9” | 2055 | 700 | X 40C | 2190 |
|
|
26” X 2.0” | 2074 | 700 | X | 2160 |
|
|
26” X 2.2” | 2100 |
|
|
|
|
|
1.Measure the wheel circumference before setup
Refer to fig. 1 (25.4 mm equals 1 inch) or Table 1 to get the wheel circumference in millimeters. Confirm and note this number in the manual for later use here:__________
2. Installing/Replacing the battery. | fig 2 |
Remove the battery cover by using a narrow flat blade or similar opener as illustrated in fig. 2. Insert a new battery (3v) CR2032, position the (+) pole upward as illustrated. Place the battery properly into the case and close the cover securely. After the battery is installed speed scale and wheel size can be set.
3. Setting Speed Scale Choose KM for Kilometers | 3 | |
fig | ||
or MI for Miles. | ||
| ||
After installing the battery, all displays will be |
| |
illuminated, the “SEL km” will remain on the screen |
| |
as in fig 3. Press either the Left (L) or Right (R) |
|
button to switch between miles and | 4 | |
fig | ||
kilometers. Press both L & R buttons to | ||
| ||
confirm and enter |
| |
setting as shown in fig 4. |
|
If incorrect data appears on the screen, please
4.Setting the wheel circumference (100mm-2999mm)
Sensor 2.0 has 2 wheel circumference settings. The display shows 1/2155 and the last two digits “55” will flash. Advance them rapidly by holding down the R button, or one at a time by pressing the R button ( or go backward by holding the L button). When desired number (confirmed and marked from fig. 1 or Table 1 and between
a. Dual Odometer (Settable)
When “00000” shows & blinks press L & R buttons at the same time, the last two digits will flash. Advance them rapidly by holding down the R button, or one at a time by pressing the R button. When desired number has been achieved press both L & R buttons for confirmation and the next three digits will flash. Repeat the same method to complete. Press both L
&R buttons to confirm and enter “ODO” function. If “ODO” program is not necessary, press L or R for next function setting. Note: Dual Odometer function is used for 2 bikes separate odometers. Bike 1 & bike 2 have their own Odometer record. (The maximum distance of the odometer is 9,999 km or 6,213 mi.)
b. Review wheel-circumference value
Go to (ODO) Odometer function, press both L & R buttons at same time to review display
Page 2 | Page 3 |