Tripp Lite B072-016-IP4, B072-016-IP2 Connecting the System, Initial Settings Default IP Address

Models: B072-032-IP2 B072-016-IP4 B072-016-IP2 B072-032-IP4

1 56
Download 56 pages 10.85 Kb
Page 7
Image 7

1.. Product Overview

1..9 Connecting the System

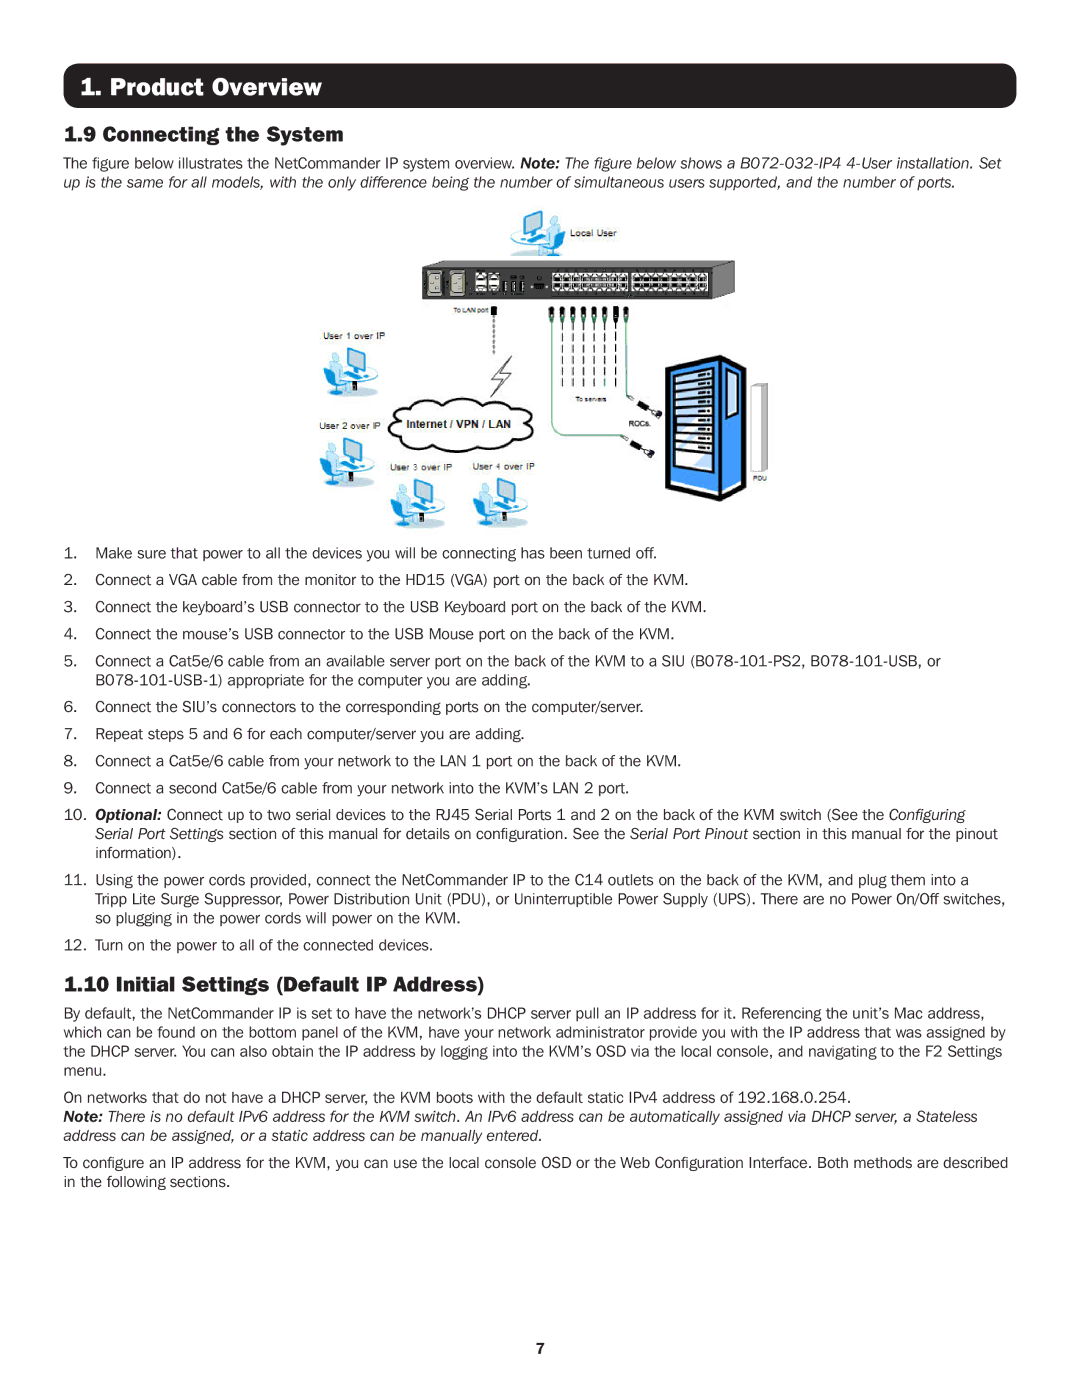
The figure below illustrates the NetCommander IP system overview. Note: The figure below shows a B072-032-IP4 4-User installation. Set up is the same for all models, with the only difference being the number of simultaneous users supported, and the number of ports.

1.Make sure that power to all the devices you will be connecting has been turned off.

2.Connect a VGA cable from the monitor to the HD15 (VGA) port on the back of the KVM.

3.Connect the keyboard’s USB connector to the USB Keyboard port on the back of the KVM.

4.Connect the mouse’s USB connector to the USB Mouse port on the back of the KVM.

5.Connect a Cat5e/6 cable from an available server port on the back of the KVM to a SIU (B078-101-PS2, B078-101-USB, or B078-101-USB-1) appropriate for the computer you are adding.

6.Connect the SIU’s connectors to the corresponding ports on the computer/server.

7.Repeat steps 5 and 6 for each computer/server you are adding.

8.Connect a Cat5e/6 cable from your network to the LAN 1 port on the back of the KVM.

9.Connect a second Cat5e/6 cable from your network into the KVM’s LAN 2 port.

10.Optional: Connect up to two serial devices to the RJ45 Serial Ports 1 and 2 on the back of the KVM switch (See the Configuring Serial Port Settings section of this manual for details on configuration. See the Serial Port Pinout section in this manual for the pinout information).

11.Using the power cords provided, connect the NetCommander IP to the C14 outlets on the back of the KVM, and plug them into a Tripp Lite Surge Suppressor, Power Distribution Unit (PDU), or Uninterruptible Power Supply (UPS). There are no Power On/Off switches, so plugging in the power cords will power on the KVM.

12.Turn on the power to all of the connected devices.

1..10 Initial Settings (Default IP Address)

By default, the NetCommander IP is set to have the network’s DHCP server pull an IP address for it. Referencing the unit’s Mac address, which can be found on the bottom panel of the KVM, have your network administrator provide you with the IP address that was assigned by the DHCP server. You can also obtain the IP address by logging into the KVM’s OSD via the local console, and navigating to the F2 Settings menu.

On networks that do not have a DHCP server, the KVM boots with the default static IPv4 address of 192.168.0.254.

Note: There is no default IPv6 address for the KVM switch. An IPv6 address can be automatically assigned via DHCP server, a Stateless address can be assigned, or a static address can be manually entered.

To configure an IP address for the KVM, you can use the local console OSD or the Web Configuration Interface. Both methods are described in the following sections.

7

Page 7
Image 7
Tripp Lite B072-016-IP4, B072-016-IP2, B072-032-IP4, B072-032-IP2 Connecting the System, Initial Settings Default IP Address

B072-032-IP2, B072-016-IP4, B072-016-IP2, B072-032-IP4 specifications

Tripp Lite, a renowned leader in power management and connectivity solutions, offers a diversified range of KVM switches, including the B072-032-IP4, B072-016-IP2, B072-016-IP4, and B072-032-IP2 models. These devices are designed to streamline the management of multiple computers and servers from a single interface, making them ideal for data centers and IT environments where space and efficiency are paramount.

The Tripp Lite B072-032-IP4 model supports up to 32 computers, enabling administrators to access and control systems through a standard web browser. It features an IP-based architecture, allowing remote management over the internet. This remote access capability is crucial for IT professionals who need to troubleshoot systems from various locations. The B072-032-IP4 supports multiple operating systems and incorporates advanced security measures, including SSL encryption and user authentication, ensuring a secure management environment.

The B072-016-IP2 and B072-016-IP4 models cater to environments requiring control over fewer systems, with support for 16 computers. Both models maintain the essential IP functionality, promoting remote access and management features. The B072-016-IP4 specifically offers dual-monitor support, which is increasingly essential in today’s multitasking work environments. This capability enhances productivity by providing more screen real estate for users managing multiple applications simultaneously.

On the other hand, the B072-032-IP2 model combines support for 32 computers with a more straightforward 2-port configuration. This model caters to users who require extensive control without the complexity of managing numerous KVM switches. Each of these models supports resolutions up to 1920 x 1200, ensuring clear visuals and seamless user interactions.

One of the standout features across the Tripp Lite KVM switches is their robust architecture, which includes built-in firmware upgrading capabilities, ensuring that users can benefit from ongoing improvements and features. Additionally, the simplicity of setup and a user-friendly interface make these models accessible to both seasoned IT professionals and those new to KVM technology.

In summary, Tripp Lite's B072 series KVM switches offer a range of features tailored to meet diverse user needs. From remote access capabilities to multi-monitor support and high-resolution outputs, these switches are engineered for efficiency and reliability in managing multiple systems. Whether you’re in a small office or a large data center, Tripp Lite’s KVM solutions facilitate efficient control and management of your IT infrastructure.