Section 4: Operation
To Start and Stop the Engine
IMPORTANT: Use the following steps to practice starting and stopping the engine ONLY. Do not attempt to use the equipment as a tiller or cultivator until you have read all operating instructions in this Owner’s Manual.
To Start the Engine:
1. | The spark plug wire must be connected |
to the spark plug and the fuel tank must | |
have fresh, unleaded gasoline. | |
2. | Let go of all controls. |
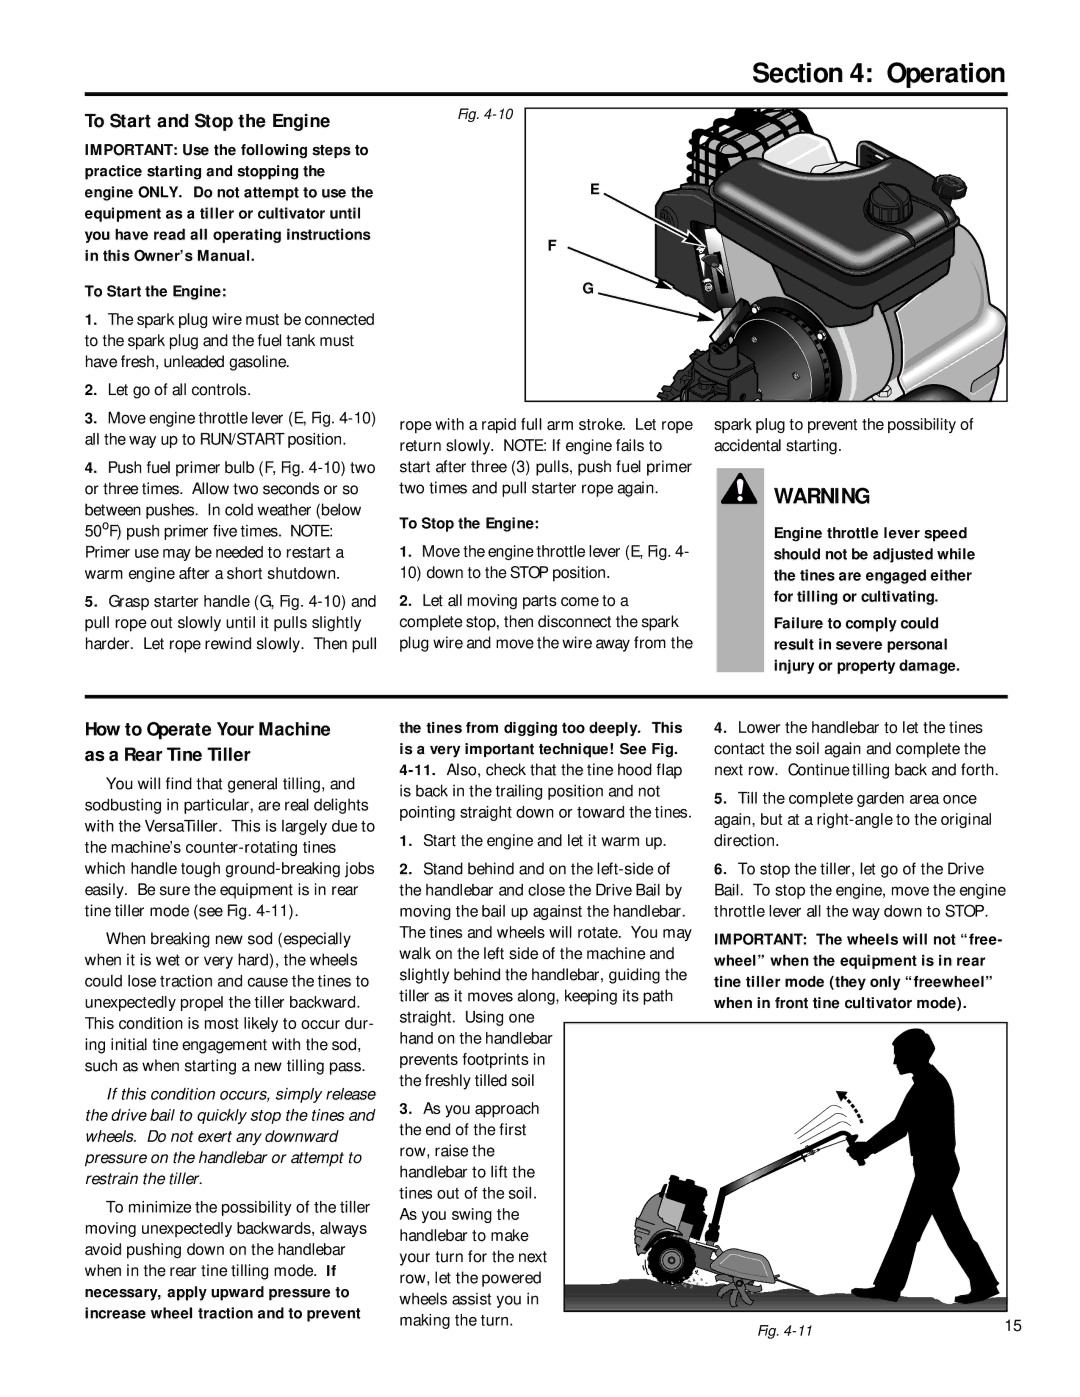
Fig. |
E |
F |
G |
3. Move engine throttle lever (E, Fig. |
all the way up to RUN/START position. |
4. Push fuel primer bulb (F, Fig. |
or three times. Allow two seconds or so |
between pushes. In cold weather (below |
50oF) push primer five times. NOTE: |
Primer use may be needed to restart a |
warm engine after a short shutdown. |
5. Grasp starter handle (G, Fig. |
pull rope out slowly until it pulls slightly |
harder. Let rope rewind slowly. Then pull |
rope with a rapid full arm stroke. Let rope return slowly. NOTE: If engine fails to start after three (3) pulls, push fuel primer two times and pull starter rope again.
To Stop the Engine:
1.Move the engine throttle lever (E, Fig. 4- 10) down to the STOP position.
2.Let all moving parts come to a complete stop, then disconnect the spark plug wire and move the wire away from the
spark plug to prevent the possibility of accidental starting.
WARNING
Engine throttle lever speed should not be adjusted while the tines are engaged either for tilling or cultivating.
Failure to comply could result in severe personal injury or property damage.
How to Operate Your Machine as a Rear Tine Tiller
You will find that general tilling, and sodbusting in particular, are real delights with the VersaTiller. This is largely due to the machine’s
When breaking new sod (especially when it is wet or very hard), the wheels could lose traction and cause the tines to unexpectedly propel the tiller backward. This condition is most likely to occur dur- ing initial tine engagement with the sod, such as when starting a new tilling pass.
If this condition occurs, simply release the drive bail to quickly stop the tines and wheels. Do not exert any downward pressure on the handlebar or attempt to restrain the tiller.
To minimize the possibility of the tiller moving unexpectedly backwards, always avoid pushing down on the handlebar when in the rear tine tilling mode. If necessary, apply upward pressure to increase wheel traction and to prevent
the tines from digging too deeply. This | 4. Lower the handlebar to let the tines |
| |
is a very important technique! See Fig. | contact the soil again and complete the |
| |
next row. Continue tilling back and forth. |
| ||
is back in the trailing position and not | 5. Till the complete garden area once |
| |
pointing straight down or toward the tines. |
| ||
again, but at a |
| ||
|
|
| |
1. | Start the engine and let it warm up. | direction. |
|
2. | Stand behind and on the | 6. To stop the tiller, let go of the Drive |
|
the handlebar and close the Drive Bail by | Bail. To stop the engine, move the engine | ||
moving the bail up against the handlebar. | throttle lever all the way down to STOP. |
| |
The tines and wheels will rotate. You may | IMPORTANT: The wheels will not “free- |
| |
walk on the left side of the machine and |
| ||
wheel” when the equipment is in rear |
| ||
slightly behind the handlebar, guiding the |
| ||
tine tiller mode (they only “freewheel” |
| ||
tiller as it moves along, keeping its path |
| ||
when in front tine cultivator mode). |
| ||
straight. Using one |
| ||
|
| ||
hand on the handlebar |
|
| |
prevents footprints in |
|
| |
the freshly tilled soil |
|
| |
3. | As you approach |
|
|
the end of the first |
|
| |
row, raise the |
|
| |
handlebar to lift the |
|
| |
tines out of the soil. |
|
| |
As you swing the |
|
| |
handlebar to make |
|
| |
your turn for the next |
|
| |
row, let the powered |
|
| |
wheels assist you in |
|
| |
making the turn. | Fig. | 15 | |