Operating Instructions
Fuel Recommendations | 1. Always set the thermostat to high before opening | |
Wood | the feed door to refuel or stoke the fire. | |
Hardwood, 18” to 23” log should be split and air | 2. When opening the feed door, turn handle and open | |
dried (seasoned) for 6 months to obtain maximum | door until it stops on the latch and leave it at that | |
burning efficiency. | position for at least 10 seconds before opening fully. | |
Wood should be stored in a dry, well ventilated | This, along with step 1 above, will allow any accu- | |
mulated gases or smoke to exit into the chimney, | ||
area. A wooden box or crate is ideal for storage. | ||
eliminating flame or smoke spillage into the room. | ||
|
Combustible Wall Chimney Connector Pass-Throughs
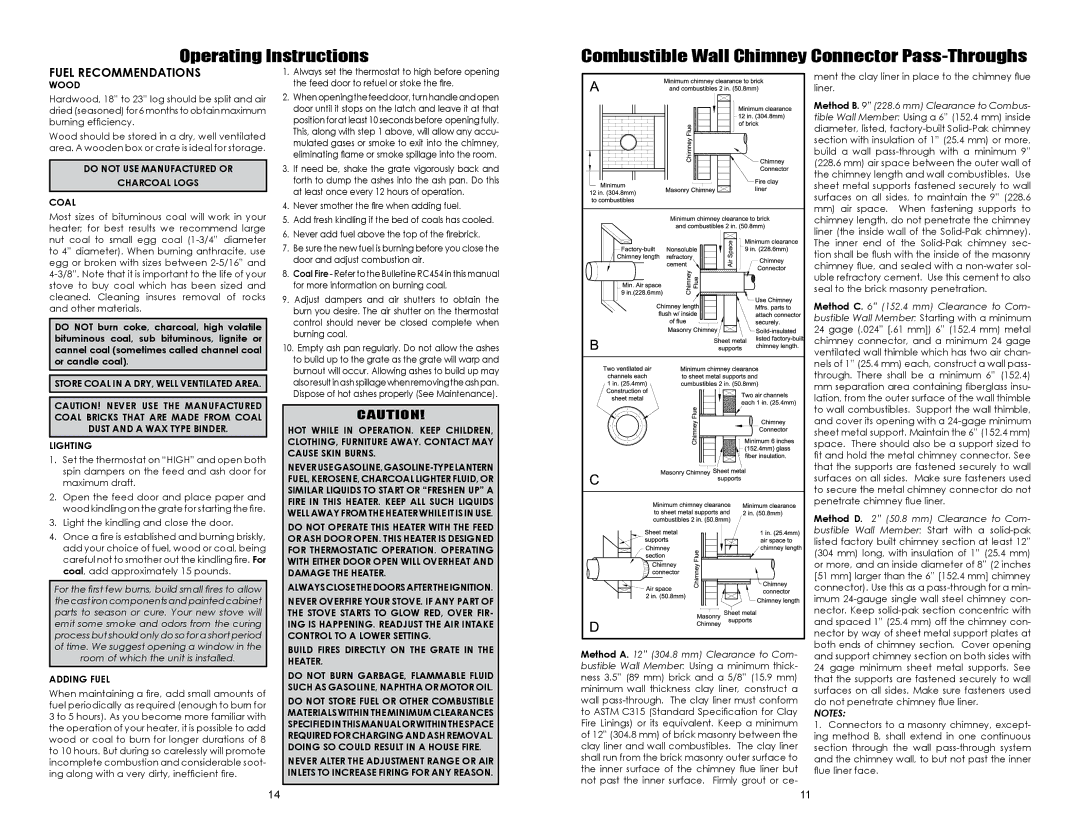
ment the clay liner in place to the chimney flue liner.
Method B. 9” (228.6 mm) Clearance to Combus- tible Wall Member: Using a 6” (152.4 mm) inside diameter, listed,
DO NOT USE MANUFACTURED OR
CHARCOAL LOGS
Coal
Most sizes of bituminous coal will work in your heater; for best results we recommend large nut coal to small egg coal
DO NOT burn coke, charcoal, high volatile bituminous coal, sub bituminous, lignite or cannel coal (sometimes called channel coal or candle coal).
STORE COAL IN A DRY, WELL VENTILATED AREA.
CAUTION! Never use the manufactured coal bricks that are made from coal dust and a wax type binder.
Lighting
1.Set the thermostat on “HIGH” and open both spin dampers on the feed and ash door for maximum draft.
2.Open the feed door and place paper and wood kindling on the grate for starting the fire.
3.Light the kindling and close the door.
4.Once a fire is established and burning briskly, add your choice of fuel, wood or coal, being careful not to smother out the kindling fire. For coal, add approximately 15 pounds.
For the first few burns, build small fires to allow the cast iron components and painted cabinet parts to season or cure. Your new stove will emit some smoke and odors from the curing process but should only do so for a short period of time. We suggest opening a window in the
room of which the unit is installed.
Adding Fuel
When maintaining a fire, add small amounts of fuel periodically as required (enough to burn for 3 to 5 hours). As you become more familiar with the operation of your heater, it is possible to add wood or coal to burn for longer durations of 8 to 10 hours. But during so carelessly will promote incomplete combustion and considerable soot- ing along with a very dirty, inefficient fire.
3.If need be, shake the grate vigorously back and forth to dump the ashes into the ash pan. Do this at least once every 12 hours of operation.
4.Never smother the fire when adding fuel.
5.Add fresh kindling if the bed of coals has cooled.
6.Never add fuel above the top of the firebrick.
7.Be sure the new fuel is burning before you close the door and adjust combustion air.
8.Coal Fire - Refer to the Bulletine RC454 in this manual for more information on burning coal.
9.Adjust dampers and air shutters to obtain the burn you desire. The air shutter on the thermostat control should never be closed complete when burning coal.
10.Empty ash pan regularly. Do not allow the ashes to build up to the grate as the grate will warp and burnout will occur. Allowing ashes to build up may also result in ash spillage when removing the ash pan. Dispose of hot ashes properly (See Maintenance).
CAUTION!
HOT WHILE IN OPERATION. KEEP CHILDREN, CLOTHING, FURNITURE AWAY. CONTACT MAY CAUSE SKIN BURNS.
NEVER USE GASOLINE,
DO NOT OPERATE THIS HEATER WITH THE FEED OR ASH DOOR OPEN. THIS HEATER IS DESIGNED FOR THERMOSTATIC OPERATION. OPERATING WITH EITHER DOOR OPEN WILL OVERHEAT AND DAMAGE THE HEATER.
ALWAYS CLOSE THE DOORS AFTER THE IGNITION.
NEVER OVERFIRE YOUR STOVE. IF ANY PART OF THE STOVE STARTS TO GLOW RED, OVER FIR- ING IS HAPPENING. READJUST THE AIR INTAKE CONTROL TO A LOWER SETTING.
Build fires directly on the grate in the heater.
DO NOT BURN garbage, FLAMMABLE FLUID SUCH AS GASOLINE, NAPHTHA OR MOTOR OIL.
Do not store fuel or other combustible materials within the minimum clearances specifiedin this manualor withinthe space required for charging and ash removal. Doing so could result in a house fire.
NEVER ALTER THE ADJUSTMENT RANGE OR AIR INLETS TO INCREASE FIRING FOR ANY REASON.
Method A. 12” (304.8 mm) Clearance to Com- bustible Wall Member: Using a minimum thick- ness 3.5” (89 mm) brick and a 5/8” (15.9 mm) minimum wall thickness clay liner, construct a wall
the chimney length and wall combustibles. Use sheet metal supports fastened securely to wall surfaces on all sides, to maintain the 9” (228.6
mm)air space. When fastening supports to chimney length, do not penetrate the chimney liner (the inside wall of the
Method C. 6” (152.4 mm) Clearance to Com- bustible Wall Member: Starting with a minimum 24 gage (.024” [.61 mm]) 6” (152.4 mm) metal chimney connector, and a minimum 24 gage ventilated wall thimble which has two air chan- nels of 1” (25.4 mm) each, construct a wall pass- through. There shall be a minimum 6” (152.4)
mmseparation area containing fiberglass insu- lation, from the outer surface of the wall thimble to wall combustibles. Support the wall thimble, and cover its opening with a
Method D. 2” (50.8 mm) Clearance to Com- bustible Wall Member: Start with a
NOTES:
1.Connectors to a masonry chimney, except- ing method B, shall extend in one continuous section through the wall
14 | 11 |