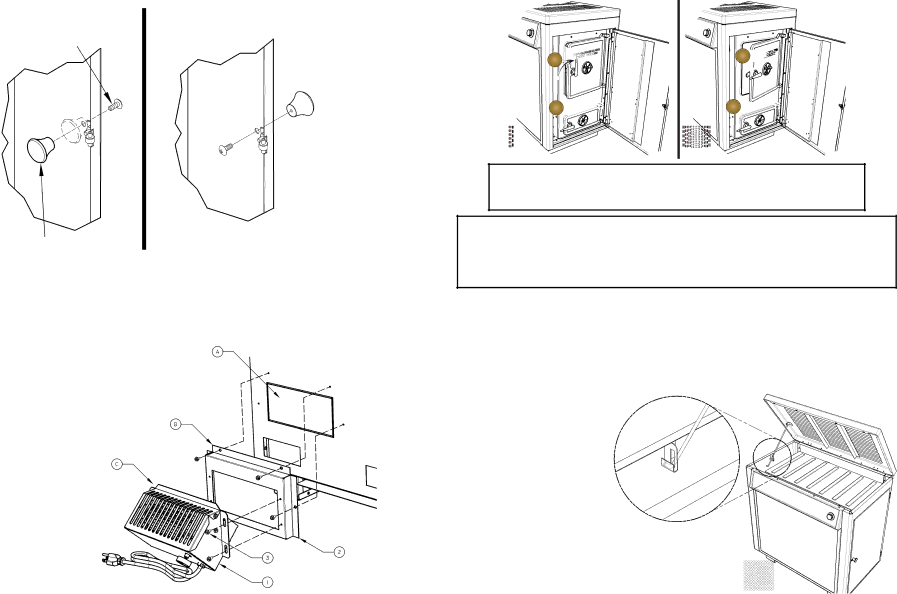
CABINET DOOR KNOB ASSEMBLY
INSTRUCTIONS FOR
The cabinet door knob is mounted on the
FOLLOW THESE INSTRUCTIONS FOR DOOR
Follow these instructions to operate you unit safely when operating the feed door.
inside of the cabinet door to facilitate shipping and must be removed and re- installed for proper usage.
To get the cabinet door open, place your hand under the cabinet frame (right hand side of the cabinet door) and push door out.
KNOB ASSEMBLY:
1.Remove the machine screw and the door knob.
2.Place the knob on the outside of the cabinet door,
1.Turn handle clockwise to the 12 o'clock position (A), pull the door open until you engage the second step (B).
2.Hold the door in that position for ap- proximately 10 seconds.
3.Then to open door, turn the handle counter clockwise to the 9 o'clock position (C) and then continue to pull the door open. (D)
4.To close and latch the door, reverse steps 1 thru 4.
MACHINE SCREW
A![]()
![]()
![]()
![]()
![]()
![]()
![]()
![]()
![]()
![]()
![]()
![]()
![]()
![]()
![]()
![]()
![]()
B ![]()
![]()
![]()
![]()
C ![]()
![]()
![]()
![]()
![]()
![]()
![]()
![]()
D ![]()
![]()
![]()
![]()
CABINET DOOR KNOB
CB36 ROOM BLOWER ASSEMBLY
NOTICE: The CB36 is standard equipment on the |
| |
model B2350B. If you wish to purchase an as- | Caution! Route the Power Supply Cord | |
sembly, you can contact your dealer for details | ||
away from the heat source and out of high | ||
or get it directly from the U.S. Stove Company. | ||
traffic areas. | ||
Installation | ||
|
1. Remove the Panel (A) using tin snips or knock out using a hammer and chisel care- ful not to distort the mounting surface.
2. Attach the Blower Mounting Box (B) to the rear of the unit using four(4) of the supplied #10 screws.
3. Then mount the Blower Assembly with the four(4) remaining screws.
Operation
1. Rotating the rheostat control knob clockwise will turn ON the blower.
2. When turned on, the blower comes on HIGH, then as the knob is rotated clockwise, the blower speed reduces.
3. Rotate the knob
NOTE:
THIS NEW LATCHING MECHANISM MEETS CODES AND PROVIDES MORE
SAFETY FOR THE USER OF THIS STOVE.
NOTE:
DURING OPENING AND CLOSING OF THE FEED AND ASH DOORS OF THIS HEATER, IT MAY SEEM THAT THE FIT OF THE DOOR IS "TOO TIGHT". AS THE HEATER IS FIRED, THE GASKETING "SETTLES" OR "SEATS" ITSELF IN THE DOOR. THE TIGHT FIT AT THE FACTORY AND BEFORE THE HEATER'S INITIAL FIRING IS TO INSURE A GOOD SEAL AFTER THE GASKETING "SETTLES".
HOW TO OPEN THE TOP LID
CAUTION! DO NOT OPEN OR CLOSE THE TOP WHEN THE HEATER IS HOT!
To open, grasp the top at the front or on each | To Close, lift the top until the support rod is out |
corner and lift all the way up until the support | of the cup. Pull the rod forward and lower the |
rod stops the motion. Then gently lower the top | lid closed. |
allowing the support rod to settles in the cup, |
|
holding the top open. |
|
12 | 13 |
