360 DVS Series Direct Vent Fireplaces

Glass Cleaning

It is necessary to periodically clean glass. During start- up, condensation, which is normal, forms on the inside of the glass. This condensation causes lint, dust and other airborne particles to cling to glass surface.

Also initial paint curing may deposit a slight film on the glass. It is therefore recommended glass be cleaned two or three times with a non-ammonia based house- hold cleaner and warm water. The use of fireplace glass cleaner is recommended within the first few weeks of operation.

After the initial cleaning process the glass should be cleaned two or three times during each operating sea- son depending on the environment in the house.

Clean the glass after the first two weeks of operation.

Do not clean the glass when hot.

Do not use an abrasive cleaner.

Do not strike or slam the glass.

Ceramic Refractory Installation

The vertical refractory panels are installed in the unit prior to shipment. For assembly procedures, refer to Figure 39.

1.Unpack the ceramic refractory panels from the car- ton.

Handle the refractory material carefully, the panels are fragile.

2.Place the two end floor refractory panels on the base of the fireplace.

3.Place both side panels along the side of the base.

NOTE: 360DVS2 is the only 360DV unit that is fitted with two (2) end vertical panels, as shown in Figure

39.360DVSL and 360DVSR units are each fitted with one end vertical panel and two side vertical panel. The 360DVS3 has only one end vertical panel.

Vertical Panels in

Place When Shipped


Floor Panels Placed


FP1446

During Installation

Fig. 39 Ceramic panel installation.

Log Installation

Refer to Figures 40 and 41 for log location and align- ment.

Because of the log stack design, these instructions can be followed from either side of the fireplace. To follow these instructions, identify the logs by the number cast into the underside.

For correct operation of the fireplace, the logs must be correctly placed in the sequence described below:

1.Unpack the logs from the shipping carton. The logs are fragile; handle them carefully.

Handle and dispose of plastic bags in which logs were shipped in a safe manner. As with all plastics, they are not toys and should be kept away from infants.

2.Remove both sides of the window frame assembly (where applicable).

3.Place the log rear (B120) on the grate. The square hole located on the underside of the log is to be placed over the center of the grate. The inner end of the log ensures that the bottom hole is located on the pin of the support.

4.Place the log front left (B121) on the grate. The square hole located on the underside of the log is to place over the corner leg of the grate. The inner end of the log ensures the bottom holes are located on the pin of the support.

5.Place the log front right (B122). Once more, the square hole fits over the corner leg of the grate. The inner end of this log maintains a recess on the underside, which locates over the knob on the top of the log front left (B121) to secure the inner end in place.

6.Place the log rear left (B123). The bottom back of the log rests on the grate. The notch at the back of the log locates over the knob on the top of the log rear (B120). The bottom of the log rests on top of the log front left (B121).

7.Place the log bottom left (B124). The log maintains a step on the outer end, which rests against the prong of the grate. The alternate end rests on the side floor refractory panel.

8.Place the log rear right (B125). The log maintains a hole on the underside, which rests over the knob on the top of the log rear (B120). The bottom of the log rests against the side floor refractory panel, and the side rests against the last prong of the grate.

9.Place the log center (B126). The log maintains a hole on the underside, which rests over the knob on the top of the log front right (B122). The alternate end rests against the side floor refractory panel and positions between the two (2) prongs of the grate.

24

10006326

Page 23
Image 23
Vermont Casting 360DVS3, 360DVS2, 360DVSR, 360DVSL warranty Glass Cleaning, Ceramic Refractory Installation, Log Installation

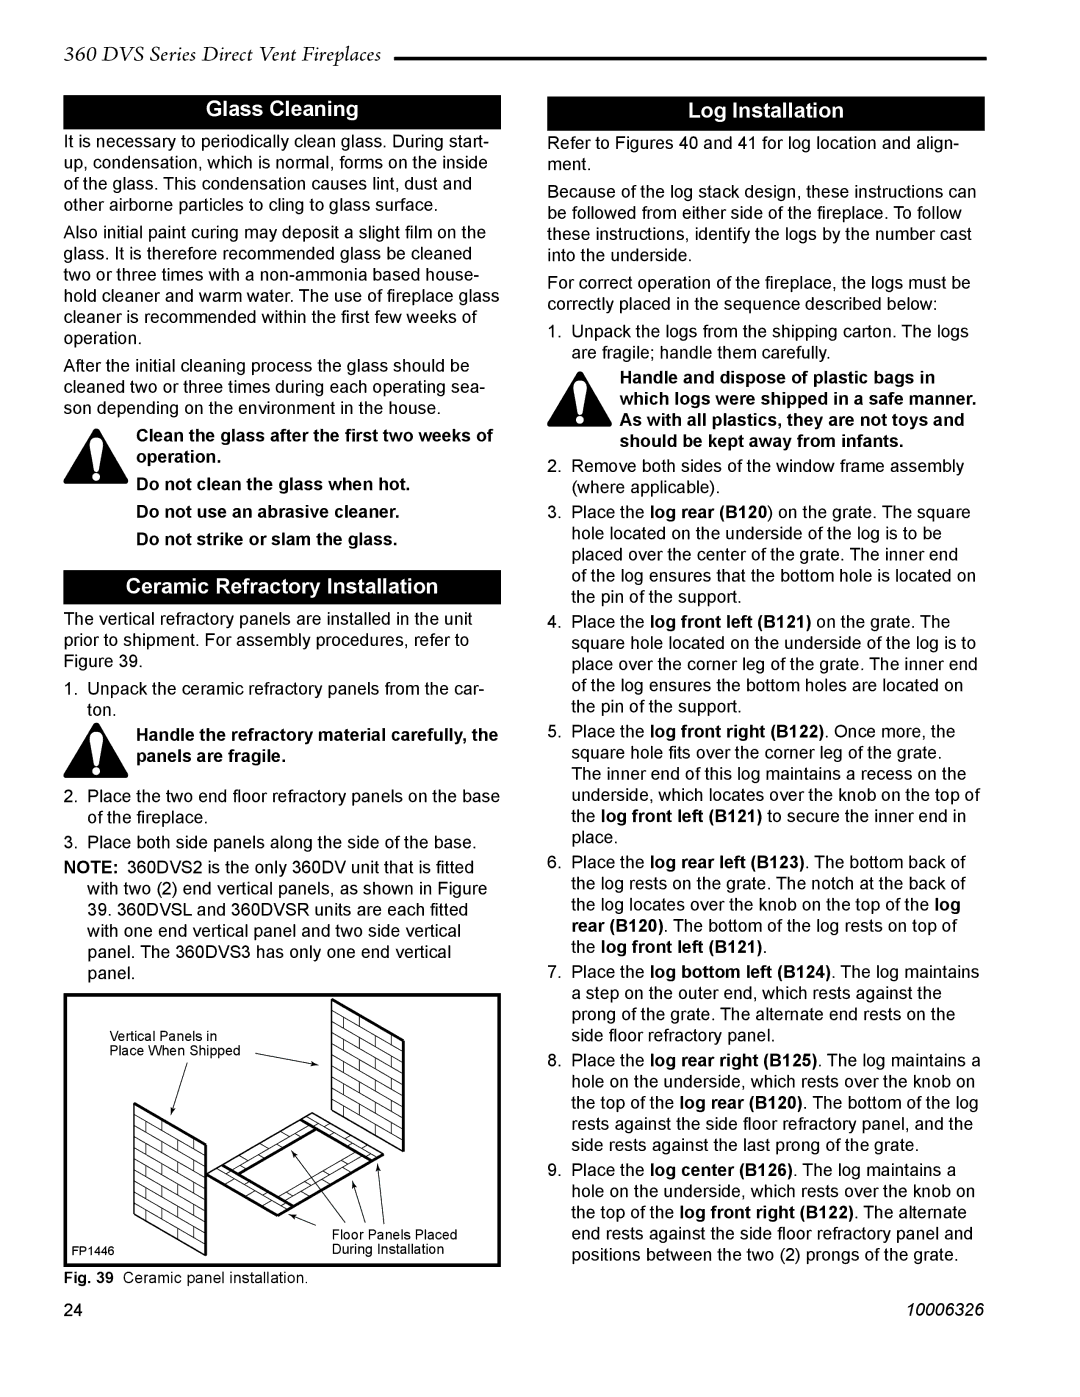
360DVS3, 360DVSL, 360DVSR, 360DVS2 specifications

Vermont Casting offers a range of high-quality gas stoves designed to enhance home heating and add aesthetic appeal. Among their most popular models are the 360DVSR, 360DVSL, 360DVS2, and 360DVS3. Each of these models features unique characteristics and innovative technologies that set them apart in the world of home heating.

The 360DVSR is a versatile choice known for its superb efficiency and heating capabilities. This model employs advanced technology to ensure optimal performance, featuring a heat exchanger that maximizes heat transfer while minimizing fuel consumption. The DVSR boasts a stunning design with a wide viewing area, allowing users to enjoy the mesmerizing flames. Its easy-to-use electronic ignition ensures that lighting the stove is hassle-free, and it also comes with remote control options for added convenience.

The 360DVSL, on the other hand, is tailored for those seeking a more contemporary aesthetic. This model offers the same outstanding energy efficiency as the DVSR but incorporates a sleek, low-profile design that fits seamlessly with modern interiors. Its programmable thermostat allows users to maintain their desired temperature easily, while the dual-fuel capability enables the use of either natural gas or propane. The 360DVSL is perfect for families looking to combine style with function.

For larger spaces, the 360DVS2 and 360DVS3 are optimal choices. These models are designed with a greater heating capacity, making them suitable for larger rooms or open-concept living spaces. The 360DVS2 features a dual burner system that allows for variable heat output, improving comfort in varying conditions. It also includes a realistic log set that adds to the ambiance of the flame.

Meanwhile, the 360DVS3 distinguishes itself with a three-sided design, offering a panoramic view of the fire from multiple angles. This makes it a stunning focal point in any room. Each model is built with durable materials and features Vermont Casting’s renowned craftsmanship, ensuring longevity and reliability.

In summary, Vermont Casting's range of 360DVSR, 360DVSL, 360DVS2, and 360DVS3 gas stoves combine advanced technology, efficiency, and timeless design. Whether you are looking for versatility, contemporary style, or higher heating capacity, these models offer a solution to meet varied needs while enhancing any living space with the warm ambiance of a gas fire.