the upper leg of strut to the bottom section using (1) 1/4”-20 x 1-7/8” carriage bolt and

(1)1/4”–20 flange hex nut. Next secure the bottom leg of strut, the lower slot of the center hinge to the bottom section (1) 1/4”-20 x 1-7/8” carriage bolt and (1) 1/4”–20 flange hex nut, as shown. Repeat same process for other center hinges.


Short

Center hinge

(1) Strut clip

edge

(2) 1/4” - 20 x 1 7/8” Carriage bolts

(if applicable)

(1) Strut clip

and (2) 1/4” - 20 Flange hex nuts


(if applicable)


Long edge

Lower hinge leaf


(1) Strut clip

(2)1/4” - 20 x 1 7/8” Carriage bolts

Short stem track roller

(2)1/4” - 20 Flange hex nuts

Top section

(C)Left hand top fixture


(1) Strut clip

(if applicable)

Long strut


(if applicable)

Long edge

(if applicable)


Typical

Short edge


section


shown

If you have single graduated end hinges, insert a short stem track roller / short stem tandem track roller (if included) into the hinge tube on each side.

If you have double graduated end hinges, insert a long stem track roller / short stem tandem track roller (if included) into the hinge tubes on each side.

Important: When placing track rollers / tandem track roller (if included) into graduated end hinges number 2 and higher, the track roller / tandem track roller (if included) goes into tube furthest away from section.

8

Half Center Hinges

Tools: Power drill, 7/16” Socket driver, Tape measure

Note: If you don’t have half center hinges, then skip this step. Refer to Package Contents / Parts Breakdown, to determine if you have half center hinges.

Using a tape measure, position the half center hinges equally spaced in between the center hinges and equally spaced in between the center hinges and the graduated end hinges. Position the holes of the lower hinge leaf onto the bottom section surface, as shown. Using the half center hinge as a template, drill pilot holes, 1” deep into the bottom section using a 1/8” drill bit.

IMPORTANT: Be extremely careful not to drill thru the section. Only drill 1” deep.

Attach the lower hinge leaf of the center hinge to the bottom section using (2) 1/4”-14 x 1” lag screws. Repeat for other half center hinge(s). Set the bottom section aside.

Place the Intermediate I section face down on a couple of sawhorses or flat clean/ smooth surface. Reference step Graduated End And Center Hinges and this step to attach the long struts (if applicable) and hinges to the top rail of the sections in the same manner as was done for the bottom section. Repeat the same process for the other Intermediate section(s) if applicable, except top section.

Half

Equally spaced

Center

center


hinge

hinge

Lower hinge leaf

Typical section


shown


(2) 1/4” - 14 x 1” Lag screws


Long strut


(if applicable)


9

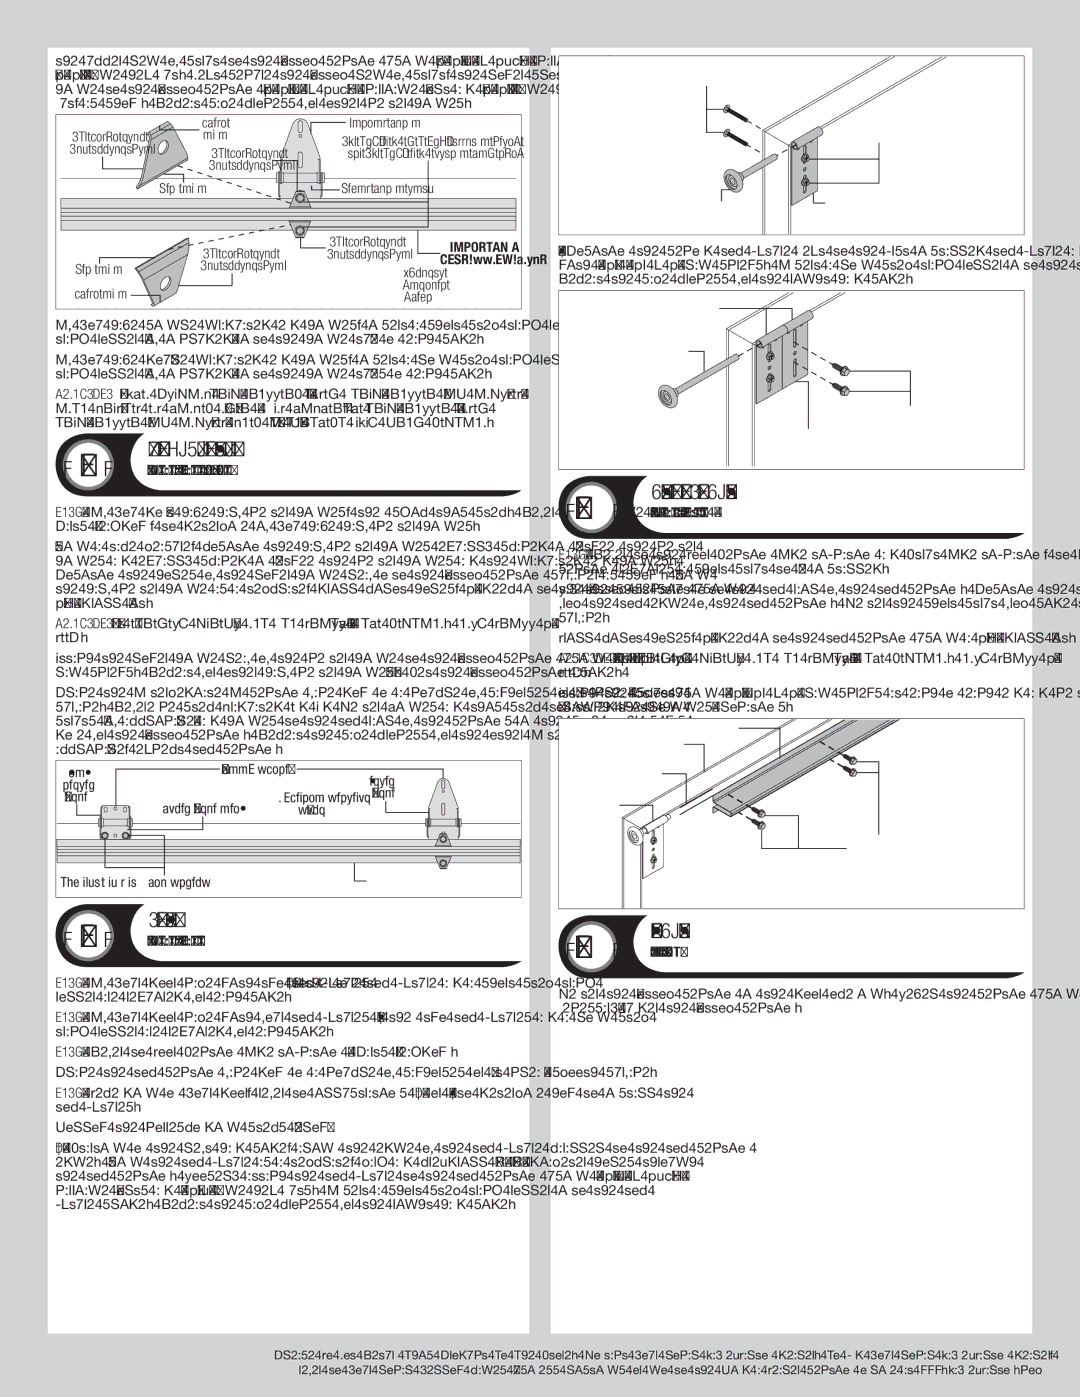
Top Fixtures

Tools: Power drill, 7/16” Socket driver

NOTE: If your door came with two top fixtures (A), then one top fixture and a short stem track roller are required for each side.

NOTE: If your door came with four top fixtures (B), then two top fixtures and a long stem track roller are required for each side.

Note: Refer to Door Section Identification / Parts Breakdown.

Place the top section face down on a couple of sawhorses or flat clean/ smooth surface.

NOTE: Depending on your door, refer to illustrations (A) or (B) to determine how to install the top fixtures.

Follow the corresponding steps below:

(A): Starting on the left hand side, align the edge of the top fixture parallel to the top section edge. Using the top fixture as a template, mark and pre-drill (3) 9/32” diameter holes through the top section. Loosely attach the top fixture to the top section using (2) 1/4”-20 x 1-7/8” carriage bolts and (2) 1/4-20 flange hex nuts. Insert a short stem track roller into the top fixture slide. Repeat the same process for the right hand side.

(B): Position the second top fixture next to the first installed top fixture and loosely attach it with (2) 1/4 – 14 x 1” lag screws. Insert a long stem track roller into the top fixture slides. Repeat the same process for the right hand side.

(2) Top


fixtures

Top section


Long stem


track roller


(2) 1/4” - 14 x 1”


Lag screws


(D) Left hand


top fixture

10

Strutting For Top Section

Tools: Power drill, 7/16” Socket driver

NOTE: Refer to the Door Section Identification and Strut Identification, to determine if the top section requires a short strut to be installed.

Lay the short strut onto the top rail of the top section. Position the top of the strut 3/4” down from the top edge of the top section. Center the short strut from side to side on the section surface.

Drill pilot holes, 1” deep into the top section using a 1/8” drill bit.

IMPORTANT: Be extremely careful not to drill thru the section. Only drill 1” deep.

Attach the strut using (2) 1/4”-14 x 1” lag screws at each on each end and center stile (aligned with hinges) locations.

Short strut

Top section

3/4”

Typical top

fixture

1/4” - 14 x 1”

Lag screws

11

Bottom Section

Tools: Level, Wooden shims (if necessary)

Center the bottom section in the door opening. Level the section using wooden shims (if necessary) under the bottom section.

9

Please Do Not Return This Product To The Store. Contact your local Wayne-Dalton dealer. To find your local Wayne-Dalton dealer,

refer to your local yellow pages business listings or go to the Find a Dealer section online at www.Wayne-Dalton.com

Page 9
Image 9
Wayne-Dalton 45, 43, 40, 47, 42 Half Center Hinges, Top Fixtures, Bottom Section, Follow the corresponding steps below

45, 42, 47, 40, 43 specifications

Wayne-Dalton is renowned for its innovative approach to garage doors, and the series 45, 43, 42, 47, and 40 exemplify their commitment to quality and performance. Each model is engineered with unique features that cater to both aesthetic preferences and functional requirements, ensuring homeowners find the perfect match for their needs.

The Wayne-Dalton 45 model stands out with its distinctive design, offering a variety of panels and styles that can complement different architectural themes. This model utilizes durable materials such as steel and aluminum, providing excellent resistance against the elements while maintaining an attractive appearance. Its insulated version incorporates polyurethane foam, which effectively enhances energy efficiency, improving home comfort.

The 43 series is characterized by its robust construction and design flexibility. With multiple color options and textures, homeowners can easily personalize their garage doors. This model also highlights Wayne-Dalton’s innovative TorqueMaster® torsion spring system, which simplifies installation and enhances safety by keeping the spring contained within a steel tube.

The 42 model showcases a contemporary aesthetic, featuring sleek lines and modern designs that appeal to today’s homeowners. Constructed with high-quality materials, the 42 model offers excellent thermal insulation properties, reducing energy costs and increasing overall home efficiency. Its advanced weather sealing system prevents air and water infiltration, ensuring the interior remains comfortable regardless of external conditions.

The Wayne-Dalton 47 is designed for those seeking a more rustic or traditional look. This model mimics the appearance of wood with its faux-wood options while providing the durability of steel. Its insulation technology allows for significant energy savings, making it a sensible choice for regions with extreme weather conditions.

Lastly, the 40 model is recognized for its simplicity and reliability. It combines functionality with affordability, making it ideal for homeowners seeking an economical option without sacrificing quality. Its design allows for a smooth operation, and its long-lasting materials ensure that it withstands the test of time.

In summary, the Wayne-Dalton 45, 43, 42, 47, and 40 models showcase a variety of designs, technologies, and characteristics that cater to different homeowner preferences. From energy efficiency and security features to aesthetic choices, Wayne-Dalton continues to lead the market in garage door solutions. Whether prioritizing style, durability, or value, there is a Wayne-Dalton model that fits every homeowner's needs.