WayneWood Doors Models: 40,42,43,45,47

START HERE

IMPORTANT! READ IMPORTANT SAFETY NOTICES AND REFER TO INSERT SHEET INSTRUC-

WayneWood Doors Models: 40,42,43,45,47

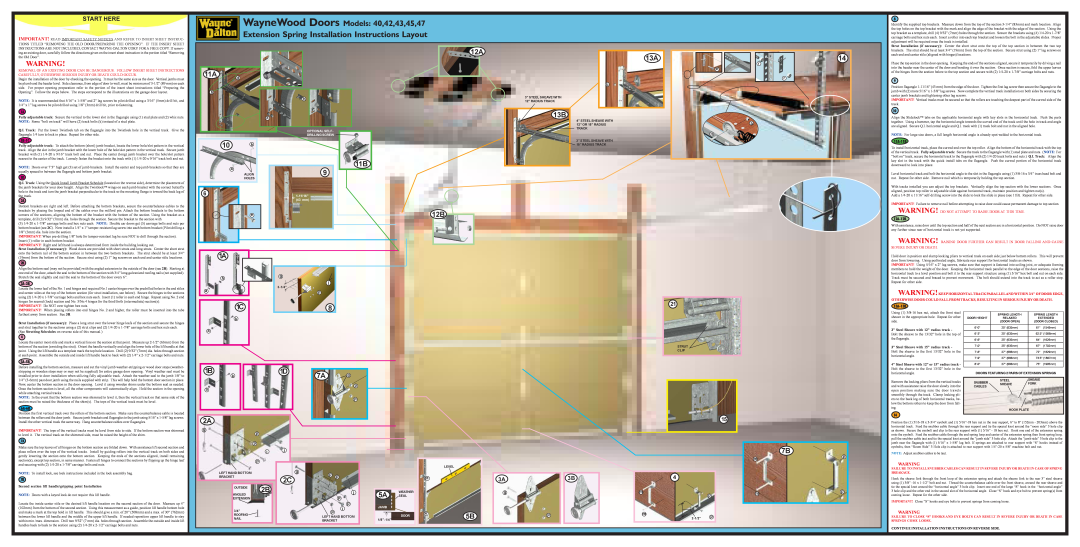
Extension Spring Installation Instructions Layout

8

Identify the supplied top brackets. Measure down from the top of the section 3-1/4” (83mm) and mark location. Align the top holes on the top bracket with the mark and align the edge of the bracket with the edge of the section. Using the top bracket as a template, drill (4) 9/32” (7mm) holes through the section. Secure the brackets using (4) 1/4-20 x 1-7/8” carriage bolts and hex nuts each. Insert a roller into each top bracket and loosen the bolt in the adjustable slides. Proper adjustment will be required once the track is installed.

TIONS TITLED “REMOVING THE OLD DOOR/PREPARING THE OPENING”. IF THE INSERT SHEET INSTRUCTIONS ARE NOT INCLUDED, CONTACT WAYNE-DALTON CORP. FOR A FREE COPY. If remov- ing an existing door, carefully follow the directions given on the insert sheet instruction in the portion titled “Removing the Old Door”.

WARNING!

REMOVAL OF AN EXISTING DOOR CAN BE DANGEROUS. FOLLOW INSERT SHEET INSTRUCTIONS CAREFULLY, OTHERWISE SERIOUS INJURY OR DEATH COULD OCCUR.

Begin the installation of the door by checking the opening. It must be the same size as the door. Vertical jambs must be plumb and the header level. Side clearance, from edge of door to wall, must be minimum of 3-1/2” (89 mm) on each side. For proper opening preparation refer to the portion of the insert sheet instructions titled “Preparing the Opening”. Follow the steps below. The steps correspond to the illustrations on the garage door layout.

NOTE: It is recommended that 5/16” x 1-5/8” and 2” lag screws be pilot drilled using a 3/16” (5mm) drill bit, and 1/4” x 1” lag screws be pilot drilled using 1/8” (3mm) drill bit, prior to fastening.

1A

Fully adjustable track: Secure the vertical to the lower slot in the flagangle using (1) stud plate and (2) whiz nuts.

NOTE: Some “bolt on track” will have (2) track bolts (k) instead of a stud plate.

Q.I. Track: Put the lower Twistlock tab on the flagangle into the Twistlock hole in the vertical track. Give the flagangle 1/4 turn to lock in place. Repeat for other side.

1B-1C

Fully adjustable track: To attach the bottom (short) jamb bracket, locate the lower hole/slot pattern in the vertical track. Align the slot in the jamb bracket with the lower hole of the hole/slot pattern in the vertical track. Secure jamb bracket with (1) 1/4-20 x 9/16” track bolt and nut. Place the center (long) jamb bracket over the hole/slot pattern nearest to the center of the track. Loosely fasten the bracket onto the track with (1) 1/4-20 x 9/16” track bolt and nut.

NOTE: Doors over 7’3” high get (3) set of jamb brackets. Install the center and top jamb brackets so that they are equally spaced in between the flagangle and bottom jamb bracket.

1D

Q.I. Track: Using the Quick Install Jamb Bracket Schedule (located on the reverse side), determine the placement of the jamb brackets for your door height. Align the Twistlock™ wings on each jamb bracket with the correct butterfly hole in the track and turn the jamb bracket perpendicular to the track so the mounting flange is toward the back leg of the track.

2A

Bottom brackets are right and left. Before attaching the bottom brackets, secure the counterbalance cables to the brackets by placing the looped end of the cables over the milford pin. Attach the bottom brackets to the bottom corners of the sections, aligning the bottom of the bracket with the bottom of the section. Using the bracket as a template, drill (3) 9/32” (7mm) dia. holes through the section. Secure the bracket to the section with

(3) 1/4-20 x 1-7/8” carriage bolts and hex nuts each. NOTE: Double car doors get (5) carriage bolts and nuts per

bottom bracket (see 2C). Now install a 1/4” x 1” tamper-resistant lag screw into each bottom bracket (Pilot drilling a

1/8” (3mm) dia. hole into the section.

IMPORTANT! When pre-drilling 1/8” hole for tamper-resistant lag be sure NOT to drill through the section).

Insert (1) roller in each bottom bracket.

IMPORTANT! Right and left hand is always determined from inside the building looking out.

Strut Installation (if necessary): Wood doors are provided with short struts and long struts. Center the short strut

11A


d


b


h


a


OPTIONAL SELF-


10


DRILLING SCREW


k


a

11B


9


ALIGN


HOLES


6


1-11/16”


(43 mm)


e


12A

12B

3” STEEL SHEAVE WITH 12” RADIUS TRACK

13B

13A

b

4” STEEL SHEAVE WITH 12” OR 15” RADIUS TRACK

3” STEEL SHEAVE WITH 15” RADIUS TRACK

e

n

r

r

b

14

Strut Installation (if necessary): Center the short strut onto the top of the top section in between the two top brackets. The strut should be at least 3/4” (19mm) from the top of the section. Secure strut using (2) 1” lag screws on each end and center stile (aligned with hinges) locations.

Place the top section in the door opening. Keeping the ends of the sections aligned, secure it temporarily by driving a nail into the header near the center of the door and bending it over the section. Once section is secure, fold the upper leaves of the hinges from the section below to the top section and secure with (2) 1/4-20 x 1-7/8” carriage bolts and nuts.

9

Position flagangle 1-11/16” (43 mm) from the edge of the door. Tighten the first lag screw then secure the flagangle to the jamb with (2) more 5/16” x 1-5/8” lag screws. Now complete the vertical track installation on both sides by securing the center jamb brackets and tightening other lag screws.

IMPORTANT! Vertical tracks must be secured so that the rollers are touching the deepest part of the curved side of the track.

10

Align the Slidelock™ tabs on the applicable horizontal angle with key slots in the horizontal track. Push the parts together. Using a hammer, tap the horizontal angle towards the curved end of the track until the hole in track and angle are aligned. Secure Q.I. horizontal angle and Q.I. track with (1) track bolt and nut in the aligned hole.

NOTE: For large size doors, a full length horizontal angle is already spot welded to the horizontal track.

11A-11B

To install horizontal track, place the curved end over the top roller. Align the bottom of the horizontal track with the top of the vertical track. Fully adjustable track: Secure the track to the flagangle with (1) stud plate and nuts. (NOTE: For “bolt on” track, secure the horizontal track to the flagangle with (2) 1/4-20 track bolts and nuts.) Q.I. Track: Align the key slot in the track with the quick install tabs on the flagangle. Push the curved portion of the horizontal track downward to lock into place.

Level horizontal track and bolt the horizontal angle to the slot in the flagangle using (1) 3/8-16 x 3/4” truss head bolt and nut. Repeat for other side. Remove nail which is temporarily holding the top section.

With tracks installed you can adjust the top brackets. Vertically align the top section with the lower sections. Once aligned, position top roller in adjustable slide against horizontal track, maintain position and tighten nut(s).

Add a 1/4-20 x 11/16” self-drilling screw into the slide to lock the slide in place (see 11B). Repeat for other side.

IMPORTANT! Failure to remove nail before attempting to raise door could cause permanent damage to top section.

WARNING! DO NOT ATTEMPT TO RAISE DOOR AT THIS TIME.

12A-12B

With assistance, raise door until the top section and half of the next section are in a horizontal position. Do NOT raise door any further since rear of horizontal track is not yet supported.

WARNING! RAISING DOOR FURTHER CAN RESULT IN DOOR FALLING AND CAUSE SEVERE INJURY OR DEATH.

onto the bottom rail of the bottom section in between the two bottom brackets. The strut should be at least 3/4”

(19mm) from the bottom of the section. Secure strut using (2) 1” lag screws on each end and center stile locations.

2B

Align the bottom seal (may not be provided) with the angled extension to the outside of the door (see 2B). Starting at one end of the door, attach the seal to the bottom of the section with 3/4” long galvanized roofing nails (not supplied). Stretch the seal slightly and nail the seal to the bottom of the door every 6”.

3A-3B

Locate the lower leaf of the No. 1 end hinges and required No.1 center hinges over the predrilled holes in the end stiles and center stiles at the top of the bottom section (for strut installation, see below). Secure the hinges to the sections using (2) 1/4-20 x 1-7/8” carriage bolts and hex nuts each. Insert (1) roller in each end hinge. Repeat using No. 2 end hinges for second (lock) section and No. 3/No.4 hinges for the third/forth (intermediate) section(s).

1A

h

a

g

j

3-1/4”

p

21

Hold door in position and clamp locking pliers to vertical track on each side just below bottom rollers. This will prevent door from lowering. Using perforated angle, fabricate rear support for horizontal tracks as shown.

IMPORTANT! Using 5/16” x 2” lag screws, make sure that support is fastened into ceiling joist, or adequate framing members to hold the weight of the door. Keeping the horizontal track parallel to the edge of the door sections, raise the horizontal track to a level position and bolt it to the rear support structure using (1) 5/16” hex bolt and nut on each side. Track must be secured and braced to prevent movement. The bolt should extend into the track to act as a roller stop. Repeat for other side.

WARNING!KEEP HORIZONTALTRACK PARALLELAND WITHIN 3/4” OF DOOR EDGE, OTHERWISE DOOR COULD FALL FROM TRACKS, RESULTING IN SERIOUS INJURY OR DEATH.

IMPORTANT! Do NOT over tighten hex nuts.

IMPORTANT! When placing rollers into end hinges No. 2 and higher, the roller must be inserted into the tube furthest away from section. See 3B.

Strut Installation (if necessary): Place a long strut over the lower hinge leafs of the section and secure the hinges and strut together to the sections using a (2) strut clips and (2) 1/4-20 x 1-7/8” carriage bolts and hex nuts each. (See Strutting Schedules on reverse side of this manual.)

4

Locate the center most stile and mark a vertical line on the section at that point. Measure up 2-1/2” (63mm) from the bottom of the section (avoiding the strut). Orient the handle vertically and align the lower hole of the lift handle at that point. Using the lift handle as a template mark the top hole location. Drill (2) 9/32” (7mm) dia. holes through section at each point. Assemble the outside and inside lift handle back to back with (2) 1/4” x 2-1/2” carriage bolts and nuts.

1C

k

a

8

STRUT

CLIP

13A-13B

Using (1) 3/8-16 hex nut, attach the front steel sheave in the appropriate hole. Repeat for other side.

3” Steel Sheave with 12” radius track -

Bolt the sheave to the 13/32” hole in the top of the flagangle.

3” Steel Sheave with 15” radius track -

Bolt the sheave to the first 13/32” hole in the horizontal angle.


SPRING LENGTH

SPRING LENGTH

DOOR HEIGHT

RELAXED

EXTENDED


(DOOR OPEN)

(DOOR CLOSED)


6'-0"

25" (635mm)

61"

(1549mm)


6'-3"

25" (635mm)

62.5" (1588mm)


6'-6"

25" (635mm)

64"

(1626mm)


7'-0"

25" (635mm)

67"

(1702mm)


7'-6"

27" (686mm)

72"

(1829mm)


7'-9"

27" (686mm)

73.5" (1867mm)

5A-5B

Before installing the bottom section, measure and cut the vinyl jamb weather-stripping or wood door stops (weather- stripping or wooden stops may or may not be supplied) for entire garage door opening. Vinyl weather seal must be installed prior to door installation when utilizing fully adjustable track. Attach the weather seal to the jamb 1/8” to 1/4” (3-6mm) past door jamb using the nails supplied with strip. This will help hold the bottom door section in place. Now, center the bottom section in the door opening. Level it using wooden shims under the bottom seal as needed. Once the bottom section is level, all the other components will automatically align. Hold the section in the opening while attaching vertical tracks.

NOTE: In the event that the bottom section was shimmed to level it, then the vertical track on that same side of the section must be raised the thickness of the shim(s). The tops of the vertical track must be level.

6A-6B

Position the first vertical track over the rollers of the bottom section. Make sure the counterbalance cable is located between the rollers and the door jamb. Secure jamb brackets and flagangles to the jamb using 5/16” x 1-5/8” lag screws.

1B

1D

7A

g

k


a


p


p

2A


4” Steel Sheave with 12” or 15” radius track -

Bolt the sheave to the first 13/32” hole in the horizontal angle.

Remove the locking pliers from the vertical tracks and with assistance raise the door slowly into the open position making sure the door travels smoothly through the track. Clamp locking pli- ers to the back leg of both horizontal tracks, be- low the bottom rollers to keep the door from fall- ing.

14

8'-0"

27" (686mm)

75" (1905mm)


DOORS FEATURING 2 PAIRS OF EXTENSION SPRINGS


SNUBBER

STEEL

SHEAVE


SHEAVE

FORK


CABLES


HOOK PLATE

Install the other vertical track the same way. Hang counterbalance cables over flagangles.

IMPORTANT! The tops of the vertical tracks must be level from side to side. If the bottom section was shimmed to level it. The vertical track on the shimmed side, must be raised the height of the shim.

7A

Make sure the top leaves of all hinges on the bottom section are folded down. With assistance lift second section and place rollers over the tops of the vertical tracks. Install by guiding rollers into the vertical track on both sides and gently lowering the section onto the bottom section. Keeping the ends of the sections aligned, install remaining section(s), except top section, in same manner. Fasten all hinges to connect the sections by flipping up the hinge leaf and securing with (2) 1/4-20 x 1-7/8” carriage bolts and nuts.

NOTE: To install lock, see lock instructions included in the lock assembly bag.

7B

Second section lift handle/gripping point Installation

NOTE: Doors with a keyed lock do not require this lift handle.

Locate the inside center stile or the desired lift handle location on the second section of the door. Measure up 4” (102mm) from the bottom of the second section. Using this measurement as a guide, position lift handle bottom hole and make a mark at the top hold in lift handle. This should give a min. of 20” (508mm) and a max. of 30” (762mm) between the lower lift handle and the middle of the upper lift handle. If needed reposition upper lift handle to stay within min./max. dimension. Drill two 9/32” (7 mm) dia. holes through section. Assemble the outside and inside lift handles back to back to the section using (2) 1/4-20 x 2-1/2” carriage bolts and nuts.

g

p


p


i

j


p


LEFT HAND BOTTOM


g

p

p


BRACKET


2C


2B


OUTSIDE


j


WEATHER

ANGLED


5A


p

SEAL

EXTENSION


p

JAMB


3/4”


p

i


ROOFING


LEFT HAND BOTTOM


DOOR

NAIL


BRACKET

1/8”-1/4”


LEVEL

e


e

5B


3A

3B

g


p


4


m


p


m

2-1/2”

p


7B

m

p


m

p


Position the (1) 5/16-18 x 3-3/4” eyebolt and (1) 5/16”-18 hex nut in the rear support, 6” to 8” (152mm - 203mm) above the horizontal track. Feed the snubber cable through the rear support and tie the special knot around the “room side” 3 hole clip as shown. Secure the eyebolt and clip to the rear support with (1) 5/16” - 18 hex nut. Hook one end of the extension spring onto the eyebolt. Feed the snubber cable through the end spring loop and center of the extension spring then front spring loop, pull the snubber cable taut and tie the special knot around the “jamb side” 3 hole clip. Attach the “jamb side” 3 hole clip to the jamb near the flagangle with (1) 5/16” x 1-5/8” lag bolt. If springs are attached to rear support with “S” hooks instead of eyebolts, then “Room Side” 3 Hole clip is attached to rear support with 1/4”-20 x 5/8” machine bolt and nut.

NOTE: Adjust snubber cables to be taut.

WARNING

FAILURE TO INSTALL SNUBBER CABLES CAN RESULT IN SEVERE INJURY OR DEATH IN CASE OF SPRING BREAKAGE.

Hook the sheave fork through the front loop of the extension spring and attach the sheave fork to the rear 3” steel sheave using (1) 3/8” -16 x 1-1/2” bolt and nut. Thread the counterbalance cable over the front sheave, around the rear sheave and tie the special knot around the “horizontal angle” 3 hole clip. Insert one end of the large “S” hook in the “horizontal angle” 3 hole clip and the other end in the second slot of the horizontal angle. Close “S” hook and eye bolt to prevent spring(s) from coming loose. Repeat for the other side.

IMPORTANT! Close “S” hooks and eye bolts to prevent springs from coming loose.

WARNING

FAILURE TO CLOSE “S” HOOKS AND EYE BOLTS CAN RESULT IN SEVERE INJURY OR DEATH IN CASE SPRINGS COME LOOSE.

CONTINUE INSTALLATION INSTRUCTIONS ON REVERSE SIDE.

Page 1
Image 1
Wayne-Dalton installation instructions WayneWood Doors Models 40,42,43,45,47

45, 42, 47, 40, 43 specifications

Wayne-Dalton is renowned for its innovative approach to garage doors, and the series 45, 43, 42, 47, and 40 exemplify their commitment to quality and performance. Each model is engineered with unique features that cater to both aesthetic preferences and functional requirements, ensuring homeowners find the perfect match for their needs.

The Wayne-Dalton 45 model stands out with its distinctive design, offering a variety of panels and styles that can complement different architectural themes. This model utilizes durable materials such as steel and aluminum, providing excellent resistance against the elements while maintaining an attractive appearance. Its insulated version incorporates polyurethane foam, which effectively enhances energy efficiency, improving home comfort.

The 43 series is characterized by its robust construction and design flexibility. With multiple color options and textures, homeowners can easily personalize their garage doors. This model also highlights Wayne-Dalton’s innovative TorqueMaster® torsion spring system, which simplifies installation and enhances safety by keeping the spring contained within a steel tube.

The 42 model showcases a contemporary aesthetic, featuring sleek lines and modern designs that appeal to today’s homeowners. Constructed with high-quality materials, the 42 model offers excellent thermal insulation properties, reducing energy costs and increasing overall home efficiency. Its advanced weather sealing system prevents air and water infiltration, ensuring the interior remains comfortable regardless of external conditions.

The Wayne-Dalton 47 is designed for those seeking a more rustic or traditional look. This model mimics the appearance of wood with its faux-wood options while providing the durability of steel. Its insulation technology allows for significant energy savings, making it a sensible choice for regions with extreme weather conditions.

Lastly, the 40 model is recognized for its simplicity and reliability. It combines functionality with affordability, making it ideal for homeowners seeking an economical option without sacrificing quality. Its design allows for a smooth operation, and its long-lasting materials ensure that it withstands the test of time.

In summary, the Wayne-Dalton 45, 43, 42, 47, and 40 models showcase a variety of designs, technologies, and characteristics that cater to different homeowner preferences. From energy efficiency and security features to aesthetic choices, Wayne-Dalton continues to lead the market in garage door solutions. Whether prioritizing style, durability, or value, there is a Wayne-Dalton model that fits every homeowner's needs.