5

Attaching Counterbalance Cables


to Bottom Brackets


Tools Needed:

IMPORTANT: Right and left hand is

always determined from inside the


Pliers

garage looking out.


NOTE: For door section identification see page


4.


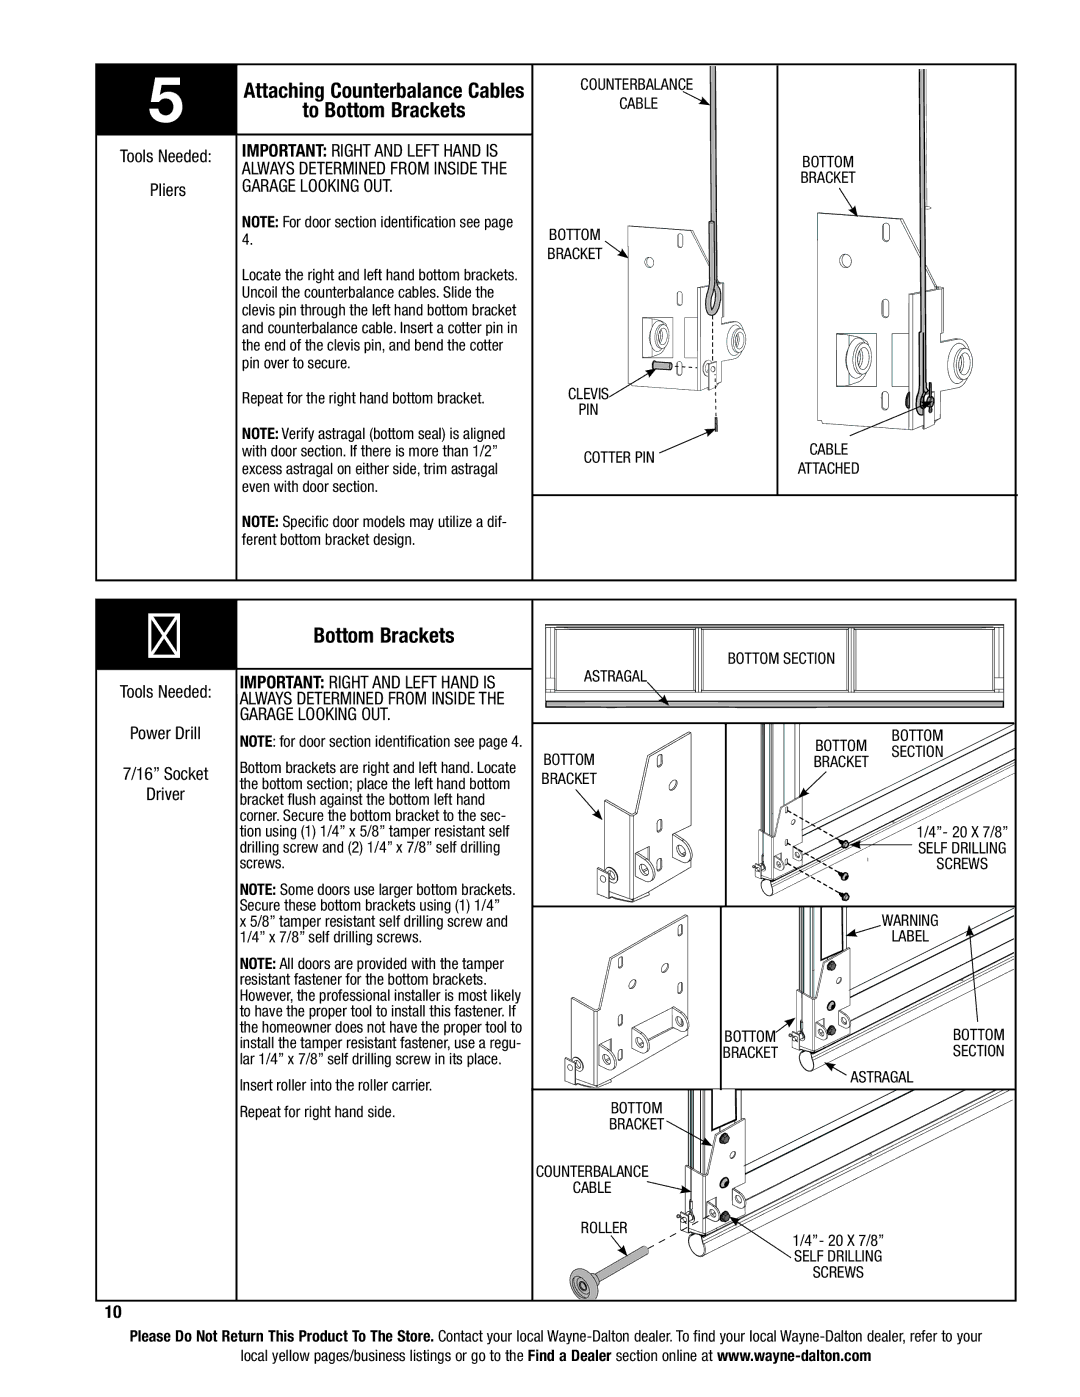
Locate the right and left hand bottom brackets.


Uncoil the counterbalance cables. Slide the


clevis pin through the left hand bottom bracket


and counterbalance cable. Insert a cotter pin in


the end of the clevis pin, and bend the cotter


pin over to secure.


Repeat for the right hand bottom bracket.


NOTE: Verify astragal (bottom seal) is aligned


with door section. If there is more than 1/2”


excess astragal on either side, trim astragal


even with door section.


NOTE: Specific door models may utilize a dif-


ferent bottom bracket design.


counterbalance cable

Bottom

Bracket

clevis pin

cotter PIN

bottom bracket

cable

attached

6

Bottom Brackets


BOTTOM SECTION


Tools Needed:

IMPORTANT: RIGHT AND LEFT HAND IS

astragal


ALWAYS DETERMINED FROM INSIDE THE


Power Drill

GARAGE LOOKING OUT.


NOTE: for door section identification see page 4.


Bottom

Bottom


Bottom

section


Bottom brackets are right and left hand. Locate

Bracket

7/16” Socket


Bracket


the bottom section; place the left hand bottom


Driver


bracket flush against the bottom left hand


corner. Secure the bottom bracket to the sec-


tion using (1) 1/4” x 5/8” tamper resistant self


1/4”- 20 x 7/8”


drilling screw and (2) 1/4” x 7/8” self drilling


self drilling


screws.


screws


NOTE: Some doors use larger bottom brackets.


Secure these bottom brackets using (1) 1/4”


warning


x 5/8” tamper resistant self drilling screw and


1/4” x 7/8” self drilling screws.


label


NOTE: All doors are provided with the tamper


resistant fastener for the bottom brackets.


However, the professional installer is most likely


to have the proper tool to install this fastener. If


the homeowner does not have the proper tool to

Bottom


Bottom


install the tamper resistant fastener, use a regu-


Bracket


section


lar 1/4” x 7/8” self drilling screw in its place.


astragal


Insert roller into the roller carrier.


Repeat for right hand side.

Bottom


Bracket


counterbalance


cable


roller

1/4”- 20 x 7/8”


self drilling


screws


10

Please Do Not Return This Product To The Store. Contact your local Wayne-Dalton dealer. To find your local Wayne-Dalton dealer, refer to your

local yellow pages/business listings or go to the Find a Dealer section online at www.wayne-dalton.com

Page 10
Image 10
Wayne-Dalton 8800 To Bottom Brackets, Important Right and left hand is, Always determined from inside, Garage looking out

8800 specifications

The Wayne-Dalton 8800 is a premium insulated steel garage door designed for both residential and commercial applications. Renowned for its superior durability and energy efficiency, this model stands out as an ideal choice for homeowners and businesses looking to enhance their property’s aesthetic and functional characteristics.

One of the primary features of the Wayne-Dalton 8800 door is its construction. The door is constructed with a robust steel frame filled with high-density polystyrene insulation. This insulation provides a remarkable thermal performance, helping to reduce energy costs and maintain comfortable temperatures throughout the year. With an R-value of up to 14.5, the 8800 door ensures that indoor environments remain stable, minimizing the heat loss or gain typical of garage spaces.

In terms of design, the 8800 model is available in various styles and colors, allowing homeowners to customize their doors to match their personal taste and architectural preferences. This door is typically offered in a smooth finish or with a wood-grain texture, providing options for both modern and classic aesthetics. Additionally, the door features steel construction with a sophisticated exterior, ensuring it withstands the test of time while looking great.

Safety is paramount in the Wayne-Dalton 8800 design. Equipped with safety features such as pinch-resistant finger protection, the door helps prevent injuries, making it a family-friendly choice. Its advanced torsion spring system, which is designed for longevity, further enhances safety, ensuring smooth operation and reducing the risk of accidents.

Additionally, the Wayne-Dalton 8800 incorporates innovative technology to improve convenience and usability. The door can be fitted with various automatic opening mechanisms, including Wi-Fi-enabled garage door openers that allow for remote access via smartphones. This technology not only adds an element of convenience but also enhances security, allowing homeowners to monitor access and control their garage door from anywhere.

Overall, the Wayne-Dalton 8800 combines practical features, advanced technology, and customizable design, making it an excellent choice for those seeking a reliable and stylish garage door solution. With its focus on energy efficiency, safety, and overall functionality, it remains a leading option in the market for both residential and commercial use.