7

Hinges


Tools Needed:

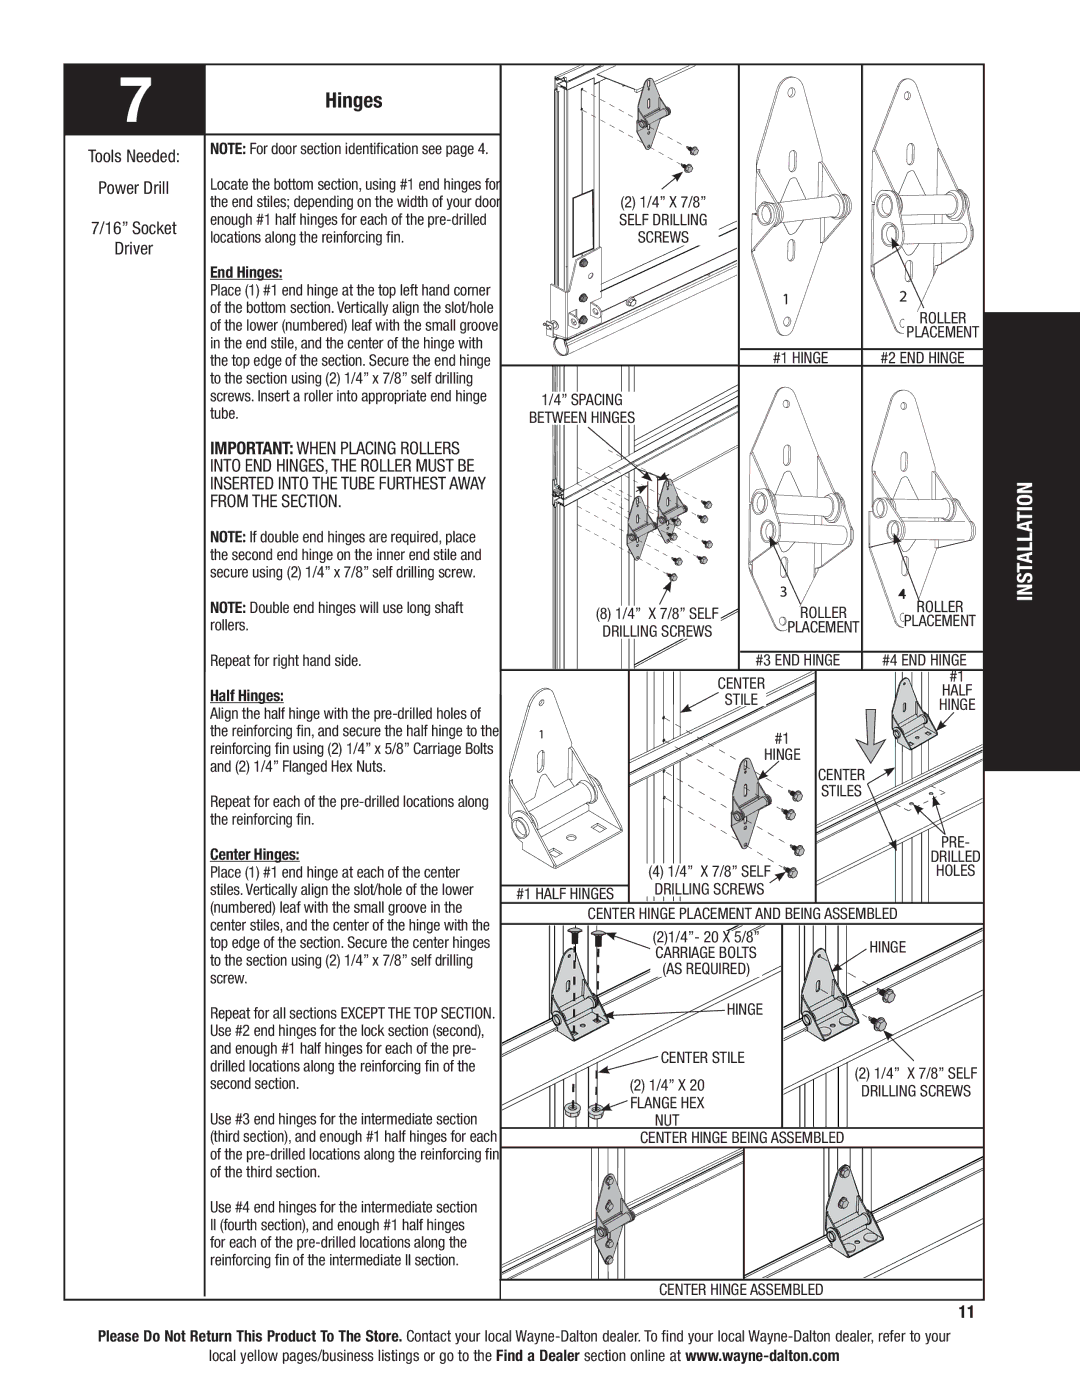
NOTE: For door section identification see page 4.


Power Drill

Locate the bottom section, using #1 end hinges for


the end stiles; depending on the width of your door

7/16” Socket

enough #1 half hinges for each of the pre-drilled

locations along the reinforcing fin.

Driver


End Hinges:

Place (1) #1 end hinge at the top left hand corner of the bottom section. Vertically align the slot/hole of the lower (numbered) leaf with the small groove in the end stile, and the center of the hinge with the top edge of the section. Secure the end hinge to the section using (2) 1/4” x 7/8” self drilling screws. Insert a roller into appropriate end hinge tube.

IMPORTANT: WHEN PLACING ROLLERS

INTO END HINGES, THE ROLLER MUST BE

INSERTED INTO THE TUBE FURTHEST AWAY

FROM THE SECTION.

NOTE: If double end hinges are required, place the second end hinge on the inner end stile and secure using (2) 1/4” x 7/8” self drilling screw.

NOTE: Double end hinges will use long shaft rollers.

Repeat for right hand side.

Half Hinges:

Align the half hinge with the pre-drilled holes of the reinforcing fin, and secure the half hinge to the reinforcing fin using (2) 1/4” x 5/8” Carriage Bolts and (2) 1/4” Flanged Hex Nuts.

Repeat for each of the pre-drilled locations along the reinforcing fin.

Center Hinges:

Place (1) #1 end hinge at each of the center stiles. Vertically align the slot/hole of the lower (numbered) leaf with the small groove in the center stiles, and the center of the hinge with the top edge of the section. Secure the center hinges to the section using (2) 1/4” x 7/8” self drilling screw.

Repeat for all sections EXCEPT THE TOP SECTION. Use #2 end hinges for the lock section (second), and enough #1 half hinges for each of the pre- drilled locations along the reinforcing fin of the second section.

Use #3 end hinges for the intermediate section (third section), and enough #1 half hinges for each of the pre-drilled locations along the reinforcing fin of the third section.

Use #4 end hinges for the intermediate section

II(fourth section), and enough #1 half hinges for each of the pre-drilled locations along the reinforcing fin of the intermediate II section.

(2)1/4” x 7/8” self drilling

screws

roller

placement

#1 Hinge

#2 End Hinge

1/4” Spacing

between hinges

(8) 1/4” x 7/8” self

roller

roller

placement

drilling screws

placement


#3 End Hinge

#4 End Hinge


center


#1


Half


stile


hinge


#1


hinge


center


stiles


Pre-


Drilled


(4) 1/4” x 7/8” self


holes

#1 Half hinges

drilling screws


center hinge placement and being assembled


(2)1/4”- 20 x 5/8”


hinge


Carriage Bolts


(as required)


hinge


center stile

(2) 1/4” x 7/8” self

(2) 1/4” x 20drilling screws flange hex

nut

center hinge being assembled

center hinge assembled

INSTALLATION

11

Please Do Not Return This Product To The Store. Contact your local Wayne-Dalton dealer. To find your local Wayne-Dalton dealer, refer to your

local yellow pages/business listings or go to the Find a Dealer section online at www.wayne-dalton.com

Page 11
Image 11
Wayne-Dalton 8800 installation instructions Hinges, Important When Placing Rollers

8800 specifications

The Wayne-Dalton 8800 is a premium insulated steel garage door designed for both residential and commercial applications. Renowned for its superior durability and energy efficiency, this model stands out as an ideal choice for homeowners and businesses looking to enhance their property’s aesthetic and functional characteristics.

One of the primary features of the Wayne-Dalton 8800 door is its construction. The door is constructed with a robust steel frame filled with high-density polystyrene insulation. This insulation provides a remarkable thermal performance, helping to reduce energy costs and maintain comfortable temperatures throughout the year. With an R-value of up to 14.5, the 8800 door ensures that indoor environments remain stable, minimizing the heat loss or gain typical of garage spaces.

In terms of design, the 8800 model is available in various styles and colors, allowing homeowners to customize their doors to match their personal taste and architectural preferences. This door is typically offered in a smooth finish or with a wood-grain texture, providing options for both modern and classic aesthetics. Additionally, the door features steel construction with a sophisticated exterior, ensuring it withstands the test of time while looking great.

Safety is paramount in the Wayne-Dalton 8800 design. Equipped with safety features such as pinch-resistant finger protection, the door helps prevent injuries, making it a family-friendly choice. Its advanced torsion spring system, which is designed for longevity, further enhances safety, ensuring smooth operation and reducing the risk of accidents.

Additionally, the Wayne-Dalton 8800 incorporates innovative technology to improve convenience and usability. The door can be fitted with various automatic opening mechanisms, including Wi-Fi-enabled garage door openers that allow for remote access via smartphones. This technology not only adds an element of convenience but also enhances security, allowing homeowners to monitor access and control their garage door from anywhere.

Overall, the Wayne-Dalton 8800 combines practical features, advanced technology, and customizable design, making it an excellent choice for those seeking a reliable and stylish garage door solution. With its focus on energy efficiency, safety, and overall functionality, it remains a leading option in the market for both residential and commercial use.