21

End Brackets


Tools: Power drill, 7/16” Socket driver, 1/2” Wrench, Step ladder


Important: warning tags must be securely attached to both end brackets.

Vice clamps


above third


End brackets are right and left hand. You can identify the right hand end bracket by the discon-

roller on both sides of door

nect cable guide hole in the top of the bracket.


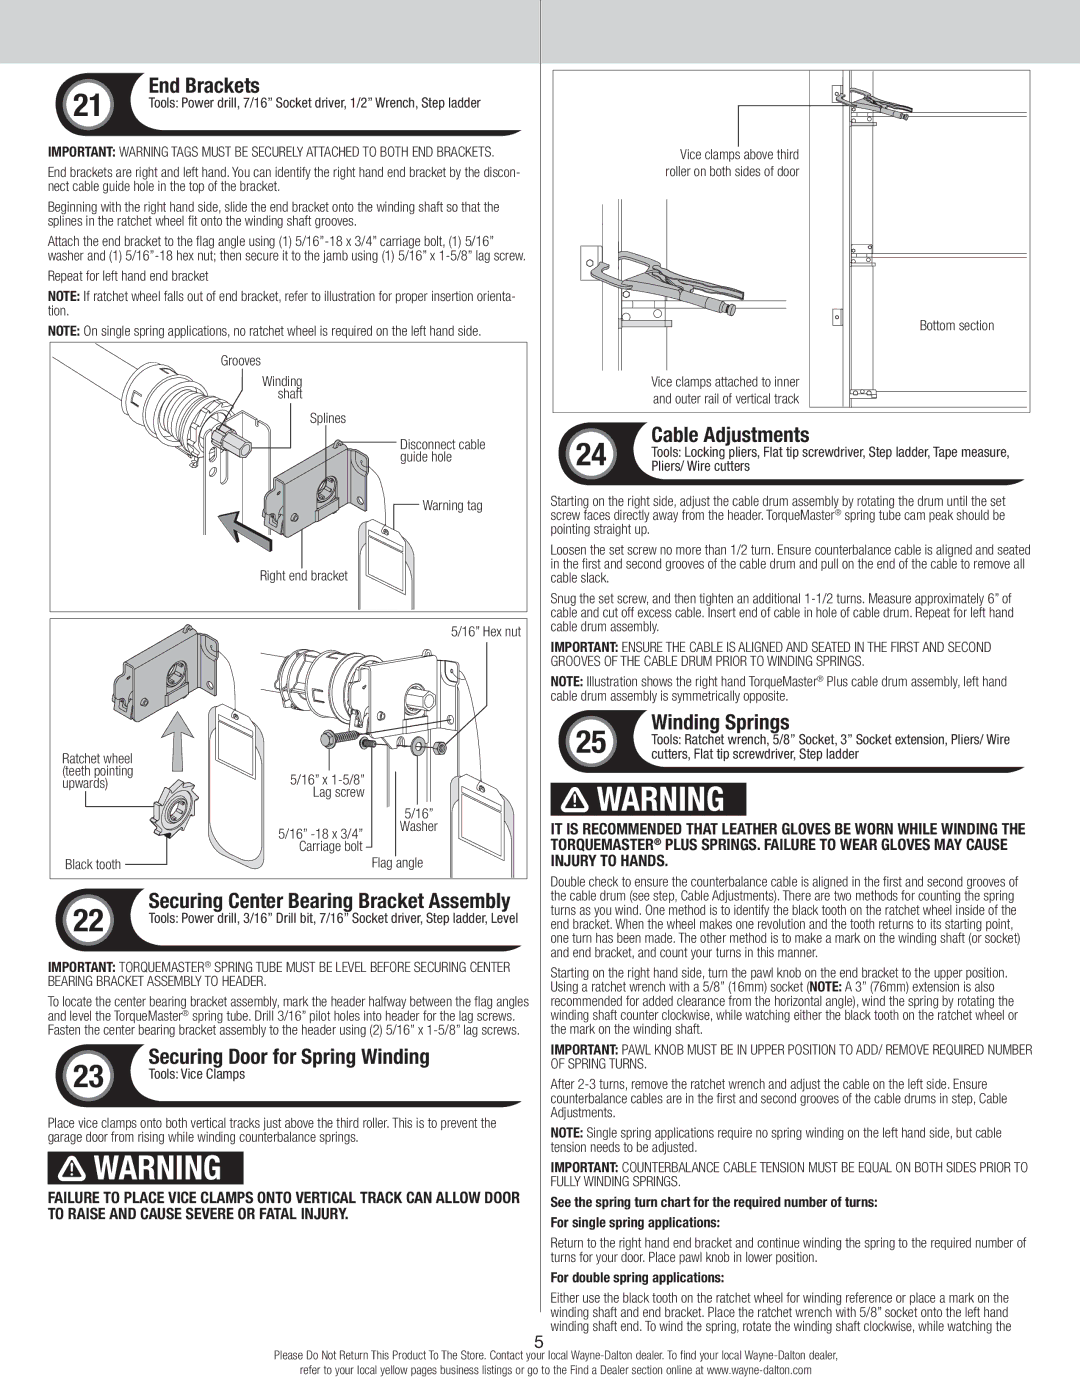
Beginning with the right hand side, slide the end bracket onto the winding shaft so that the splines in the ratchet wheel fit onto the winding shaft grooves.

Attach the end bracket to the flag angle using (1) 5/16”-18 x 3/4” carriage bolt, (1) 5/16” washer and (1) 5/16”-18 hex nut; then secure it to the jamb using (1) 5/16” x 1-5/8” lag screw.

Repeat for left hand end bracket

Note: If ratchet wheel falls out of end bracket, refer to illustration for proper insertion orienta- tion.

Note: On single spring applications, no ratchet wheel is required on the left hand side.

Bottom section


Grooves


Winding


Vice clamps attached to inner


shaft


and outer rail of vertical track


Splines


Cable Adjustments


Disconnect cable

24


Tools: Locking pliers, Flat tip screwdriver, Step ladder, Tape measure,


guide hole


Pliers/ Wire cutters


Warning tag

Starting on the right side, adjust the cable drum assembly by rotating the drum until the set


screw faces directly away from the header. TorqueMaster® spring tube cam peak should be


pointing straight up.


Loosen the set screw no more than 1/2 turn. Ensure counterbalance cable is aligned and seated


Right end bracket


in the first and second grooves of the cable drum and pull on the end of the cable to remove all


cable slack.


Snug the set screw, and then tighten an additional 1-1/2 turns. Measure approximately 6” of


cable and cut off excess cable. Insert end of cable in hole of cable drum. Repeat for left hand


5/16” Hex nut

cable drum assembly.


Important: Ensure the cable is aligned and seated in the first and second


grooves of the cable drum prior to winding springs.


Note: Illustration shows the right hand TorqueMaster® Plus cable drum assembly, left hand


cable drum assembly is symmetrically opposite.


25

Winding Springs


Tools: Ratchet wrench, 5/8” Socket, 3” Socket extension, Pliers/ Wire

Ratchet wheel


cutters, Flat tip screwdriver, Step ladder

(teeth pointing

5/16” x 1-5/8”


upwards)

5/16”

WARNING


Lag screw


5/16” -18 x 3/4”

Washer

It is recommended that leather gloves be worn while winding the


Carriage bolt


TorqueMaster® Plus springs. Failure to wear gloves may cause

Black tooth


Flag angle

injury to hands.


Double check to ensure the counterbalance cable is aligned in the first and second grooves of

22

Securing Center Bearing Bracket Assembly

the cable drum (see step, Cable Adjustments). There are two methods for counting the spring

turns as you wind. One method is to identify the black tooth on the ratchet wheel inside of the

Tools: Power drill, 3/16” Drill bit, 7/16” Socket driver, Step ladder, Level

end bracket. When the wheel makes one revolution and the tooth returns to its starting point,


one turn has been made. The other method is to make a mark on the winding shaft (or socket)


and end bracket, and count your turns in this manner.

Important: TorqueMaster® spring tube must be level before securing center

Starting on the right hand side, turn the pawl knob on the end bracket to the upper position.

bearing bracket assembly to header.

Using a ratchet wrench with a 5/8” (16mm) socket (NOTE: A 3” (76mm) extension is also


To locate the center bearing bracket assembly, mark the header halfway between the flag angles

recommended for added clearance from the horizontal angle), wind the spring by rotating the

and level the TorqueMaster® spring tube. Drill 3/16” pilot holes into header for the lag screws.

winding shaft counter clockwise, while watching either the black tooth on the ratchet wheel or

Fasten the center bearing bracket assembly to the header using (2) 5/16” x 1-5/8” lag screws.

the mark on the winding shaft.


Securing Door for Spring Winding

Important: pawl knob must be in upper position to add/ remove required number

23

of spring turns.

Tools: Vice Clamps

After 2-3 turns, remove the ratchet wrench and adjust the cable on the left side. Ensure


counterbalance cables are in the first and second grooves of the cable drums in step, Cable

Place vice clamps onto both vertical tracks just above the third roller. This is to prevent the

Adjustments.

Note: Single spring applications require no spring winding on the left hand side, but cable

garage door from rising while winding counterbalance springs.


tension needs to be adjusted.

WARNING


Important: Counterbalance cable tension must be equal on both sides prior to


fully winding springs.

Failure to place vice clamps onto vertical track can allow door

See the spring turn chart for the required number of turns:

to raise and cause severe or fatal injury.

For single spring applications:


Return to the right hand end bracket and continue winding the spring to the required number of


turns for your door. Place pawl knob in lower position.


For double spring applications:


Either use the black tooth on the ratchet wheel for winding reference or place a mark on the


winding shaft and end bracket. Place the ratchet wrench with 5/8” socket onto the left hand


winding shaft end. To wind the spring, rotate the winding shaft clockwise, while watching the


5


Please Do Not Return This Product To The Store. Contact your local Wayne-Dalton dealer. To find your local Wayne-Dalton dealer,


refer to your local yellow pages business listings or go to the Find a Dealer section online at www.wayne-dalton.com

Page 5
Image 5
Wayne-Dalton 9600, 9400, 9100 quick start End Brackets, Cable Adjustments, Winding Springs, Securing Door for Spring Winding

9600, 9100, 9400 specifications

Wayne-Dalton is a renowned name in the garage door industry, and its series of garage doors, namely the 9600, 9400, and 9100, stand out for their exceptional quality, durability, and aesthetic appeal. Each series is designed to meet various needs, offering a range of features and technologies that enhance functionality and performance.

The Wayne-Dalton 9600 series is known for its energy efficiency and robust construction. These doors are insulated with a foamed-in-place polyurethane core, which provides an exceptional R-value, making them ideal for regions with extreme temperature fluctuations. The 9600 series features high-quality steel construction, ensuring durability and resistance to dents and damage. This series also offers a variety of design options, including wood grain textures and multiple color finishes, allowing homeowners to match their garage doors with their home’s exterior.

Moving to the Wayne-Dalton 9400 series, this line is recognized for its versatility and premium insulation. Like the 9600 series, the 9400 features a polyurethane core foamed between two layers of steel for superior thermal performance. Moreover, it offers a wider selection of panel designs, from traditional to contemporary finishes. The 9400 doors come equipped with a weather seal, enhancing protection against the elements and keeping the garage environment comfortable year-round.

Lastly, the Wayne-Dalton 9100 series combines affordability with functionality. It also offers insulated construction, although with a polystyrene core, making it an excellent choice for homeowners seeking a budget-friendly option without sacrificing quality. The 9100 series provides a good range of design options and customizable accessories such as decorative hardware, windows, and color choices to suit individual preferences.

All three series benefit from advanced technology, such as Wayne-Dalton's innovative design features for smooth operation and increased safety. They are equipped with sectional door designs, reducing the risk of pinch points and enhancing user safety. Additionally, Wayne-Dalton offers a variety of remote access and control technologies, ensuring convenience and peace of mind for users.

In summary, the Wayne-Dalton 9600, 9400, and 9100 series are distinguished by their superior insulation, durability, and stylish design options. Whether prioritizing energy efficiency, versatility, or budget considerations, these garage doors cater to a spectrum of consumer needs, thereby continuing Wayne-Dalton's legacy of excellence in design and functionality.