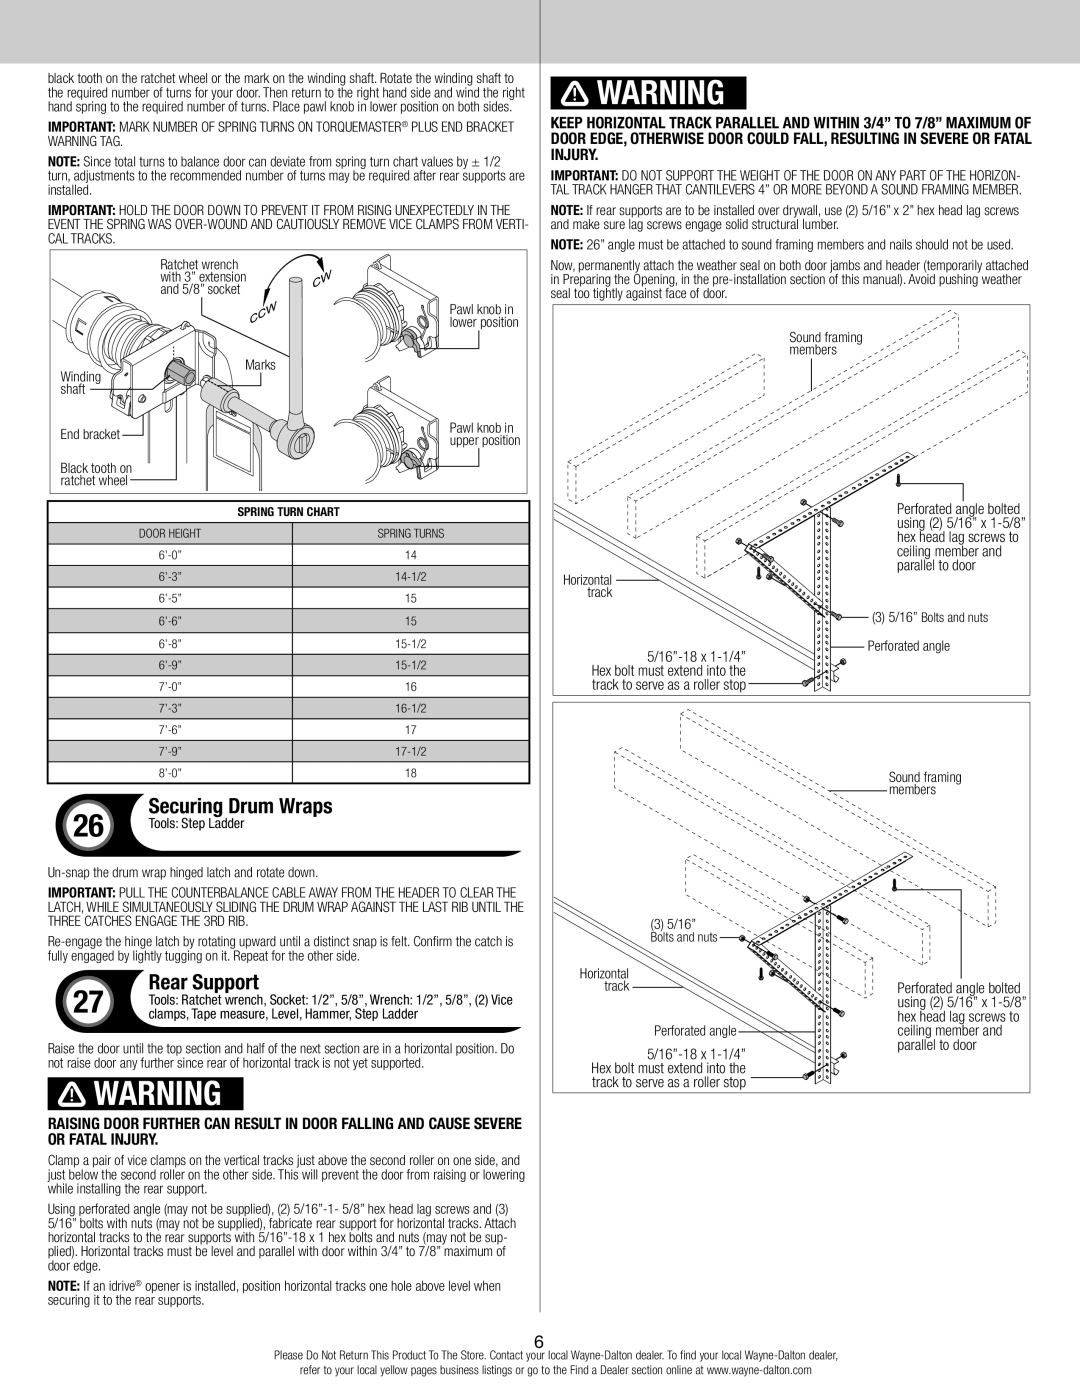
black tooth on the ratchet wheel or the mark on the winding shaft. Rotate the winding shaft to the required number of turns for your door. Then return to the right hand side and wind the right hand spring to the required number of turns. Place pawl knob in lower position on both sides.

Important: Mark number of spring turns on TorqueMaster® Plus end bracket warning tag.

Note: Since total turns to balance door can deviate from spring turn chart values by ± 1/2 turn, adjustments to the recommended number of turns may be required after rear supports are installed.

Important: Hold the door down to prevent it from rising unexpectedly in the event the spring was over-wound and cautiously remove vice clamps from verti- cal tracks.

Ratchet wrench with 3” extension and 5/8” socket


Pawl knob in


lower position

Winding

Marks


shaft


End bracket

Pawl knob in

upper position


Black tooth on


ratchet wheel


WARNING

Keep horizontal track parallel and within 3/4” to 7/8” maximum of door edge, otherwise door could fall, resulting in severe or fatal injury.

Important: Do not support the weight of the door on any part of the horizon- tal track hanger that cantilevers 4” or more beyond a sound framing member.

Note: If rear supports are to be installed over drywall, use (2) 5/16” x 2” hex head lag screws and make sure lag screws engage solid structural lumber.

Note: 26” angle must be attached to sound framing members and nails should not be used.

Now, permanently attach the weather seal on both door jambs and header (temporarily attached in Preparing the Opening, in the pre-installation section of this manual). Avoid pushing weather seal too tightly against face of door.

Sound framing members


SPRING TURN CHART


DOOR HEIGHT

SPRING TURNS


6’-0”

14


6’-3”

14-1/2


6’-5”

15


6’-6”

15


6’-8”

15-1/2


6’-9”

15-1/2


7’-0”

16


7’-3”

16-1/2


7’-6”

17


7’-9”

17-1/2

Horizontal track

5/16”-18 x 1-1/4” Hex bolt must extend into the track to serve as a roller stop

Perforated angle bolted using (2) 5/16” x 1-5/8” hex head lag screws to ceiling member and parallel to door

(3) 5/16” Bolts and nuts

Perforated angle

8’-0”

18

26

Securing Drum Wraps

Tools: Step Ladder


Un-snap the drum wrap hinged latch and rotate down.

Important: Pull the counterbalance cable away from the header to clear the latch, while simultaneously sliding the drum wrap against the last rib until the three catches engage the 3rd rib.

Re-engage the hinge latch by rotating upward until a distinct snap is felt. Confirm the catch is fully engaged by lightly tugging on it. Repeat for the other side.

Rear Support

27 Tools: Ratchet wrench, Socket: 1/2”, 5/8”, Wrench: 1/2”, 5/8”, (2) Vice clamps, Tape measure, Level, Hammer, Step Ladder

Raise the door until the top section and half of the next section are in a horizontal position. Do not raise door any further since rear of horizontal track is not yet supported.

WARNING

Raising door further can result in door falling and cause severe or fatal injury.

Clamp a pair of vice clamps on the vertical tracks just above the second roller on one side, and just below the second roller on the other side. This will prevent the door from raising or lowering while installing the rear support.

Using perforated angle (may not be supplied), (2) 5/16”-1- 5/8” hex head lag screws and (3) 5/16” bolts with nuts (may not be supplied), fabricate rear support for horizontal tracks. Attach horizontal tracks to the rear supports with 5/16”-18 x 1 hex bolts and nuts (may not be sup- plied). Horizontal tracks must be level and parallel with door within 3/4” to 7/8” maximum of door edge.

NOTE: If an idrive® opener is installed, position horizontal tracks one hole above level when securing it to the rear supports.

(3) 5/16”

Bolts and nuts

Horizontal track

Perforated angle

5/16”-18 x 1-1/4” Hex bolt must extend into the track to serve as a roller stop

Sound framing members

Perforated angle bolted using (2) 5/16” x 1-5/8” hex head lag screws to ceiling member and parallel to door

6

Please Do Not Return This Product To The Store. Contact your local Wayne-Dalton dealer. To find your local Wayne-Dalton dealer,

refer to your local yellow pages business listings or go to the Find a Dealer section online at www.wayne-dalton.com

Page 6
Image 6
Wayne-Dalton 9400, 9100, 9600 quick start Rear Support, Securing Drum Wraps

9600, 9100, 9400 specifications

Wayne-Dalton is a renowned name in the garage door industry, and its series of garage doors, namely the 9600, 9400, and 9100, stand out for their exceptional quality, durability, and aesthetic appeal. Each series is designed to meet various needs, offering a range of features and technologies that enhance functionality and performance.

The Wayne-Dalton 9600 series is known for its energy efficiency and robust construction. These doors are insulated with a foamed-in-place polyurethane core, which provides an exceptional R-value, making them ideal for regions with extreme temperature fluctuations. The 9600 series features high-quality steel construction, ensuring durability and resistance to dents and damage. This series also offers a variety of design options, including wood grain textures and multiple color finishes, allowing homeowners to match their garage doors with their home’s exterior.

Moving to the Wayne-Dalton 9400 series, this line is recognized for its versatility and premium insulation. Like the 9600 series, the 9400 features a polyurethane core foamed between two layers of steel for superior thermal performance. Moreover, it offers a wider selection of panel designs, from traditional to contemporary finishes. The 9400 doors come equipped with a weather seal, enhancing protection against the elements and keeping the garage environment comfortable year-round.

Lastly, the Wayne-Dalton 9100 series combines affordability with functionality. It also offers insulated construction, although with a polystyrene core, making it an excellent choice for homeowners seeking a budget-friendly option without sacrificing quality. The 9100 series provides a good range of design options and customizable accessories such as decorative hardware, windows, and color choices to suit individual preferences.

All three series benefit from advanced technology, such as Wayne-Dalton's innovative design features for smooth operation and increased safety. They are equipped with sectional door designs, reducing the risk of pinch points and enhancing user safety. Additionally, Wayne-Dalton offers a variety of remote access and control technologies, ensuring convenience and peace of mind for users.

In summary, the Wayne-Dalton 9600, 9400, and 9100 series are distinguished by their superior insulation, durability, and stylish design options. Whether prioritizing energy efficiency, versatility, or budget considerations, these garage doors cater to a spectrum of consumer needs, thereby continuing Wayne-Dalton's legacy of excellence in design and functionality.