Operating Instructions and Parts Manual

Maintenance (Continued)

5.Submerge the complete pump in a disinfectant solu­tion­ (10% chlorine bleach solution) for at least one hour before handling the pump.

6.Clean all dirt and deposits from the pump float. Make sure float moves freely after cleaning.

7.Clean all dirt and deposits away from pump inlet and volute.

This pump contains dielectric motor

oil for lubrication and motor heat transfer. This oil can be harmful to the environment. Check state environmental laws before disposing of this oil. This oil can be harmful to aquatic life so consideration should be exercised in the application of this pump.

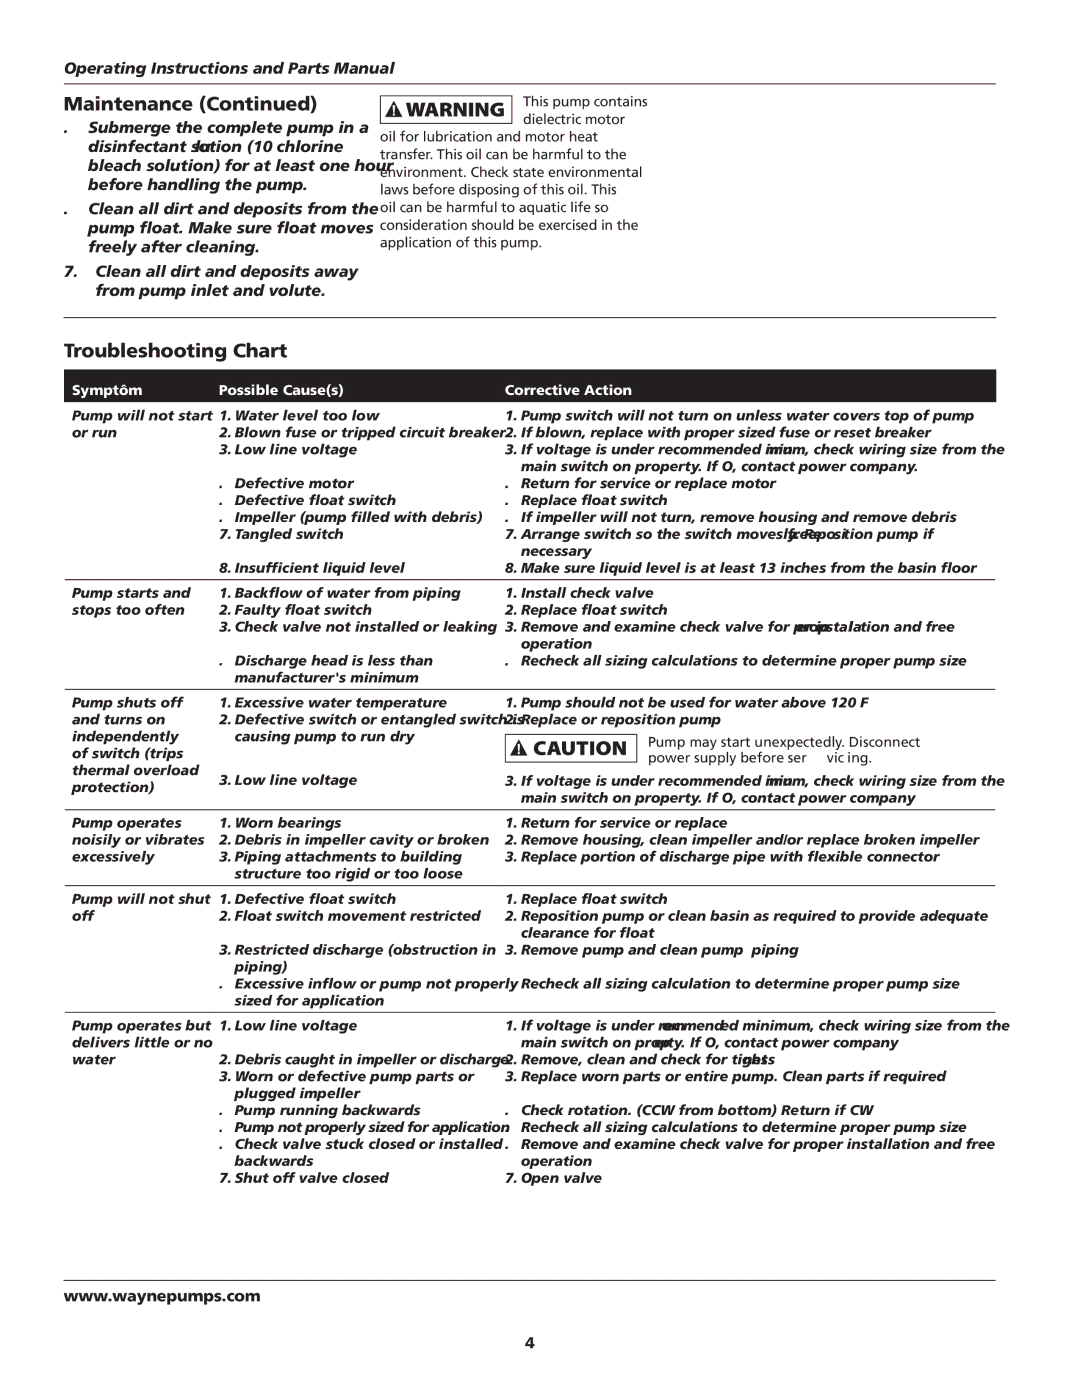
Troubleshooting Chart

Symptôm

Possible Cause(s)

Corrective Action

Pump will not start

1. Water level too low

1.

Pump switch will not turn on unless water covers top of pump

or run

2. Blown fuse or tripped circuit breaker

2.

If blown, replace with proper sized fuse or reset breaker


3.

Low line voltage

3.

If voltage is under recommended mini­mum,­ check wiring size from the


main switch on property. If OK, contact power company.


4.

Defective motor

4.

Return for service or replace motor


5.

Defective float switch

5.

Replace float switch


6.

Impeller (pump filled with debris)

6.

If impeller will not turn, remove housing and remove debris


7.

Tangled switch

7.

Arrange switch so the switch moves freely­. Repo­si­tion­ pump if


necessary


8.

Insufficient liquid level

8.

Make sure liquid level is at least 13 inches from the basin floor


Pump starts and

1. Backflow of water from piping

1.

Install check valve

stops too often

2. Faulty float switch

2.

Replace float switch


3.

Check valve not installed or leaking

3.

Remove and examine check valve for proper­ instal­la­tion­ and free


operation


4.

Discharge head is less than

4.

Recheck all sizing calculations to determine proper pump size


manufacturer's minimum


Pump shuts off

1. Excessive water temperature

1.

Pump should not be used for water above 120º F

and turns on

2. Defective switch or entangled switch is

2.

Replace or reposition pump

independently


causing pump to run dry


Pump may start unexpectedly. Disconnect


of switch (trips


power supply before servic­ing­.


thermal overload

3.

Low line voltage

3.

If voltage is under recommended mini­mum,­ check wiring size from the

protection)


main switch on property. If OK, contact power company


Pump operates

1. Worn bearings

1.

Return for service or replace

noisily or vibrates

2. Debris in impeller cavity or broken

2.

Remove housing, clean impeller and/or replace broken impeller

excessively

3. Piping attachments to building

3.

Replace portion of discharge pipe with flexible connector


structure too rigid or too loose


Pump will not shut

1. Defective float switch

1.

Replace float switch

off

2. Float switch movement restricted

2.

Reposition pump or clean basin as required to provide adequate


clearance for float


3.

Restricted discharge (obstruction in

3.

Remove pump and clean pump & piping


piping)


4.

Excessive inflow or pump not properly

4.

Recheck all sizing calculation to determine proper pump size


sized for application


Pump operates but

1. Low line voltage

1.

If voltage is under recom­mend­ed­ minimum, check wiring size from the

delivers little or no


main switch on proper­ty­. If OK, contact power company

water

2. Debris caught in impeller or discharge

2.

Remove, clean and check for tightness­


3.

Worn or defective pump parts or

3.

Replace worn parts or entire pump. Clean parts if required


plugged impeller


4.

Pump running backwards

4.

Check rotation. (CCW from bottom) Return if CW


5.

Pump not properly sized for application

5.

Recheck all sizing calculations to determine proper pump size


6.

Check valve stuck closed or installed

6.

Remove and examine check valve for proper installation and free


backwards


operation


7.

Shut off valve closed

7.

Open valve

www.waynepumps.com

4

Page 4
Image 4
Wayne SEL40, SEL50, 330002-001 specifications Troubleshooting Chart, Symptôm Possible Causes Corrective Action

SEL40, 330002-001, SEL50 specifications

The Wayne SEL50,330002-001 and SEL40 are advanced electronic payment solutions designed specifically for the fuel retail industry. Both models are well-regarded for their innovative technologies and user-friendly features that aim to enhance the overall customer experience while ensuring efficient payment processing.

The Wayne SEL50,330002-001 is known for its robust architecture, which allows it to handle a large volume of transactions seamlessly. It is equipped with a high-definition touchscreen interface that makes navigation intuitive for users of all experience levels. The touchpad is highly responsive, facilitating quick access to various services, including fuel purchases, loyalty programs, and promotional offers. Additionally, the payment terminal's customizable interface allows retailers to tailor the experience to meet specific customer needs or branding requirements.

One of the standout features of the SEL50 is its wide range of payment options. It supports EMV chip cards, contactless payments, and mobile wallet transactions, ensuring compatibility with the latest payment technologies. This versatility not only enhances convenience for customers but also helps retailers reduce the risk of fraud. The terminal also adheres to the highest security standards, providing encryption and tokenization to protect sensitive payment information.

The Wayne SEL40 is another notable model in Wayne's lineup, designed for smaller fuel retailers or those looking for a more compact solution. It shares many features with the SEL50, including the ability to accept various payment types, but with a more streamlined interface that emphasizes simplicity and efficiency. The SEL40's compact design allows it to be easily integrated into existing retail environments without requiring extensive modifications to infrastructure.

In terms of connectivity, both the SEL50 and SEL40 offer multiple options, including Ethernet, Wi-Fi, and cellular connections, ensuring reliable performance regardless of location. Furthermore, they are equipped with remote monitoring capabilities, which enable retailers to track transaction data and system status in real-time, enhancing operational efficiency.

Overall, both the Wayne SEL50,330002-001 and SEL40 represent significant advancements in fuel retail payment technology. Their combination of user-friendly interfaces, robust security, and versatile payment options makes them ideal solutions for retailers looking to improve customer satisfaction while streamlining operations. As payment technologies continue to evolve, these models are poised to remain at the forefront of the industry.