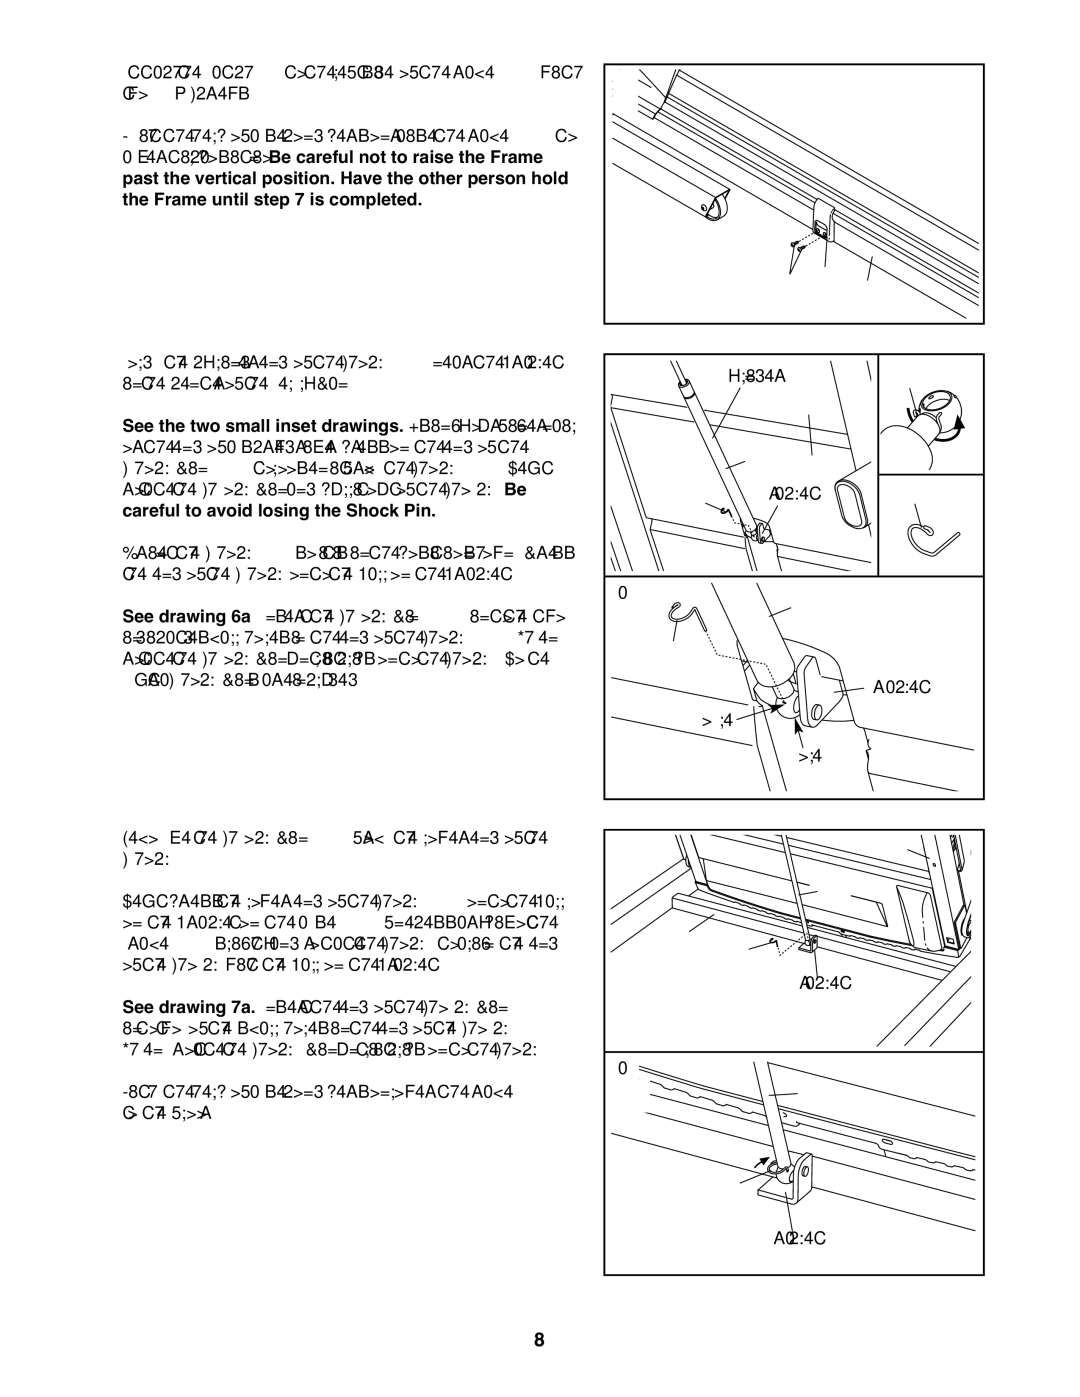
5. Attach the Catch (5) to the left side of the Frame (48) with |
|
|
|
|
|
| |
| 5 |
| |
two 3/4” Screws (4). |
|
| |
With the help of a second person, raise the Frame (48) to |
|
|
|
|
|
| |
a vertical position. Be careful not to raise the Frame |
|
|
|
past the vertical position. Have the other person hold |
|
|
|
the Frame until step 7 is completed. |
|
|
|
|
|
| 4 | 5 | 48 |
6. Hold the cylinder end of the Shock (88) near the bracket | 6 | Cylinder |
| 102 | |
in the center of the Belly Pan (50). | 50 | ||||
See the two small inset drawings. Using your fingernail |
|
|
|
| |
or the end of a screwdriver, press on the end of the |
|
| 88 |
|
|
Shock Pin (102) to loosen it from the Shock (88). Next, |
|
|
|
| |
rotate the Shock Pin and pull it out of the Shock. Be | 102 |
| Bracket | 102 | |
careful to avoid losing the Shock Pin. |
| ||||
Orient the Shock (88) so it is in the position shown. Press |
|
|
|
|
|
the end of the Shock onto the ball on the bracket. | 6a |
|
| 88 |
|
See drawing 6a. Insert the Shock Pin (102) into the two |
|
|
| ||
indicated small holes in the end of the Shock (88). Then, | 102 |
|
|
|
|
rotate the Shock Pin until it clips onto the Shock. Note: |
|
|
| Bracket | |
Extra Shock Pins are included. | Hole |
|
| ||
| Hole |
| |||
|
|
|
| ||
7. Remove the Shock Pin (102) from the lower end of the | 7 |
|
|
| 48 |
Shock (88). |
|
| 88 | ||
Next, press the lower end of the Shock (88) onto the ball |
|
|
|
| |
on the bracket on the Base (83). If necessary, pivot the | 83 |
|
|
|
|
Frame (48) slighty and rotate the Shock to align the end | 102 |
|
|
| |
of the Shock with the ball on the bracket. |
| Bracket |
| ||
See drawing 7a. Insert the end of the Shock Pin (102) |
|
|
| ||
into two of the small holes in the end of the Shock (88). |
|
|
|
|
|
Then, rotate the Shock Pin until it clips onto the Shock. | 7a |
|
|
|
|
With the help of a second person, lower the Frame (48) |
|
| 88 |
| |
|
|
|
| ||
to the floor. |
|
|
|
|
|
|
| 102 | Bracket |
| |
|
|
|
| ||
8 |
|
|
|
|
|
