Venting requirements

Fire Hazard

l Terminate venting system to outside.

. Do Not terminate the vent in an atlic or other enclosed space.

Failure to follow these instructions could result in a fire.

Ductwork needed for installation is not included. If roof or wall cap has a damper, Do Not use damper supplied with hood.

Determine which outside venting method needs to be used. NOTE: If a non-vented (recirculating) installation is desired, follow instructions on Panel D.

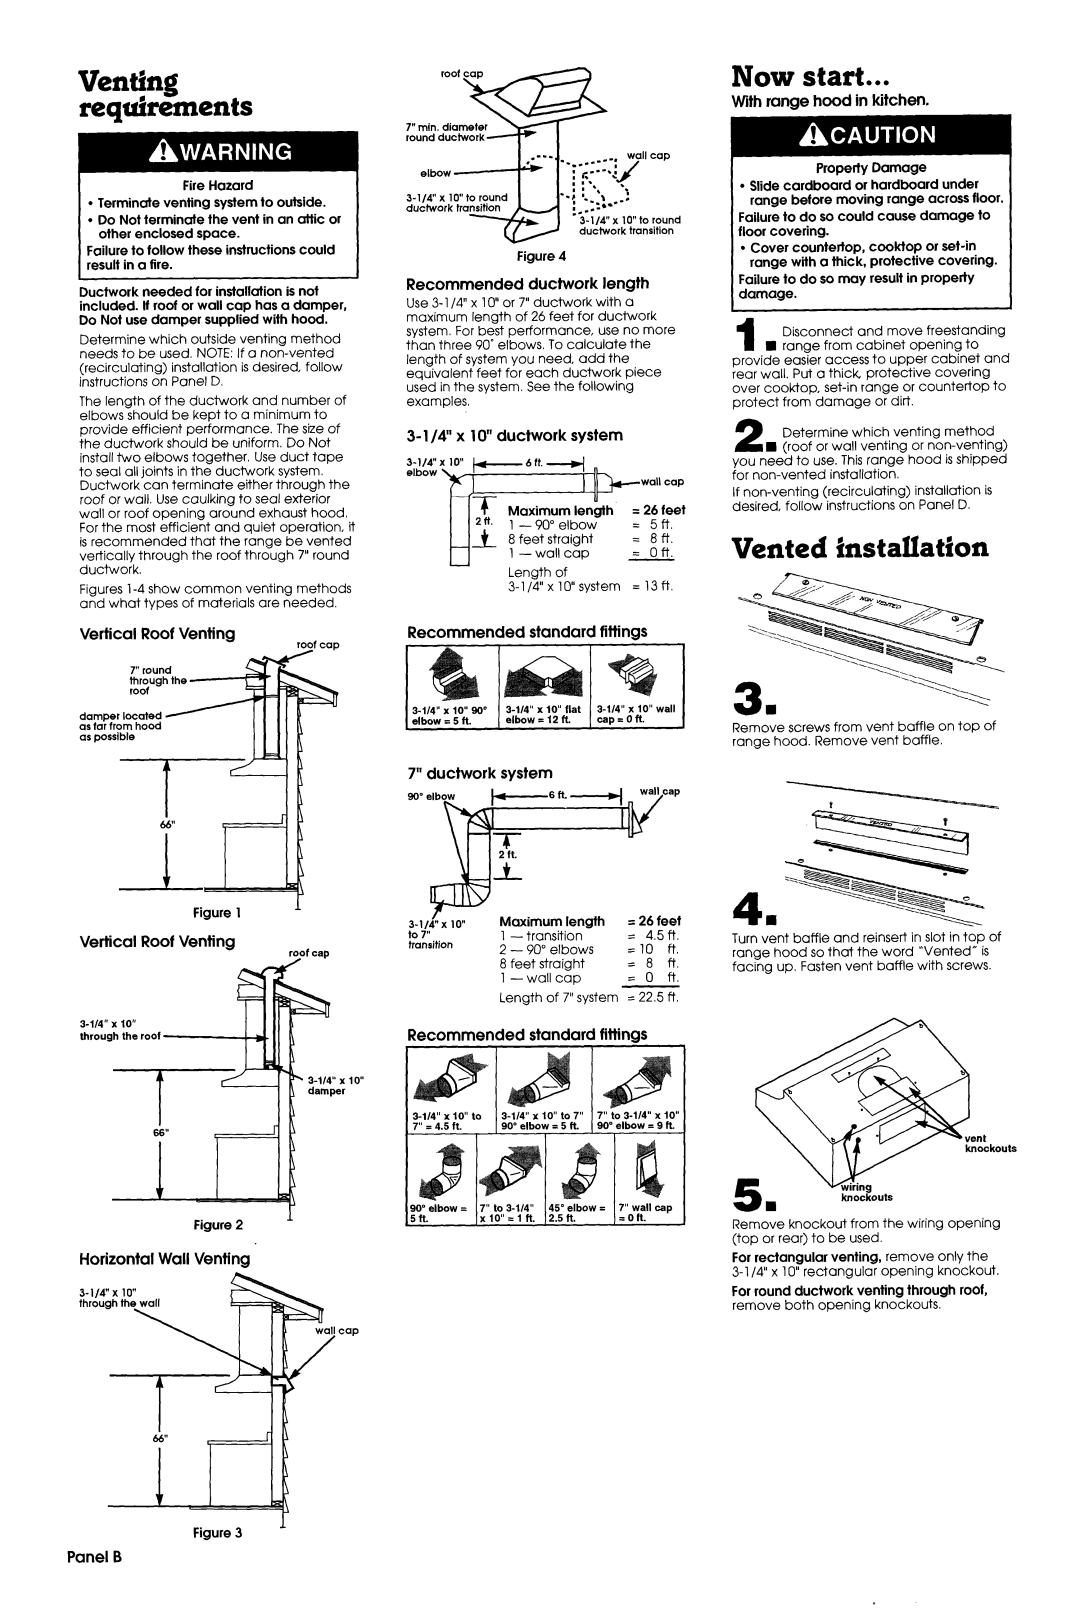
The length of the ductwork and number of elbows should be kept to a minimum to provide efficient performance. The size of the ductwork should be uniform. Do Not install two elbows together. Use duct tape to seal all joints in the ductwork system. Ductwork can terminate either through the roof or wall. Use caulking to seal exterior wall or roof opening around exhaust hood. For the most efficient and quiet operation, it is recommended that the range be vented vertically through the roof through 7” round ductwork.

Figures l-4 show common venting methods and what types of materials are needed.

Vertical Roof Venting

roof coo

7” round through the roof -

damper located as far from hood as possible

Figure 1

1


round ductwork

elbow

3-l/4” x 10” to round ductwork transition

Figure 4

Recommended ductwork length

Use 3- l/4” x lo” or 7” ductwork with a maximum length of 26 feet for ductwork system. For best performance, use no more than three 90” elbows. To calculate the length of system you need, add the equivalent feet for each ductwork piece used in the system. See the following examples.

3- l/4” x lo” ductwork system

+-

6 ft. 4


I

lb--

wall cap


I

Length of

3-1/4”xl0”system = 13ft

Recommended standard fittings

-

3-114” x IQ” 90”

3-l/4”

x IO” flat

3-114”

x 10” wall

Ielbow = 5 ft.

elbow

= 12 ft.

I cap=oft.

I

7” ductwork system

3-l/Lx lo”

Maximum length

= 26 feet

Now start...

With range hood in kitchen.

Property Damage

l Slide cardboard or hardboard under range before moving range across floor.

Failure to do so could cause damage to floor covering.

l Cover countertop, cooktop or set-in range with a thick, protective covering.

Failure to do so may result in property damage.

1 Disconnect and move freestanding n range from cabinet opening to

provide easier access to upper cabinet and rear wall. Put a thick protective covering over cooktop, set-in range or countertop to protect from damage or dirt.

2 Determine which venting method I (roof or wall venting or non-venting)

you need to use. This range hood is shipped for non-vented installation.

If non-venting (recirculating) installation is desired, follow instructions on Panel D.

Vented installation

Remove screws from vent baffle on top of range hood. Remove vent baffle.

-

4.

Vertical Roof Venting

3-114” x 10” through the roof

Figure 2

roof cap

lo”

1

to 7”

1 -

transition

=

4.5ft.

transition

2 -

90” elbows

=lO

ft.


8 feet straight

=

8

ft.


l-

wall cap

=

0

ft.


Length of 7” system

= 22.5 ft.

Recommended standard fittings

Turn vent baffle and reinsert in slot in top of range hood so that the word “Vented” is facing up, Fasten vent baffle with screws.

knockouts

knockouts

Remove knockout from the wiring opening (top or rear) to be used.

Horizontal Wall Venting

Figure 3 ’

For rectangular venting, remove only the 3-l /4” x 10” rectangular opening knockout.

For round ductwork venting through roof, remove both opening knockouts.

Panel B

Page 3
Image 3
Whirlpool 35-718, 29-718 installation instructions Now start, Vented installation, Venting requirements

35-718, 29-718 specifications

The Whirlpool 29-718 and 35-718 models represent a culmination of innovation and efficiency in the realm of home appliances, catering specifically to modern households seeking functionality without compromising on style. Both models are designed to enhance the user experience with their impressive array of features and technologies that focus on convenience and performance.

The Whirlpool 29-718 features a spacious interior, ideal for cooking and heating meals for families or gatherings. With a generous capacity, users can fit larger plates and containers with ease. The unit is equipped with advanced microwave technology that ensures even cooking and consistent heating, allowing users to enjoy perfectly warm meals every time.

One of the standout characteristics of the Whirlpool 29-718 is its intuitive control panel, which features a digital display and easy-to-navigate buttons. This user-friendly interface simplifies the cooking process, making it accessible for individuals of all skill levels. Additionally, the model includes several pre-programmed settings that cater to various cooking styles, such as popcorn, pizza, and reheating leftovers, providing versatility in meal preparation.

On the other hand, the Whirlpool 35-718 brings a sleek modern design to the kitchen, making it a stylish addition to any home décor. It utilizes smart sensor technology that detects the moisture level in food and automatically adjusts cooking time and power levels accordingly. This feature not only saves time but also enhances cooking efficiency, ensuring that meals are cooked to perfection without constant monitoring.

Both models come with a stainless steel finish, which not only adds durability but is also easy to clean, making maintenance a breeze. They are designed with energy efficiency in mind, helping households reduce their carbon footprint while keeping utility costs low.

Furthermore, these units are equipped with a quiet operation feature, allowing users to enjoy a peaceful cooking experience without disruptive noise levels. The combination of these features makes the Whirlpool 29-718 and 35-718 perfect for busy families, offering a blend of functionality, efficiency, and style that is hard to beat in today’s competitive market. Whether you're reheating leftovers or cooking an elaborate meal, these models stand out as dependable choices for today’s culinary needs.