Alternate methods:

wpw tofit.

clearance to floor

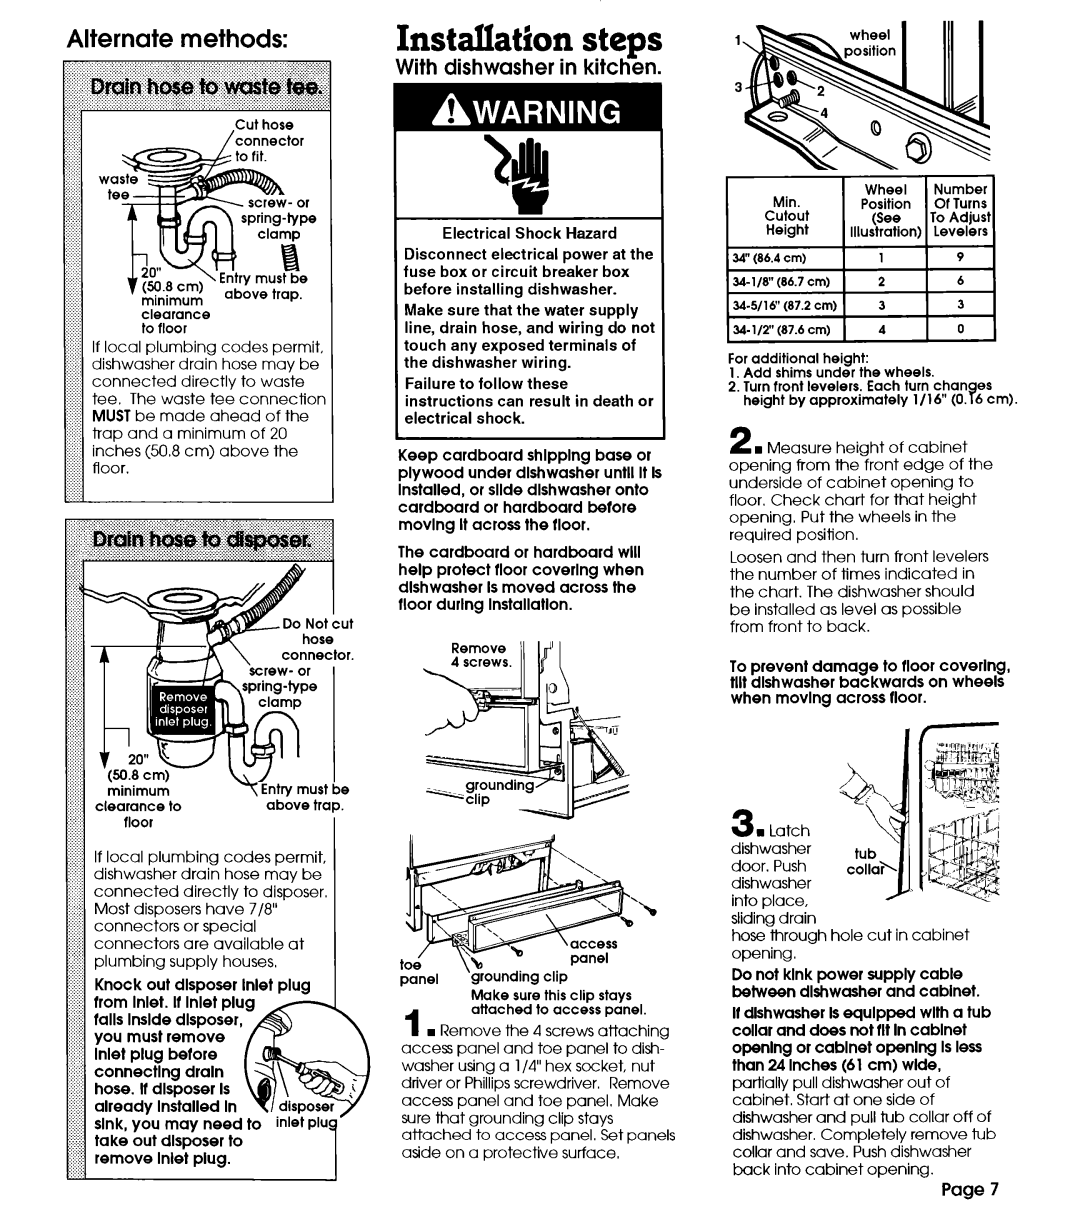
If local plumbing codes permit, dishwasher drain hose may be connected directly to waste tee. The waste tee connection MUST be made ahead of the

1 k%c$$%?$~~kk%~e

connector.

clearance to

above trap.

floor


If local plumbing codes permit, dishwasher drain hose may be connected directly to disposer. Most disposers have 7/8” connectors or special connectors are available at plumbing supply houses.

Knock out disposer Inlet plug tram Inlet. It Inlet plug

tails lnslde disposer, you must remove Inlet plug betore connecting draln hose. It disposer Is

already Installed In sink, you dlSDOSermay need

take out to remove lnlei plug.

Installation steps

With dishwasher in kitchen.

Electrical Shock Hazard

Disconnect electrical power at the fuse box or circuit breaker box before installing dishwasher.

Make sure that the water supply line, drain hose, and wiring do not touch any exposed terminals of the dishwasher wiring.

Failure to follow these

instructions can result in death or electrical shock.

Keep cardboard shlpplng base or plywood under dlshwasher until It ls Installed, or slide dlshwasher onto cardboard or hardboard before movlng It across the rloor.

The cardboard or hardboard will help protect rloor coverlng when dlshwasher Is moved across the tloor durlng Installation.

panel ‘grounding clip

Make sure this clip stays attached to access panel.

1 H Remove the 4 screws attaching access panel and toe panel to dish washer using a l/4” hex socket, nut driver or Phillips screwdriver. Remove access panel and toe panel. Make sure that grounding clip stays attached to access panel. Set panels aside on a protective surface.

Min.

Wheel

Number

Position

Of Turns

Cutout

(See

To Adjust

Height

Illustration)

Levelers

34” (86.4 cm)

1

9

34-l 18” (86.7 cm)

2

6

34-5/l& (87.2 cm)

3

3

34-112” (87.4 cm)

4

0

For additional height:

1.Add shims under the wheels.

2.Turn front levelers. Each turn than es

height by approximately l/16” (0. 96 cm).

2n Measure height of cabinet

opening from the front edge of the underside of cabinet opening to floor. Check chart for that height opening. Put the wheels in the required position.

Loosen and then turn front levelers the number of times indicated in the chart. The dishwasher should be installed as level as possible from front to back.

To prevent damage to tloor coverlng, tllt dlshwasher backwards on wheels when movlng across tloor.

3 w Latch dishwasher door. Push dishwasher into t3lace. slidi6g drain

hose through hole cut in cabinet opening.

Do not klnk power supply cable between dlshwasher and cabinet.

It dlshwasher ls equipped wlth a tub collar and does not tlt In cabinet openlng or cabinet openlng Is less than 24 Inches (61 cm) wide,

partially pull dishwasher out of cabinet. Start at one side of dishwasher and pull tub collar off of dishwasher. Completely remove tub collar and save. Push dishwasher back into cabinet opening.

Page 7

Page 7
Image 7
Whirlpool 801 Installation steps, With dishwasher in kitchen, Knock out disposer Inlet plug tram Inlet. It Inlet plug

801 specifications

The Whirlpool 801 is a standout appliance characterized by its innovative features and user-friendly design. This washing machine, part of Whirlpool's extensive range of home appliances, is built to cater to the diverse laundry needs of modern households.

One of the key features of the Whirlpool 801 is its large capacity. With the ability to accommodate significant loads, it is perfect for families or anyone who frequently deals with bulky items such as blankets and comforters. The spacious drum ensures that clothes have plenty of room to move around, leading to more effective cleaning and less wear and tear.

The appliance is equipped with various wash programs tailored to different types of fabrics and soil levels. Whether it's delicates, heavy-duty items, or everyday wear, the Whirlpool 801 has a setting that can handle it. This versatility is enhanced by the smart sensing technology that automatically adjusts the cycle settings based on the load, optimizing water and energy usage.

Another remarkable aspect of the Whirlpool 801 is its energy efficiency. Designed to meet stringent energy standards, it consumes less water and electricity compared to conventional models. This not only helps reduce household utility bills but also contributes to a more sustainable lifestyle.

Additionally, the Whirlpool 801 features advanced cleaning technologies, such as a built-in heater for hot washes and a special drum design that minimizes fabric snagging. The appliance is also equipped with a user-friendly interface, complete with a digital display that makes selecting the appropriate cycle hassle-free.

The noise reduction technology integrated into the Whirlpool 801 ensures that laundry chores can be completed without disturbing the household. Its quiet operation allows users to run cycles at any time of the day or night without concern.

Durability is another hallmark of the Whirlpool 801. Constructed with high-quality materials and backed by the company's reputation for reliability, this washing machine is built to last. Its intuitive design is complemented by features such as a self-cleaning cycle, which simplifies maintenance and prolongs the machine's life.

In summary, the Whirlpool 801 combines performance, efficiency, and convenience, making it a top choice among washing machines. Its advanced features and thoughtful design make laundry day less of a chore and more of a seamless part of daily life. Whether you're looking for efficiency, capacity, or innovative technologies, the Whirlpool 801 meets and exceeds expectations, establishing it as a valuable addition to any home.