OVEN USE

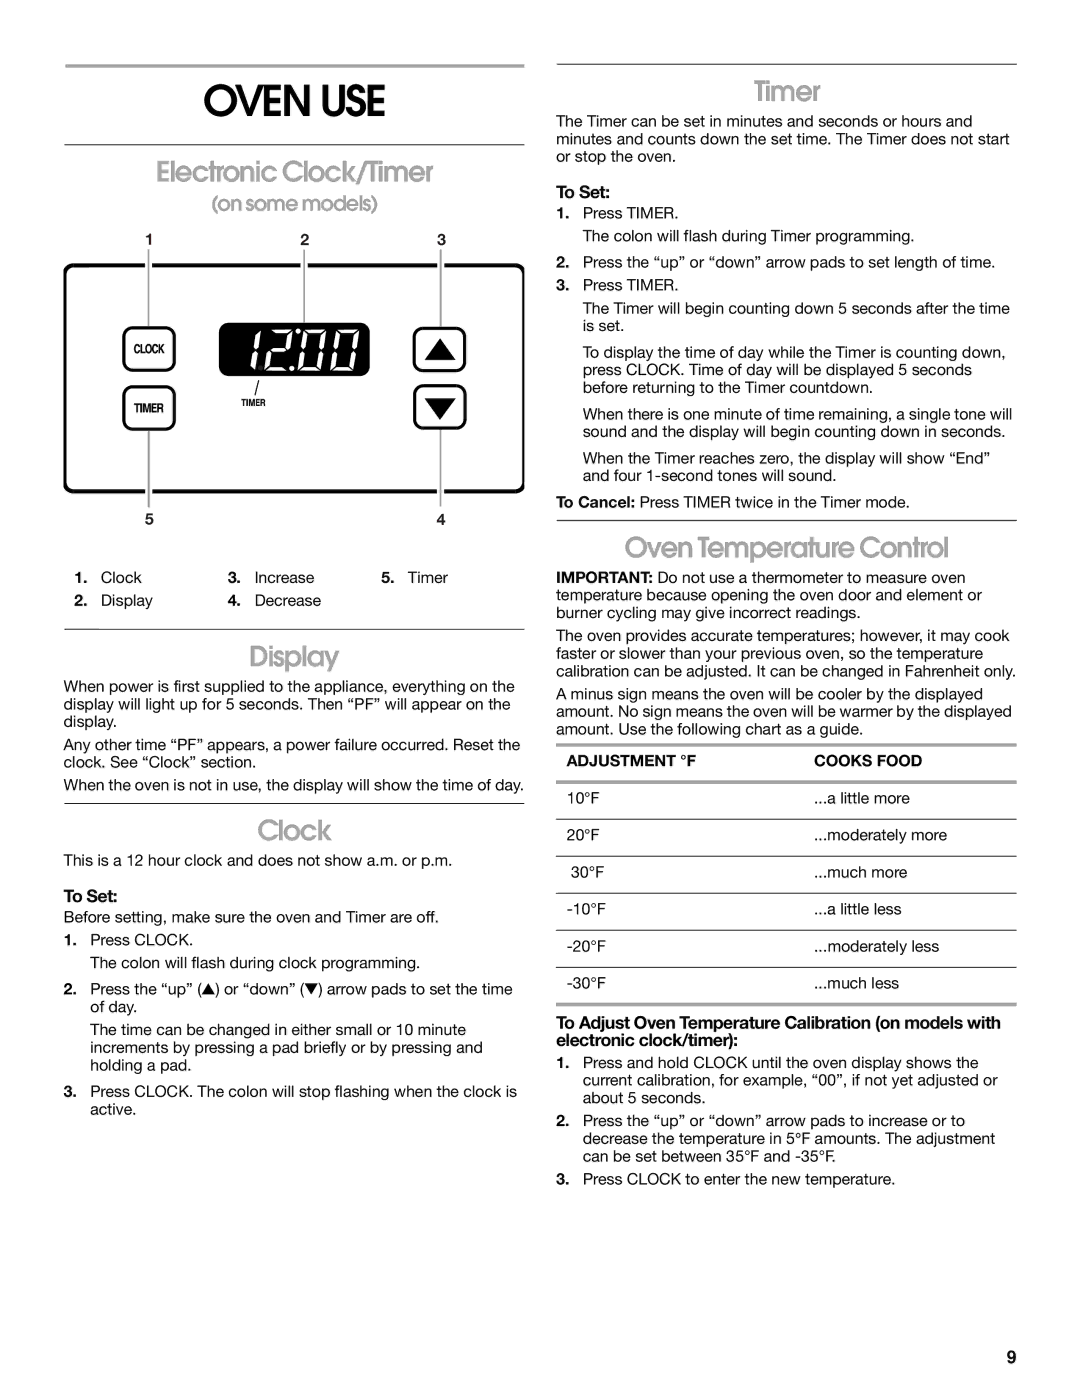
Electronic Clock/Timer

(on some models)

1

2

3


5


4

1.

Clock

3.

Increase

5. Timer

2.

Display

4.

Decrease


Display

When power is first supplied to the appliance, everything on the display will light up for 5 seconds. Then “PF” will appear on the display.

Any other time “PF” appears, a power failure occurred. Reset the clock. See “Clock” section.

When the oven is not in use, the display will show the time of day.

Clock

This is a 12 hour clock and does not show a.m. or p.m.

To Set:

Before setting, make sure the oven and Timer are off.

1.Press CLOCK.

The colon will flash during clock programming.

2.Press the “up” (▲) or “down” (▼) arrow pads to set the time of day.

The time can be changed in either small or 10 minute increments by pressing a pad briefly or by pressing and holding a pad.

3.Press CLOCK. The colon will stop flashing when the clock is active.

Timer

The Timer can be set in minutes and seconds or hours and minutes and counts down the set time. The Timer does not start or stop the oven.

To Set:

1.Press TIMER.

The colon will flash during Timer programming.

2.Press the “up” or “down” arrow pads to set length of time.

3.Press TIMER.

The Timer will begin counting down 5 seconds after the time is set.

To display the time of day while the Timer is counting down, press CLOCK. Time of day will be displayed 5 seconds before returning to the Timer countdown.

When there is one minute of time remaining, a single tone will sound and the display will begin counting down in seconds.

When the Timer reaches zero, the display will show “End” and four 1-second tones will sound.

To Cancel: Press TIMER twice in the Timer mode.

Oven Temperature Control

IMPORTANT: Do not use a thermometer to measure oven temperature because opening the oven door and element or burner cycling may give incorrect readings.

The oven provides accurate temperatures; however, it may cook faster or slower than your previous oven, so the temperature calibration can be adjusted. It can be changed in Fahrenheit only.

A minus sign means the oven will be cooler by the displayed amount. No sign means the oven will be warmer by the displayed amount. Use the following chart as a guide.

ADJUSTMENT °F

COOKS FOOD


10°F

...a little more


20°F

...moderately more


30°F

...much more


-10°F

...a little less


-20°F

...moderately less


-30°F

...much less

To Adjust Oven Temperature Calibration (on models with electronic clock/timer):

1.Press and hold CLOCK until the oven display shows the current calibration, for example, “00”, if not yet adjusted or about 5 seconds.

2.Press the “up” or “down” arrow pads to increase or to decrease the temperature in 5°F amounts. The adjustment can be set between 35°F and -35°F.

3.Press CLOCK to enter the new temperature.

9

Page 9
Image 9
Whirlpool FGP335H, FGP325H, FGP337H manual Oven USE

FGP337H, FGP325H, FGP335H specifications

The Whirlpool FGP335H, FGP325H, and FGP337H are a series of robust, feature-rich gas ranges designed to elevate the cooking experience in any kitchen. These models are engineered with practicality, efficiency, and user-friendly operation in mind, making them a popular choice for cooking enthusiasts.

One of the standout features of these ranges is their powerful burner system. Each model is equipped with multiple burners, including high-output options that deliver rapid heat for boiling water or searing meats. The burners are designed to accommodate various cooking styles, from simmering delicate sauces to achieving a robust stir-fry. The precise flame control allows users to easily adjust temperatures to their desired settings, ensuring optimal cooking results every time.

Another notable characteristic of the Whirlpool FGP335H, FGP325H, and FGP337H is their durable construction. With a sturdy stainless steel finish, these ranges not only provide durability but are also easy to clean, ensuring that your kitchen maintains its aesthetic charm. The oven cavities are designed with a porcelain-coated surface that simplifies the cleaning process while resisting scratches and chips.

The innovative cooking technologies integrated into these models enhance their overall functionality. The AccuBake temperature management system, for example, ensures consistent oven temperatures by using a sensor to monitor heat levels, resulting in more evenly cooked dishes. Additionally, these ranges come with a delay bake feature, allowing users to set their ovens to start cooking at a later time—ideal for those with busy schedules.

Safety is a top priority in the design of the Whirlpool gas ranges. They feature a gas safety shut-off valve that automatically cuts the gas flow if the flame goes out, providing peace of mind during use. Additionally, the easy-to-read oven controls, along with the straightforward interface, make it simpler for cooks of all skill levels to operate the appliance.

In terms of aesthetic appeal, these gas ranges boast a sleek and modern design that complements any kitchen décor. The ergonomic knobs and handles ensure ease of use while adding a touch of elegance to the appliance. With a combination of practical features, advanced technology, and a stylish look, the Whirlpool FGP335H, FGP325H, and FGP337H models offer a comprehensive cooking solution that meets the diverse needs of home chefs.