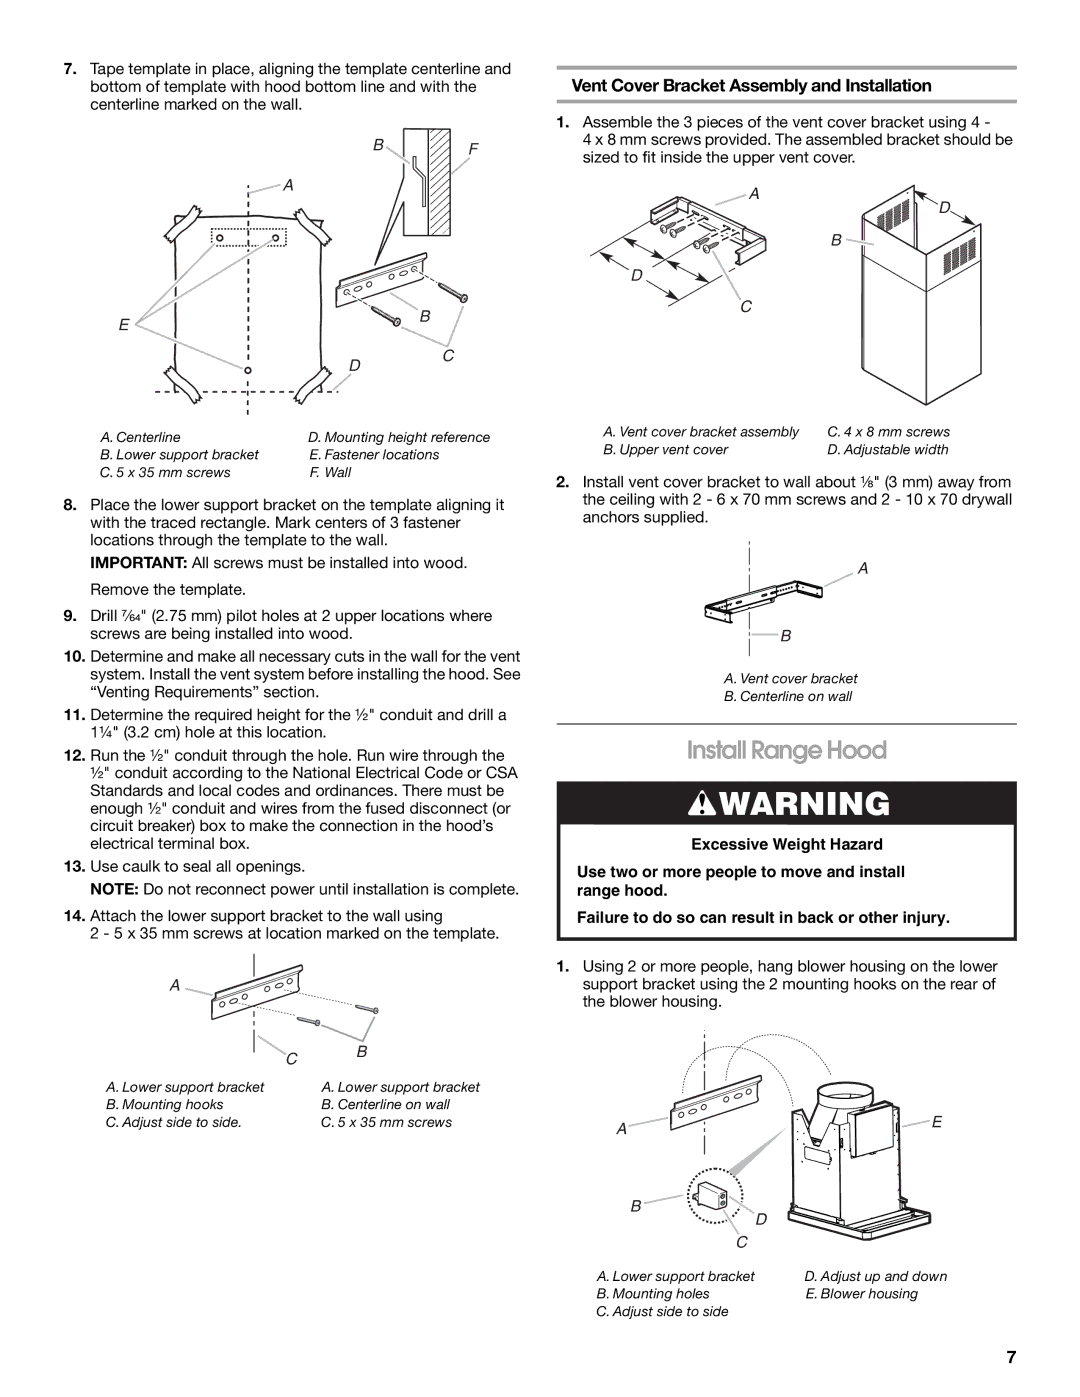
7.Tape template in place, aligning the template centerline and bottom of template with hood bottom line and with the centerline marked on the wall.

B

F

A

E

B


D

C


A. Centerline

D. Mounting height reference

B. Lower support bracket

E. Fastener locations


C. 5 x 35 mm screws

F. Wall


8.Place the lower support bracket on the template aligning it with the traced rectangle. Mark centers of 3 fastener locations through the template to the wall.

IMPORTANT: All screws must be installed into wood. Remove the template.

9.Drill ⁷⁄₆₄" (2.75 mm) pilot holes at 2 upper locations where screws are being installed into wood.

10.Determine and make all necessary cuts in the wall for the vent system. Install the vent system before installing the hood. See “Venting Requirements” section.

11.Determine the required height for the ½" conduit and drill a 1¼" (3.2 cm) hole at this location.

12.Run the ½" conduit through the hole. Run wire through the ½" conduit according to the National Electrical Code or CSA Standards and local codes and ordinances. There must be enough ½" conduit and wires from the fused disconnect (or circuit breaker) box to make the connection in the hood’s electrical terminal box.

13.Use caulk to seal all openings.

NOTE: Do not reconnect power until installation is complete.

14.Attach the lower support bracket to the wall using

2 - 5 x 35 mm screws at location marked on the template.

A


C

B


A. Lower support bracket


A. Lower support bracket

B. Mounting hooks


B. Centerline on wall

C. Adjust side to side.


C. 5 x 35 mm screws

Vent Cover Bracket Assembly and Installation

1.Assemble the 3 pieces of the vent cover bracket using 4 -

4 x 8 mm screws provided. The assembled bracket should be sized to fit inside the upper vent cover.

A

D

B

D

C

A. Vent cover bracket assembly

C. 4 x 8 mm screws

B. Upper vent cover

D. Adjustable width

2.Install vent cover bracket to wall about ¹⁄₈" (3 mm) away from the ceiling with 2 - 6 x 70 mm screws and 2 - 10 x 70 drywall anchors supplied.

A

B

A. Vent cover bracket

B. Centerline on wall

Install Range Hood

WARNING

Excessive Weight Hazard

Use two or more people to move and install range hood.

Failure to do so can result in back or other injury.

1.Using 2 or more people, hang blower housing on the lower support bracket using the 2 mounting hooks on the rear of the blower housing.

A

E


B


D


C


A. Lower support bracket

D. Adjust up and down

B. Mounting holes

E. Blower housing

C. Adjust side to side


7

Page 7
Image 7
Whirlpool W10018010 installation instructions Install Range Hood, Vent Cover Bracket Assembly and Installation

W10018010 specifications

The Whirlpool W10018010 is a state-of-the-art refrigerator water filter designed to enhance the quality of drinking water by reducing harmful contaminants. It features an advanced filtration system that not only improves taste but also ensures safety for you and your family. This water filter is compatible with a wide range of Whirlpool refrigerators, making it a versatile choice for many households.

One of the main features of the W10018010 is its ability to reduce various impurities commonly found in tap water. It effectively removes contaminants such as lead, chlorine, and sediment, ensuring that the water you drink is clean and refreshing. This filter boasts a comprehensive 6-month lifespan, allowing for long-term usage before needing a replacement. Its easy installation process means you can replace the filter without any professional help, maintaining the convenience of access to filtered water.

Technologically, the W10018010 incorporates Whirlpools's innovative filtration technology, which utilizes activated carbon to capture and absorb pollutants. This environmental-friendly solution helps provide better-tasting water while significantly reducing plastic waste, as it minimizes the need for bottled water. The filter is also NSF certified, guaranteeing that it meets stringent safety and performance standards.

Durability is another hallmark of the W10018010. Constructed with high-quality materials, this filter ensures longevity and effectiveness, making it a smart investment for anyone looking to improve their home's water quality. Additionally, the filter design facilitates optimal water flow, ensuring that you can enjoy refreshing water without compromising on pressure.

The W10018010 is designed with user-friendliness in mind. It features an easy-to-read installation guide and clear labeling, allowing users of all skill levels to install it effortlessly. Overall, the Whirlpool W10018010 water filter represents a combination of advanced technology, user-centric design, and essential purification capabilities. With its focus on both safety and convenience, it stands as an ideal choice for families looking to improve their hydration habits while ensuring the health and well-being of their loved ones. By choosing this filter, you invest not only in taste but also in the peace of mind that comes with drinking clean, safe water.