NOTE: Tighten the nut by hand. Then tighten it with a wrench two more turns. Do not overtighten.

A

B

C

D

E F G

A. Refrigerator water tubing


E. Ferrule (purchased)

B. Nut (provided)


F. Nut (purchased)

C. Bulb


G. Household water line

D. Coupling (purchased)


4.Turn shutoff valve ON.

5.Check for leaks. Tighten any nuts or connections (including connections at the valve) that leak.

Style 3

1.Unplug refrigerator or disconnect power.

2.Remove and discard the cap from the gray water tube.

A B

A.Cap

B.Inlet

3.Using a compression nut and sleeve, attach the copper tube to the water inlet.

4.Once secured, tighten the compression nut. Do not overtighten.

5.Check the connection by pulling on the copper tubing. Turn on water supply to refrigerator. Check for leaks. Tighten any nuts or connections that leak.

Complete the Installation

WARNING

Electrical Shock Hazard

Plug into a grounded 3 prong outlet.

Do not remove ground prong.

Do not use an adapter.

Do not use an extension cord.

Failure to follow these instructions can result in death, fire, or electrical shock.

1.Plug into a grounded 3 prong outlet.

2.Flush the water system. See “Prepare the Water System” or “Water and Ice Dispensers.”

NOTE: Allow 24 hours to produce the first batch of ice. Allow 3 days to completely fill ice container.

REFRIGERATOR USE

Using theControls

For your convenience, your refrigerator controls are preset at the factory. When you first install your refrigerator, make sure that the controls are still preset. The Refrigerator Control and the Freezer Control should both be set to the “mid-settings.”

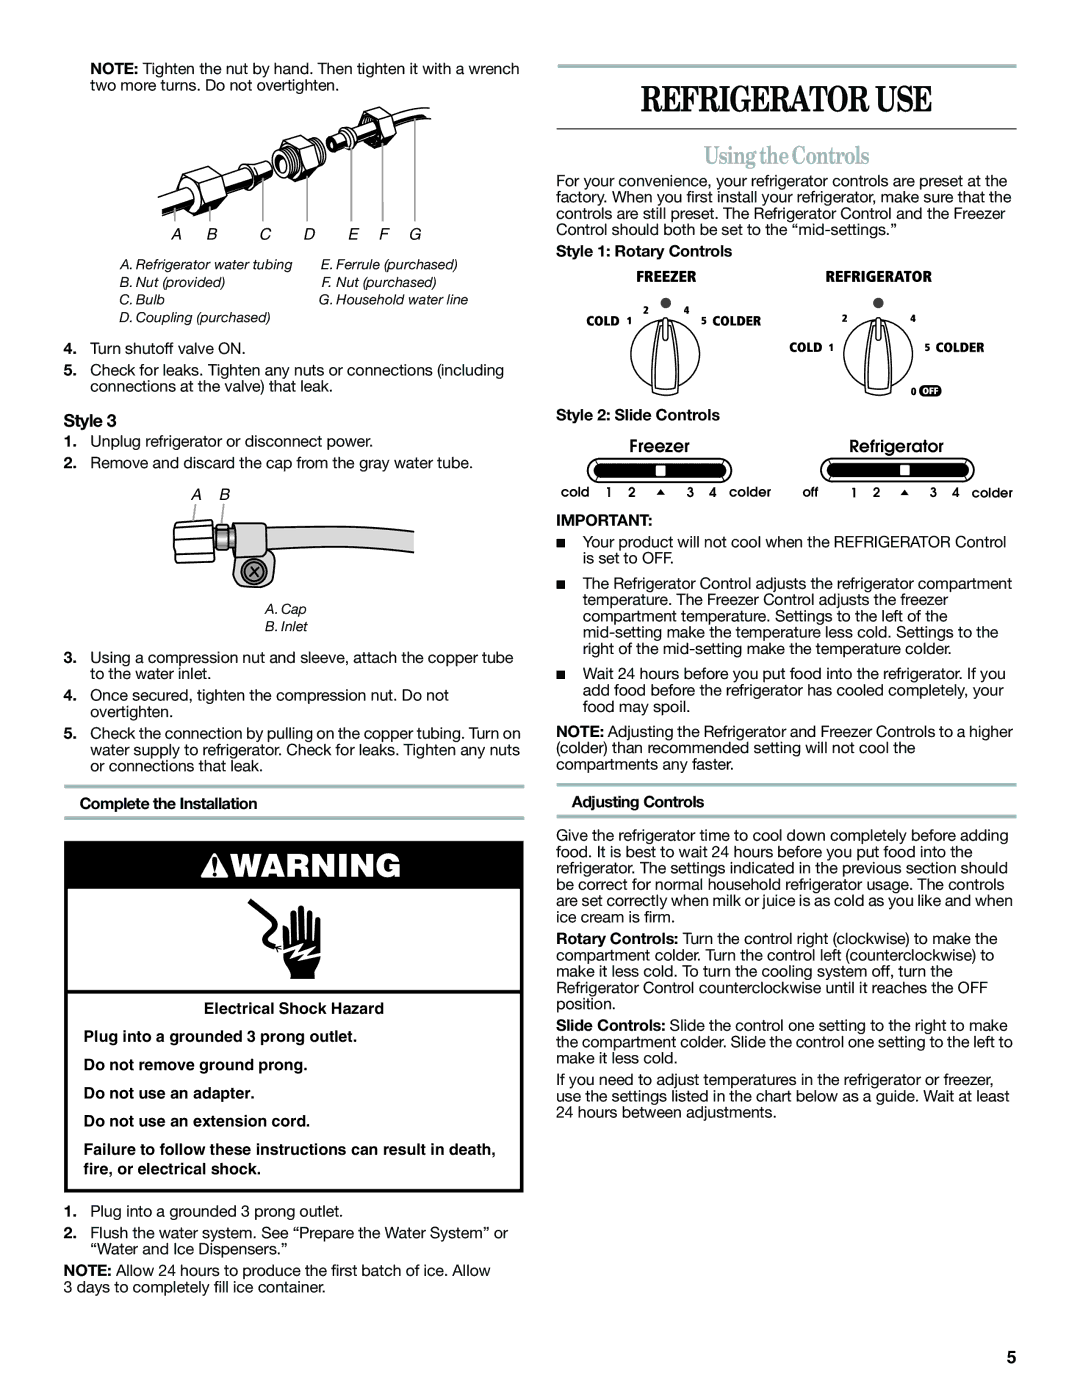
Style 1: Rotary Controls

Style 2: Slide Controls


Freezer


Refrigerator

cold 1 2

3 4 colder

off

1 2

3 4 colder

IMPORTANT:

Your product will not cool when the REFRIGERATOR Control is set to OFF.

The Refrigerator Control adjusts the refrigerator compartment temperature. The Freezer Control adjusts the freezer compartment temperature. Settings to the left of the mid-setting make the temperature less cold. Settings to the right of the mid-setting make the temperature colder.

Wait 24 hours before you put food into the refrigerator. If you add food before the refrigerator has cooled completely, your food may spoil.

NOTE: Adjusting the Refrigerator and Freezer Controls to a higher (colder) than recommended setting will not cool the compartments any faster.

Adjusting Controls

Give the refrigerator time to cool down completely before adding food. It is best to wait 24 hours before you put food into the refrigerator. The settings indicated in the previous section should be correct for normal household refrigerator usage. The controls are set correctly when milk or juice is as cold as you like and when ice cream is firm.

Rotary Controls: Turn the control right (clockwise) to make the compartment colder. Turn the control left (counterclockwise) to make it less cold. To turn the cooling system off, turn the Refrigerator Control counterclockwise until it reaches the OFF position.

Slide Controls: Slide the control one setting to the right to make the compartment colder. Slide the control one setting to the left to make it less cold.

If you need to adjust temperatures in the refrigerator or freezer, use the settings listed in the chart below as a guide. Wait at least 24 hours between adjustments.

5

Page 5
Image 5
Whirlpool W10346247A Refrigerator USE, Using theControls, Style 1 Rotary Controls Style 2 Slide Controls

W10346247A specifications

The Whirlpool W10346247A is a high-efficiency dishwasher designed to enhance the laundry experience while integrating seamlessly into contemporary kitchens. This model stands out due to its impressive blend of cutting-edge technologies and user-friendly features.

One of its key features is the Sensor Cycle, which automatically detects the soil level of the dishes and adjusts the wash cycle accordingly. This ensures optimal cleaning performance while conserving water and energy, making it an eco-friendly choice for households aiming to reduce their environmental footprint.

Another significant highlight is the SoilSensor technology. By using advanced sensors, the dishwasher can monitor the dirtiness of the water, adjusting wash times and cycles to ensure that even the toughest stains are effectively removed. This provides peace of mind, knowing that wash cycles are tailored to the amount of grime present on the dishes.

The W10346247A also boasts a stainless steel interior, which not only ensures durability and longevity but also helps with superior drying performance. The stainless steel material is resistant to staining and odors, contributing to an overall hygienic environment.

For those who value versatility, the dishwasher features adjustable upper racks, allowing users to customize the interior space to accommodate larger pots and pans. This flexibility ensures that no dish is left unwashed, catering to all dining needs, from casual meals to elaborate gatherings.

Additionally, this model is equipped with a Quiet Wash System, which operates at lower decibel levels. This means that dishes can be cleaned effectively without disturbing the home environment, making it suitable for open-concept living spaces.

The Whirlpool W10346247A also integrates a high-efficiency filtration system to ensure that food particles are effectively removed from the wash water, thus enhancing the cleaning efficacy and extending the machine's lifespan.

Overall, the Whirlpool W10346247A stands out as an efficient, versatile, and quiet dishwasher that incorporates innovative features to meet the demands of modern kitchens. With its advanced technologies and practical design, it successfully combines performance and convenience, making it a valuable addition to any household.