Final Adjustments

Auger Control Adjustment

Check the adjustment of the auger control as follows:

Push forward on the auger control until the small rubber bumper contacts the upper handle. There should be slack in the cable. See Figure 5.

Release the auger control. The cable should be

straight. Make certain you can depress the auger control against the left handle completely.

If adjustment is necessary, proceed as follows:

Loosen the jam nut and thread the cable in (for less slack) or out (for more slack) as necessary. See Figure 5.

Recheck the adjustment before retightening the jam nut against the cable.

Auger

Control

Z-End

Jam Nut

Auger

Control Cable

Figure 5

Skid Shoe Adjustment

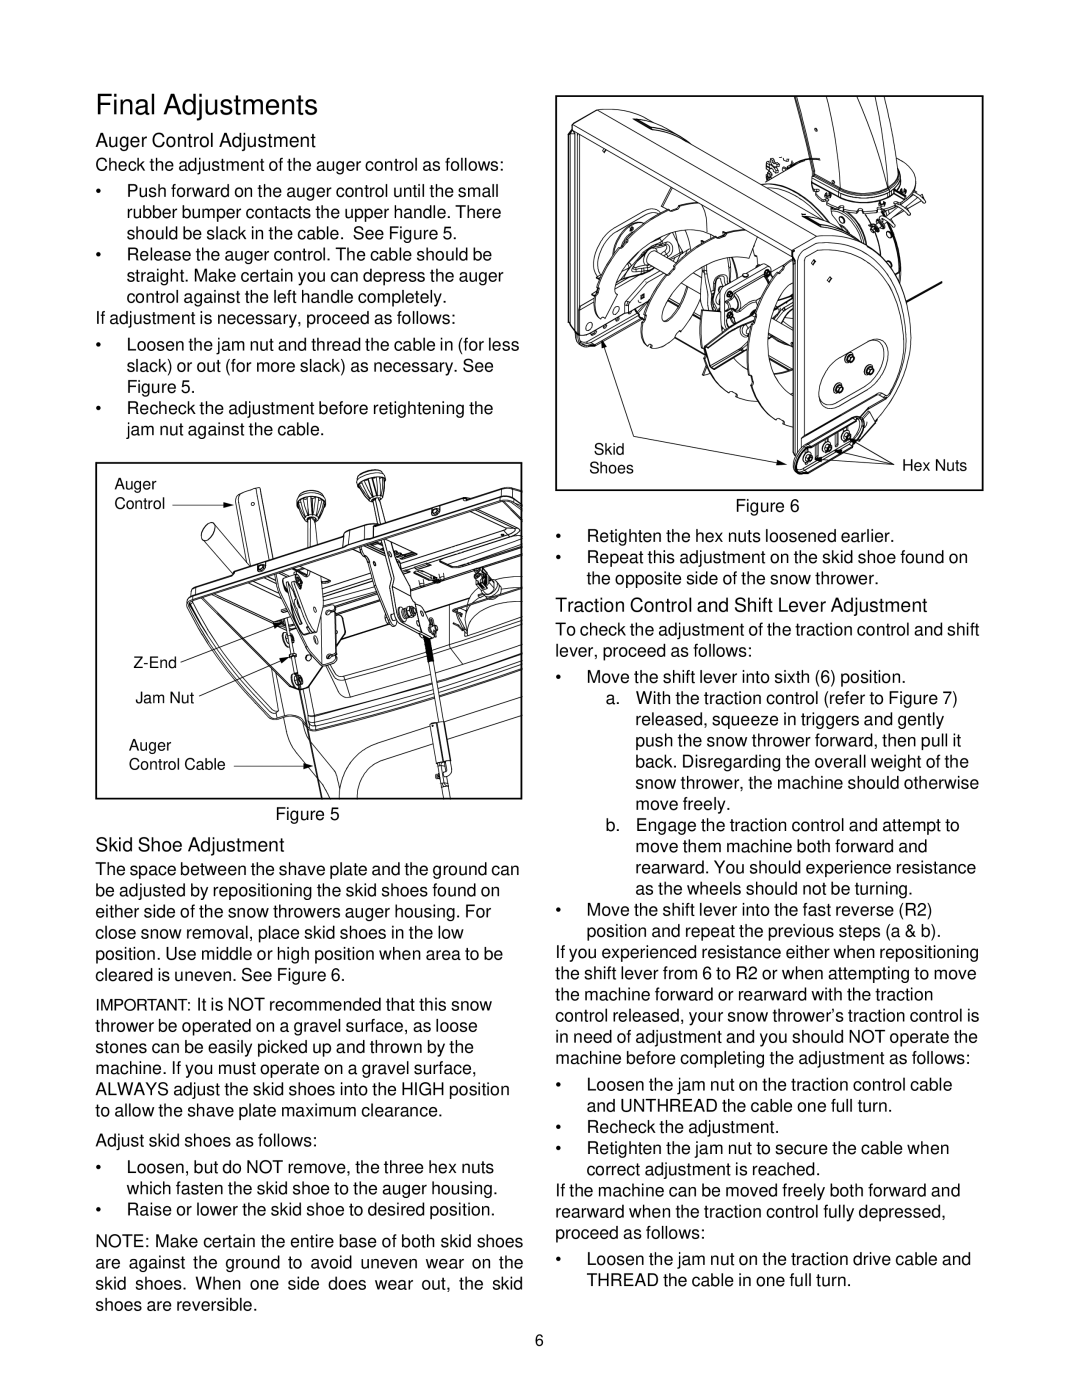
The space between the shave plate and the ground can be adjusted by repositioning the skid shoes found on either side of the snow throwers auger housing. For close snow removal, place skid shoes in the low position. Use middle or high position when area to be cleared is uneven. See Figure 6.

IMPORTANT: It is NOT recommended that this snow thrower be operated on a gravel surface, as loose stones can be easily picked up and thrown by the machine. If you must operate on a gravel surface, ALWAYS adjust the skid shoes into the HIGH position to allow the shave plate maximum clearance.

Adjust skid shoes as follows:

Loosen, but do NOT remove, the three hex nuts which fasten the skid shoe to the auger housing.

Raise or lower the skid shoe to desired position.

NOTE: Make certain the entire base of both skid shoes are against the ground to avoid uneven wear on the skid shoes. When one side does wear out, the skid shoes are reversible.

Skid

Hex Nuts

Shoes

Figure 6

Retighten the hex nuts loosened earlier.

Repeat this adjustment on the skid shoe found on the opposite side of the snow thrower.

Traction Control and Shift Lever Adjustment

To check the adjustment of the traction control and shift lever, proceed as follows:

Move the shift lever into sixth (6) position.

a.With the traction control (refer to Figure 7) released, squeeze in triggers and gently push the snow thrower forward, then pull it back. Disregarding the overall weight of the snow thrower, the machine should otherwise move freely.

b.Engage the traction control and attempt to move them machine both forward and rearward. You should experience resistance as the wheels should not be turning.

Move the shift lever into the fast reverse (R2) position and repeat the previous steps (a & b).

If you experienced resistance either when repositioning the shift lever from 6 to R2 or when attempting to move the machine forward or rearward with the traction control released, your snow thrower’s traction control is in need of adjustment and you should NOT operate the machine before completing the adjustment as follows:

Loosen the jam nut on the traction control cable and UNTHREAD the cable one full turn.

Recheck the adjustment.

Retighten the jam nut to secure the cable when

correct adjustment is reached.

If the machine can be moved freely both forward and rearward when the traction control fully depressed, proceed as follows:

Loosen the jam nut on the traction drive cable and THREAD the cable in one full turn.

6

Page 6
Image 6
White Outdoor 31AH7Q3G190 manual Final Adjustments, Auger Control Adjustment, Skid Shoe Adjustment

31AH7Q3G190 specifications

The White Outdoor 31AH7Q3G190 is a versatile and robust snow blower designed to tackle the toughest winter conditions. Built to cater to homeowners looking for an efficient solution to their snow removal needs, this model combines power, durability, and user-friendly features.

One of the standout features of the 31AH7Q3G190 is its 24-inch clearing width, allowing users to clear a wide path quickly and effectively. This wide auger ensures that even heavier snow accumulations can be handled with ease, making it ideal for areas with significant snowfall. The snow blower boasts a powerful 208cc engine, providing the necessary torque and reliability needed to handle various snow conditions, from light flurries to heavy, wet snow.

The snow blower is equipped with a 6-speed transmission, offering operators the flexibility to adjust their speed as needed. This feature allows for efficient maneuvering, whether on flat driveways or sloped surfaces. Additionally, the unit features an adjustable chute that can rotate 180 degrees, giving users precise control over snow direction. This is particularly valuable when clearing driveways or sidewalks, enabling users to avoid unwanted snow piles.

For enhanced usability, the 31AH7Q3G190 is designed with electric start technology, ensuring that starting the machine is hassle-free. This is a particularly attractive feature for those who may struggle with traditional pull-start mechanisms in cold weather. The snow blower’s heavy-duty construction also includes reinforced handles that provide comfort and stability during operation, while the large, rugged tires offer superior traction, allowing users to traverse snowy terrains without slipping.

Safety is also a priority with this snow blower. It includes features such as an operator presence control, which ensures that the machine only operates when the user is in control. This minimizes the risk of accidents during operation, adding an extra layer of security.

In summary, the White Outdoor 31AH7Q3G190 snow blower combines power, efficiency, and user-centered design. Its durable build, powerful engine, and functional features make it an excellent choice for homeowners needing a reliable snow removal solution. Whether dealing with light dustings or heavy snowfalls, this snow blower delivers performance and convenience, ensuring that winter weather doesn't become a burden. Its combination of innovation and practicality stands as a testament to quality engineering, making it a valuable addition to any winter toolkit.