correct diameter. Be sure not to damage the seal lip.

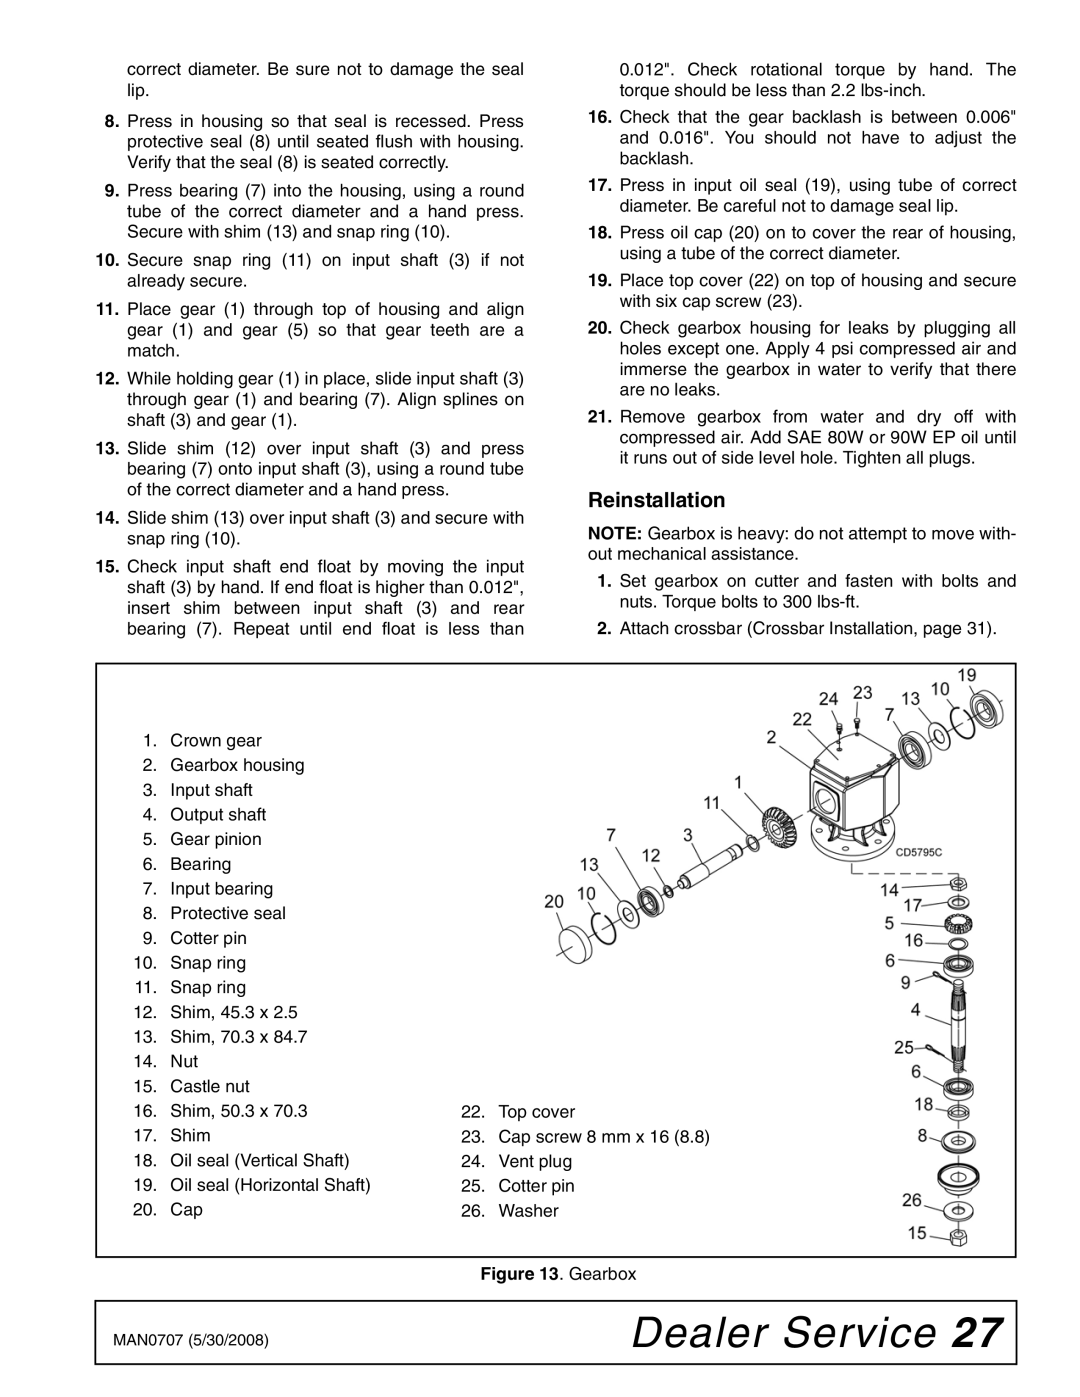
8.Press in housing so that seal is recessed. Press protective seal (8) until seated flush with housing. Verify that the seal (8) is seated correctly.

9.Press bearing (7) into the housing, using a round tube of the correct diameter and a hand press. Secure with shim (13) and snap ring (10).

10.Secure snap ring (11) on input shaft (3) if not already secure.

11.Place gear (1) through top of housing and align gear (1) and gear (5) so that gear teeth are a match.

12.While holding gear (1) in place, slide input shaft (3) through gear (1) and bearing (7). Align splines on shaft (3) and gear (1).

13.Slide shim (12) over input shaft (3) and press bearing (7) onto input shaft (3), using a round tube of the correct diameter and a hand press.

14.Slide shim (13) over input shaft (3) and secure with snap ring (10).

15.Check input shaft end float by moving the input shaft (3) by hand. If end float is higher than 0.012", insert shim between input shaft (3) and rear bearing (7). Repeat until end float is less than

0.012". Check rotational torque by hand. The torque should be less than 2.2 lbs-inch.

16.Check that the gear backlash is between 0.006" and 0.016". You should not have to adjust the backlash.

17.Press in input oil seal (19), using tube of correct diameter. Be careful not to damage seal lip.

18.Press oil cap (20) on to cover the rear of housing, using a tube of the correct diameter.

19.Place top cover (22) on top of housing and secure with six cap screw (23).

20.Check gearbox housing for leaks by plugging all holes except one. Apply 4 psi compressed air and immerse the gearbox in water to verify that there are no leaks.

21.Remove gearbox from water and dry off with compressed air. Add SAE 80W or 90W EP oil until it runs out of side level hole. Tighten all plugs.

Reinstallation

NOTE: Gearbox is heavy: do not attempt to move with- out mechanical assistance.

1.Set gearbox on cutter and fasten with bolts and nuts. Torque bolts to 300 lbs-ft.

2.Attach crossbar (Crossbar Installation, page 31).

1.

Crown gear


2.

Gearbox housing


3.

Input shaft


4.

Output shaft


5.

Gear pinion


6.

Bearing


7.

Input bearing


8.

Protective seal


9.

Cotter pin


10.

Snap ring


11.

Snap ring


12.

Shim, 45.3 x 2.5


13.

Shim, 70.3 x 84.7


14.

Nut


15.

Castle nut


16.

Shim, 50.3 x 70.3

22.

Top cover

17.

Shim

23.

Cap screw 8 mm x 16 (8.8)

18.

Oil seal (Vertical Shaft)

24.

Vent plug

19.

Oil seal (Horizontal Shaft)

25.

Cotter pin

20.

Cap

26.

Washer

Figure 13. Gearbox

MAN0707 (5/30/2008)

Dealer Service 27


Page 27
Image 27
Woods Equipment BW180-3, BW180Q-3, BW126-3, BW126Q-3 manual Reinstallation, Gearbox

BW180-3, BW126Q-3, BW126-3, BW180Q-3 specifications

Woods Equipment Company has long been a leader in manufacturing innovative agricultural and landscape maintenance products. Among its popular offerings are the BW180-3, BW180Q-3, BW126-3, and BW126Q-3 models, which are designed to meet the needs of both professional and amateur users.

The BW180-3 is an impressive rotary cutter with a cutting width of 60 inches, making it ideal for tackling overgrown fields, pastures, and other large mowing areas. It features a rugged, all-steel construction that ensures durability and longevity, even in the toughest of conditions. The cutter is equipped with a heavy-duty gearbox, ensuring efficient power transfer while minimizing wear and tear. The innovative design of the BW180-3 also includes an adjustable tail wheel that provides stability and ease of maneuverability.

For those seeking advanced functionality, the BW180Q-3 model introduces quick-attach capabilities, allowing users to easily connect and disconnect the cutter from the tractor without the need for additional tools. This feature not only saves time but also enhances user convenience, making it an excellent choice for busy farms and landscaping operations. With a similar cutting width as the BW180-3, this model maintains the robust construction and drivetrain specifications that make Woods Equipment cutters a trusted choice.

On the smaller side, the BW126-3 offers a 48-inch cutting width, perfect for maintaining smaller fields and lawn areas. Designed with the same enduring quality, it is lightweight yet powerful enough to handle tough mowing tasks. The BW126-3 comes with a versatile hitch design that makes it compatible with a wide range of tractors.

The BW126Q-3 shares the core features of the BW126-3 but incorporates the quick-attach technology for enhanced user efficiency. This model combines flexibility with reliability and is particularly suited for operators who need to switch quickly between attachments throughout their workday.

Overall, the Woods Equipment BW180-3, BW180Q-3, BW126-3, and BW126Q-3 models provide a variety of features and technologies that make them indispensable for anyone looking to efficiently manage land. Whether you need the extra cutting width and power of the BW180 series or the nimble ease of the BW126 series, Woods Equipment offers versatile solutions for diverse agricultural and landscaping needs.