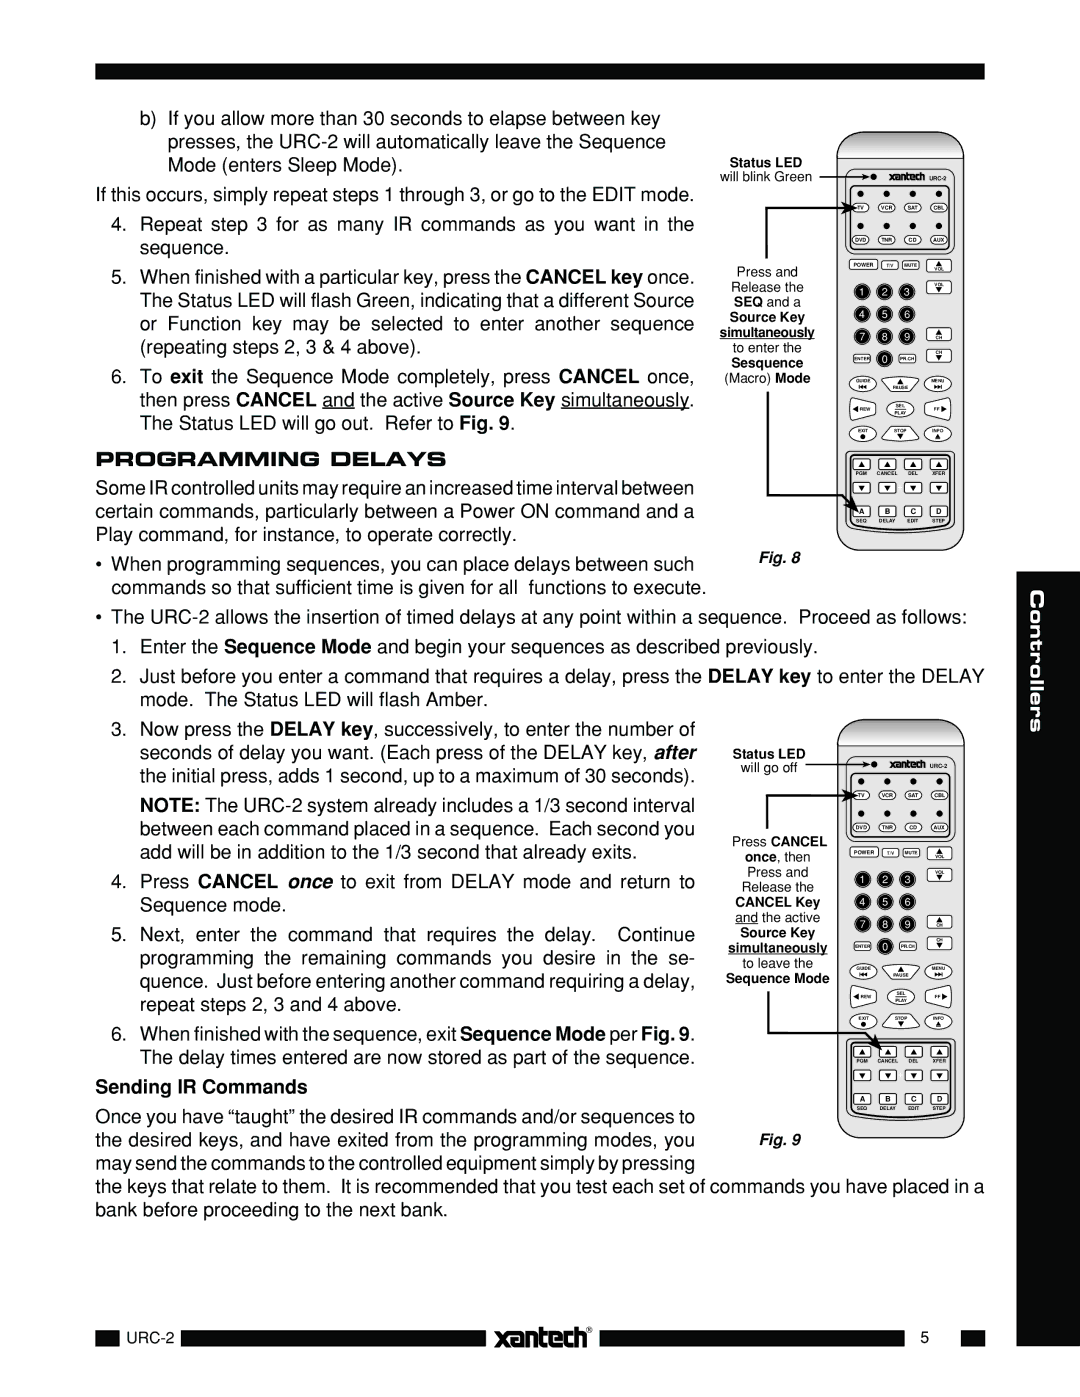
b) If you allow more than 30 seconds to elapse between key presses, the
Mode (enters Sleep Mode).Status LED
will blink Green ![]()
![]()
![]()
![]()
If this occurs, simply repeat steps 1 through 3, or go to the EDIT mode.
4.Repeat step 3 for as many IR commands as you want in the sequence.
5.When finished with a particular key, press the CANCEL key once. The Status LED will flash Green, indicating that a different Source or Function key may be selected to enter another sequence (repeating steps 2, 3 & 4 above).
6.To exit the Sequence Mode completely, press CANCEL once, then press CANCEL and the active Source Key simultaneously. The Status LED will go out. Refer to Fig. 9.
PROGRAMMING DELAYS
Some IR controlled units may require an increased time interval between certain commands, particularly between a Power ON command and a Play command, for instance, to operate correctly.
•When programming sequences, you can place delays between such commands so that sufficient time is given for all functions to execute.
| TV | VCR | SAT | CBL |
| DVD | TNR | CD | AUX |
Press and | POWER | T/V | MUTE | VOL |
|
|
| ||
Release the | 1 | 2 | 3 | VOL |
SEQ and a |
| |||
4 | 5 | 6 |
| |
Source Key |
| |||
simultaneously | 7 | 8 | 9 | CH |
to enter the |
| 0 |
| CH |
Sesquence | ENTER | PR.CH |
| |
|
|
| ||
(Macro) Mode | GUIDE | PAUSE | MENU | |
|
|
| ||
| REW | SEL | FF | |
| PLAY | |||
|
|
| ||
| EXIT | STOP | INFO | |
| PGM | CANCEL | DEL | XFER |
A B C D
SEQ DELAY EDIT STEP
Fig. 8
•The
1.Enter the Sequence Mode and begin your sequences as described previously.
2.Just before you enter a command that requires a delay, press the DELAY key to enter the DELAY mode. The Status LED will flash Amber.
3.Now press the DELAY key, successively, to enter the number of seconds of delay you want. (Each press of the DELAY key, after the initial press, adds 1 second, up to a maximum of 30 seconds).
NOTE: The
4.Press CANCEL once to exit from DELAY mode and return to Sequence mode.
5.Next, enter the command that requires the delay. Continue programming the remaining commands you desire in the se- quence. Just before entering another command requiring a delay, repeat steps 2, 3 and 4 above.
TV VCR SAT CBL
DVD TNR CD AUX
POWER | T/V | MUTE | VOL |
|
|
| |
1 | 2 | 3 | VOL |
| |||
4 | 5 | 6 |
|
7 | 8 | 9 | CH |
| 0 |
| CH |
ENTER | PR.CH |
| |
GUIDE |
|
| MENU |
| PAUSE |
| |
REW |
| SEL | FF |
| PLAY | ||
|
|
| |
EXIT |
| STOP | INFO |
Controllers
6. When finished with the sequence, exit Sequence Mode per Fig. 9.
The delay times entered are now stored as part of the sequence. | PGM | CANCEL | DEL | XFER |
|
|
|
| |
Sending IR Commands | A | B | C | D |
| ||||
Once you have “taught” the desired IR commands and/or sequences to | SEQ | DELAY | EDIT | STEP |
|
|
|
| |
the desired keys, and have exited from the programming modes, you | Fig. 9 |
|
|
|
may send the commands to the controlled equipment simply by pressing |
|
|
|
|
the keys that relate to them. It is recommended that you test each set of commands you have placed in a bank before proceeding to the next bank.
|
|
| |
|
|
|
|
|
|
| 5 |
| |
|
|
|
|
| ||
|
|
|
|
|
|
|
|
|
|
|
|
|
|
