Manuals
/
Xerox
/
Computer Equipment
/
Printer
Xerox
P8EX
manual
Installing a SIMM, D-2DocuPrint P8ex Reference Guide
Models:
P8EX
1
76
82
82
Download
82 pages
46.69 Kb
73
74
75
76
77
78
79
80
Troubleshooting
Specs
Install
Maintenance
Configuring the PCL Drivers
Printer Problems
Page Setup
Cleaning the Printer
Weight
Remote Control Panel
Page 76
Image 76
Page 75
Page 77
Page 76
Image 76
Page 75
Page 77
Contents
The Xerox DocuPrint P8ex Personal Laser Printer
Reference Guide
1999 by Xerox Corporation. All rights reserved
Contents
Chapter 2 Additional Printer Setup Information
Chapter 1 Introduction
Chapter 3 Loading Print Media
Maintenance
Troubleshooting
Printing
Chapter
Appendix A Printer Specifications
DocuPrint P8ex Reference Guide
Introduction
Chapter 1 Introduction
Overview
Overview
1-2DocuPrint P8ex Reference Guide
Printer Components
Front View
Figure 1.1 Printer Components, Front View
Inside Front View
Figure 1.3 Printer Components, Rear View
Rear View
1-4DocuPrint P8ex Reference Guide
Printer Features
Printer Features
Printer Documentation
Using the CD-ROM
Note, Caution and Warning Symbols
1-8DocuPrint P8ex Reference Guide
Additional Printer Setup Information
Installing Software
Installing Software
2-2DocuPrint P8ex Reference Guide
Installing the RCP
and Status Monitor
Windows 95/98/NT 4.0 Installation
Windows 3.1x Installation
Installing the Xerox Font Manager
2-4DocuPrint P8ex Reference Guide
Loading Print Media
Selecting Print Media
Media Selection
Weights
Media
Selecting Print Media
Using the Multipurpose Paper Feeder MPF
Loading Print Media
Loading Print Media
3-4DocuPrint P8ex Reference Guide
Adjust the paper guides to the width of the paper
Using the Manual Feeder
3-6DocuPrint P8ex Reference Guide
Using the Face-upStacker
Loading Envelopes
Remote Control Panel
Printing
Chapter 4 Printing
Printing a Document
Printing a Document
4-2DocuPrint P8ex Reference Guide
Selecting Your Printer
Configuring the PCL Drivers
Configuring the PCL Drivers
Watermarks About
Paper/Output Image Quality Overlays
4-4DocuPrint P8ex Reference Guide
Paper/Output
Image Quality
Overlays
Watermarks
Using Printer Utilities
Remote Control Panel
PAGE SETUP
PRINTER
FONT SETUP
4-8DocuPrint P8ex Reference Guide
TEST
QUALITY
ABOUT
Status Monitor Xerox Font Manager
4-10DocuPrint P8ex Reference Guide
Maintenance
Cleaning the Outside
Cleaning the Inside
Chapter 5 Maintenance
Cleaning the Printer
Cleaning the Printer
5-2DocuPrint P8ex Reference Guide
Cleaning the Printer
Replacing the Laser Print Cartridge
Replacing the Laser Print Cartridge
5-4DocuPrint P8ex Reference Guide
Chapter 5 Maintenance
5-6DocuPrint P8ex Reference Guide
Troubleshooting
Chapter 6 Troubleshooting
Printer Problems
Table 6.1 Solving Printer Problems
Problem
Printer Problems
Table 6.1 Solving Printer Problems continued
6-4DocuPrint P8ex Reference Guide
Table 6.1 Solving Printer Problems continued
Print Quality Problems
Table 6.2 Solving Print Quality Problems
Print Quality Problems
6-6DocuPrint P8ex Reference Guide
Problem
6-8DocuPrint P8ex Reference Guide
Printer Specifications
Appendix A Printer Specifications
Printer Specifications
Specification and Description
A-2DocuPrint P8ex Reference Guide
Printer Specifications
A-4DocuPrint P8ex Reference Guide
Environmental and Safety Considerations
Introduction
Introduction
B-2DocuPrint P8ex Reference Guide
Laser Safety
Laser Safety
Laser Safety for the
United States and
Canada
The use of controls, adjustments, or
Laser Safety for Finland and Sweden
Laser Statement Laserturvallisuus
Ozone Safety
Ozone Safety
B-6DocuPrint P8ex Reference Guide
Electrical Safety
Electrical Safety
Do not place objects on the power cable
The power cord is damaged or frayed
Radio Frequency Emissions
United States and Canada
B-11
Europe
Xerox Limited Product Safety
Xerox Limited Technical Centre PO Box
Bessemer Road Welwyn Garden City
Herts AL7 1HE, England
Operational Safety
B-15
B-16DocuPrint P8ex Reference Guide
Certifications
Appendix C Certifications
Quality Standards
Quality Standards
C-2DocuPrint P8ex Reference Guide
Energy Star
Energy Star
C-4DocuPrint P8ex Reference Guide
Adding Memory
Appendix D Adding Memory
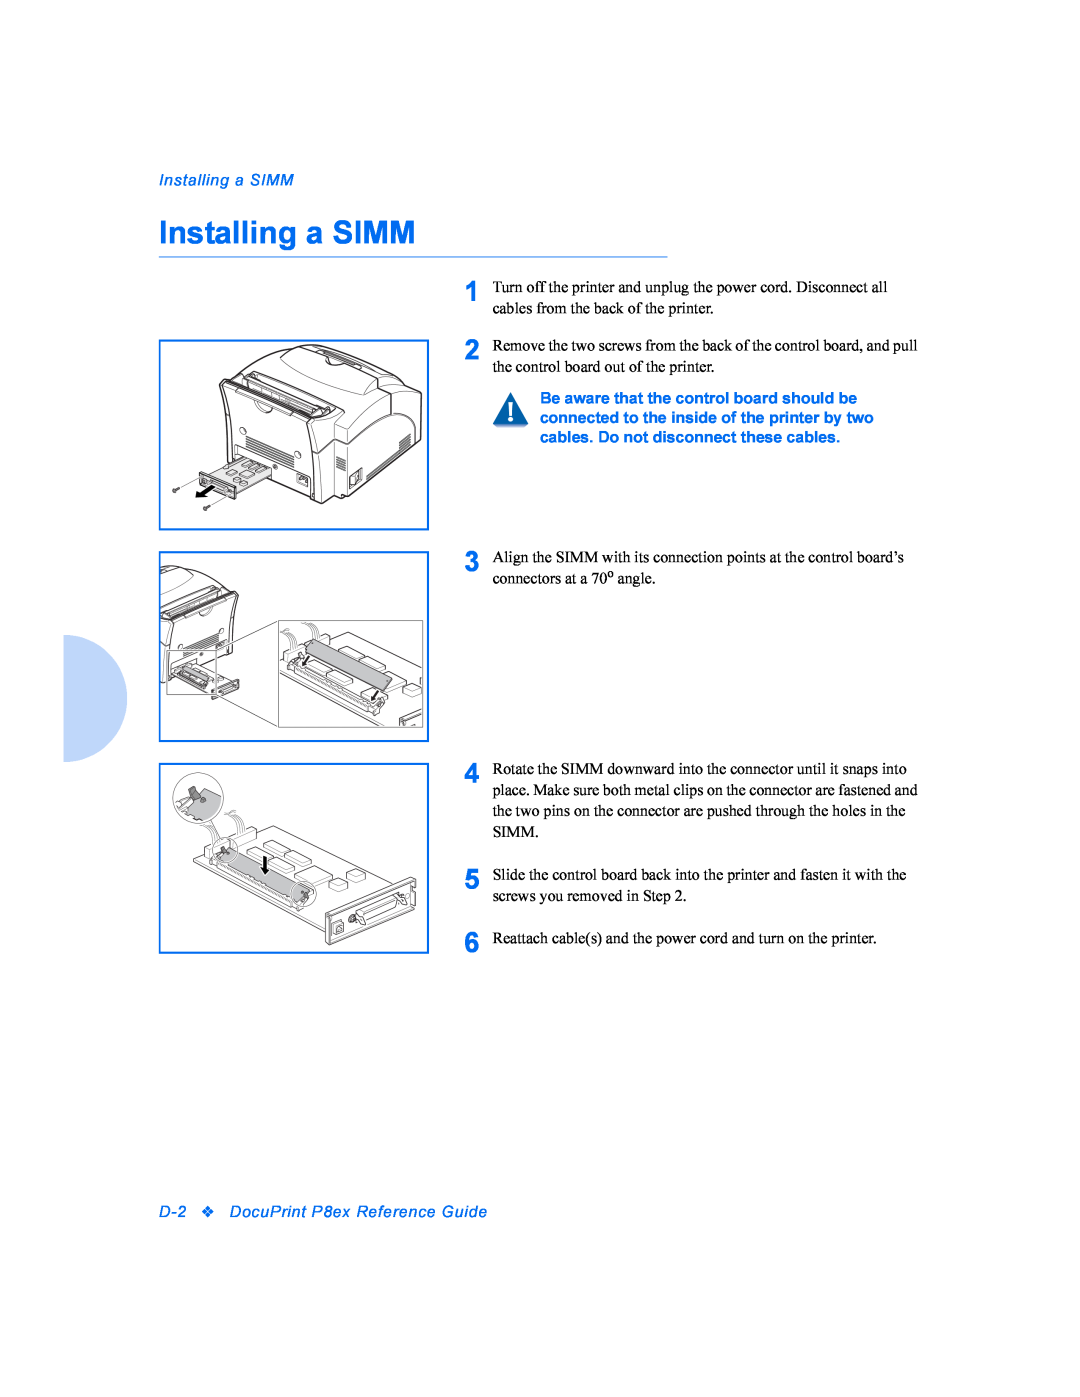
Installing a SIMM
Installing a SIMM
D-2DocuPrint P8ex Reference Guide
Removing a SIMM
Removing a SIMM
D-4DocuPrint P8ex Reference Guide
Language Codes
Appendix E Language Codes
Code
Language
Language Codes
E-2DocuPrint P8ex Reference Guide
Index
DocuPrint P8ex Reference Guide
Top
Page
Image
Contents