Changing Friction Wheel Rubber

The rubber on the friction wheel is subject to wear and should be checked after the first 25 hours of operation, and periodically thereafter. Replace the friction wheel rubber if any signs of wear or cracking are found.

Drain the gasoline from the snow thrower, or place a piece of plastic under the gas cap.

Tip the snow thrower up and forward, so that it rests on the housing.

Remove six screws from the frame cover underneath the snow thrower.

Remove the left wheel from the axle.

Using a 7/8” wrench, hold the hex shaft and remove the hex bolts and cupped washer and bearing from left side of the frame. Refer to Figure 14.

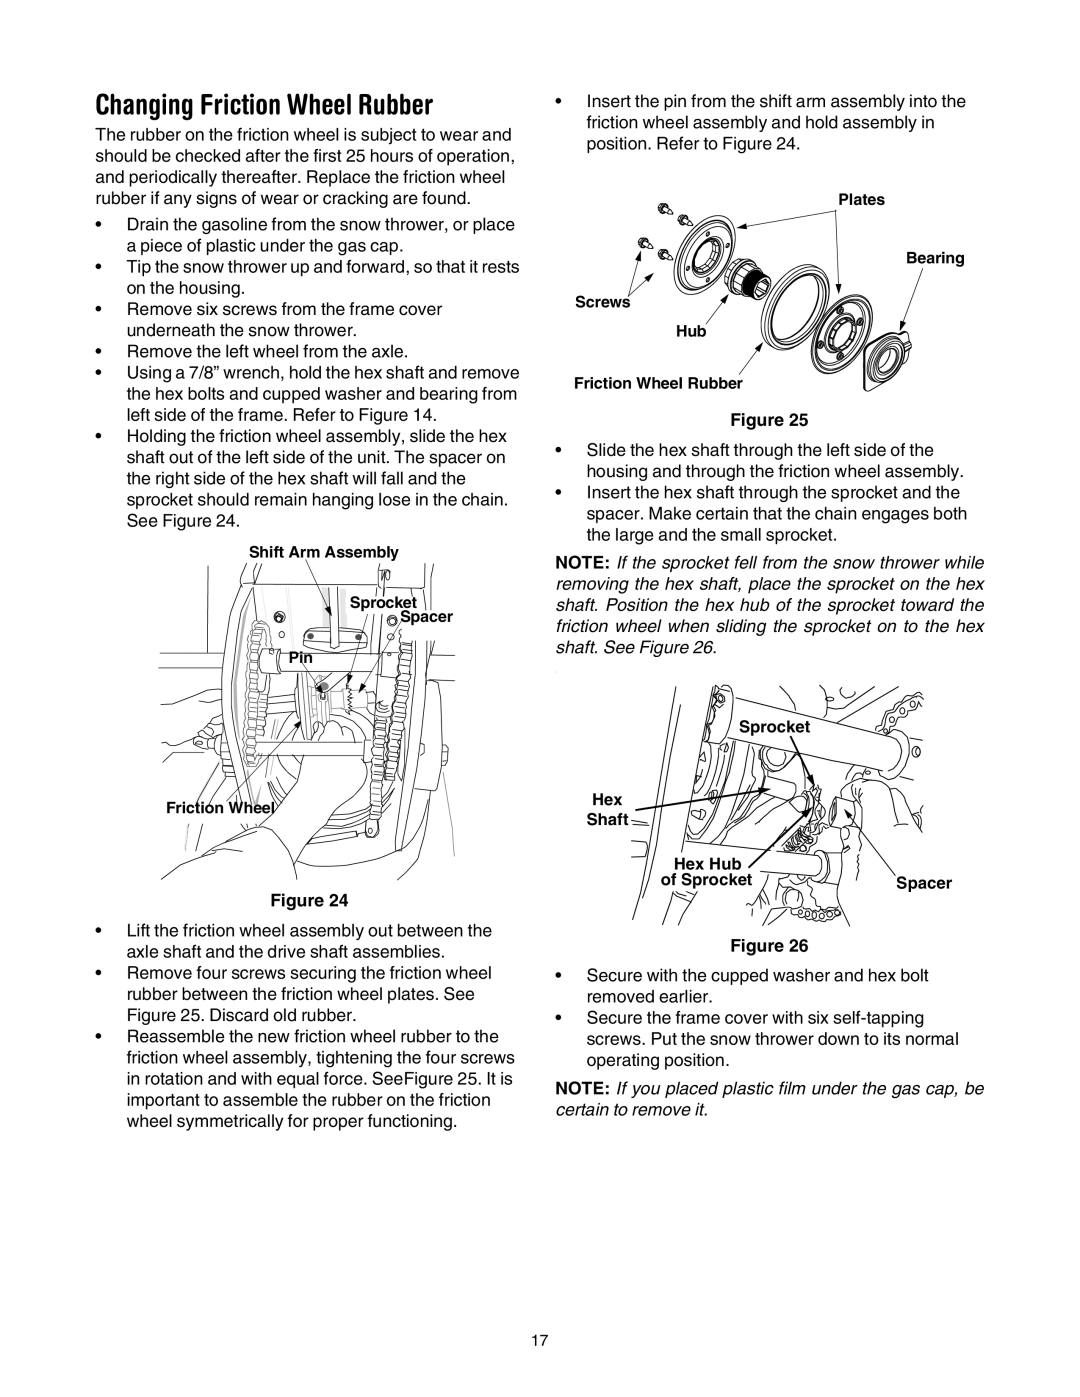
Holding the friction wheel assembly, slide the hex shaft out of the left side of the unit. The spacer on the right side of the hex shaft will fall and the sprocket should remain hanging lose in the chain. See Figure 24.

Shift Arm Assembly

Sprocket

Spacer

Pin

Friction Wheel

Figure 24

Lift the friction wheel assembly out between the axle shaft and the drive shaft assemblies.

Remove four screws securing the friction wheel rubber between the friction wheel plates. See Figure 25. Discard old rubber.

Reassemble the new friction wheel rubber to the friction wheel assembly, tightening the four screws in rotation and with equal force. SeeFigure 25. It is important to assemble the rubber on the friction wheel symmetrically for proper functioning.

Insert the pin from the shift arm assembly into the friction wheel assembly and hold assembly in position. Refer to Figure 24.

Plates

Bearing

Screws

Hub

Friction Wheel Rubber

Figure 25

Slide the hex shaft through the left side of the housing and through the friction wheel assembly.

Insert the hex shaft through the sprocket and the spacer. Make certain that the chain engages both the large and the small sprocket.

NOTE: If the sprocket fell from the snow thrower while removing the hex shaft, place the sprocket on the hex shaft. Position the hex hub of the sprocket toward the friction wheel when sliding the sprocket on to the hex shaft. See Figure 26.

.

Sprocket

Hex

Shaft

Hex Hub


of Sprocket

Spacer

Figure 26

Secure with the cupped washer and hex bolt removed earlier.

Secure the frame cover with six self-tapping screws. Put the snow thrower down to its normal operating position.

NOTE: If you placed plastic film under the gas cap, be certain to remove it.

17

Page 17
Image 17
Yard-Man OGST-2806 manual Changing Friction Wheel Rubber, Sprocket Hex Shaft

OGST-2806 specifications

The Yard-Man OGST-2806 is a robust and versatile outdoor power equipment designed for serious gardeners and landscapers. This multi-functional tool is primarily recognized for its efficiency and ease of use, making it an essential addition to any outdoor toolkit.

At the core of the OGST-2806 is its powerful engine, which delivers impressive performance for tackling a variety of lawn care tasks. The engine is designed to offer high torque, ensuring that it can handle tough terrains and thick vegetation. This allows users to confidently complete tasks such as mowing, edging, and trimming without the fear of bogging down.

One of the standout features of the Yard-Man OGST-2806 is its lightweight construction, which facilitates easy maneuverability. This significantly reduces operator fatigue, enabling users to work for extended periods without discomfort. The compact design makes it easy to transport and store, which is a crucial factor for those with limited garage space.

The OGST-2806 is equipped with advanced features that enhance its functionality. It includes an adjustable handle, allowing users to customize the height for maximum comfort. Coupled with its ergonomic design, this ensures a comfortable grip and optimal control during operation. Additionally, the model incorporates a user-friendly start mechanism, reducing the hassle often associated with outdoor equipment.

Technologically, the Yard-Man OGST-2806 integrates innovative solutions for efficient operation. It utilizes a low-emission engine that not only meets environmental regulations but also provides quiet operation, making it perfect for residential areas. This is complemented by its fuel efficiency, allowing extended run times between refueling, which saves both time and money for users.

The Yard-Man OGST-2806 is also designed with safety in mind. It features a quick-stop blade brake, which halts blade rotation instantly when the operator releases the handle. This critical safety feature helps prevent accidents and provides peace of mind while working.

In conclusion, the Yard-Man OGST-2806 is a reliable, feature-rich outdoor power tool that blends power, efficiency, and safety. Its lightweight design, advanced engine technology, and user-friendly operation make it ideal for tackling a wide range of gardening tasks. For anyone looking to enhance their lawn care experience, the OGST-2806 stands out as a solid option.