NEC VT45 user manual Top Features

Page 10

Top Features

9

1


8


SOURCE


AUTO

ADJUST


STATUS


ON POWER


STAND

BY


3


T


2


E


E


N


R

6

4 7

MENU

SELECT

CANCEL

5

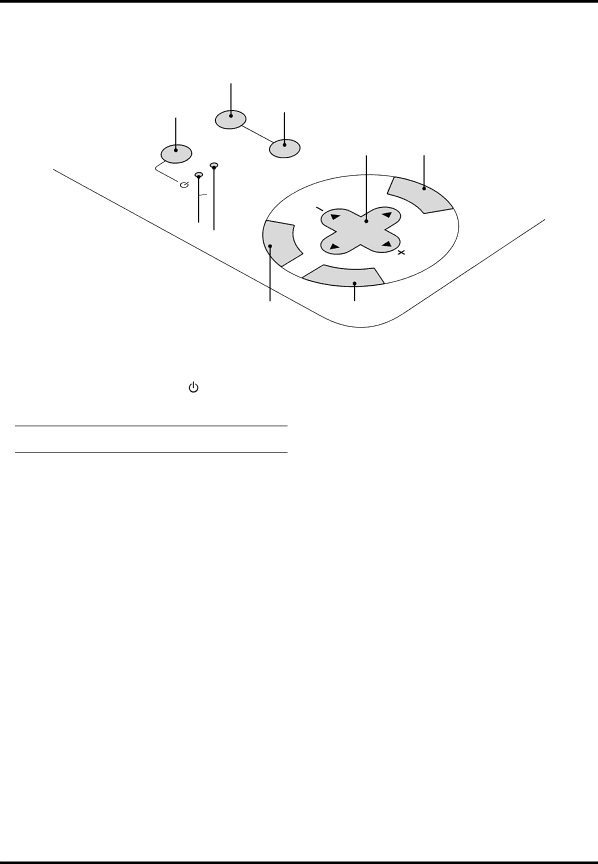
1. Power Button (ON / STAND BY) ( )

Use this button to turn the power on and off when the power is supplied and the projector is in standby mode.

NOTE: To turn off the projector, press and hold this button for minimum of two seconds.

2.Status Indicator

When this is lit red continually, it’s warning you that the projection lamp has exceeded 1000 hours (up to 2000 hours in Eco 2 mode and 1500 hours in Eco 1 mode) of service. After this light appears, it is advisable to replace the projection lamp as soon as possible. (See page E-36). In addition the message

“The lamp has reached the end of its usable life. Please re- place the lamp.” appears each time the projector is turned on until the lamp is replaced.

If this light blinks red rapidly, it indicates that the lamp cover or filter cover is not attached properly or the projector is over- heated. See the Power / Status Light Messages on page E-38 for more details.

3.Power Indicator

When this indicator is green, the projector is on; when the indicator is orange, it is in standby mode.

4.Select () / (+) (–) Buttons

: Use these buttons to select the menu of the item you wish to adjust.

: Use these buttons to change the level of a selected menu item.

When an image is magnified, these buttons can be used to move the image on screen.

5.Cancel Button

Press this button to exit the menu. While you are in the adjust- ment or setting menu, pressing this button will return to the previous menu.

6.Enter Button

Executes your menu selection and activates items selected from the menu.

7.Menu Button

Displays the menu.

8.Auto Adjust Button

Use this button to adjust Position-H/V and Pixel Clock/Phase for an optimal picture. Some signals may not be displayed correctly or take time to switch between sources.

9.Source Button

Use this button to select a video source such as a PC, VCR or DVD player.

Each time this button is pressed, the input source will change

as follows:

RGB Video S-Video RGB ...

If no input signal is present, the input will be skipped.

E–10

Image 10
Contents VT45 LCD Projector User’s Manual Precautions Important InformationPower Supply Important SafeguardsInstallation CleaningLamp Replacement Fire and Shock PrecautionsTable of Contents Introduction to the VT45 Projector Features you’ll enjoyIntroduction Getting StartedManualUsers Whats in the Box?Getting to Know Your VT45 Projector Front / Side Features Rear / Side FeaturesBottom / Side Features Using the protective lens padTop Features Terminal Panel Features Remote Control Remote Control FeaturesRemote Control Precautions Remote Control Battery Installation Operating RangeUsing a Tabletop or Cart InstallationSetting up Your Projector Using the Lens ShiftLens Offset 4mm Distance ChartScreen inch Ceiling Installation Reflecting the ImageWiring Diagram Document CameraIBM VGA or Compatibles Connecting Your PCSignal cable supplied Audio cableMacintosh Desktop type Connecting Your Macintosh ComputerMacintosh Notebook type To connect to a Macintosh, simplyConnecting an External Monitor Audio Equipment Connecting Your DVD PlayerDVD player Component video cable RCA3Audio equipment Connecting Your VCR or Laser Disc PlayerVCR/ Laser disc player Document cameraOperation General ControlsAbout Startup screen Menu Language Select screen To select a menu language, follow these stepsGeometrical correction Enlarging and Moving a PictureShifting Image Position Using the Menus Adjusting the Tilt FootSub Menu Menu TreeBasic/ Advanced Menu ItemsMenu Elements Title bar Tab HighlightSource Select VolumeMenu Descriptions & Functions PictureLamp Mode Advanced Options Advanced modeFactory Default Position/ Clock when Auto Adjust is offColor Management User AdjustProjector Options Setup Keystone Bar optionPhase Information To lock the cabinet buttonsReplacing the Lamp MaintenanceTo replace the lamp Cleaning or Replacing the Filters Common Problems & Solutions TroubleshootingPower/ Status Light Messages Problem Check These ItemsElectrical SpecificationsMechanical Cabinet Dimensions VT45Pin No RGB Signal Analog YCbCr Signal Mini D-Sub 15 Pin ConnectorSub Pin Assignments Timing Chart Communication Protocol PC Control CodesCable Connection To RxD of PC