TRENDnet TEW-P1U, TEW-P1P manual Installing Print Server on NetWare 4.x/5.x

Page 46

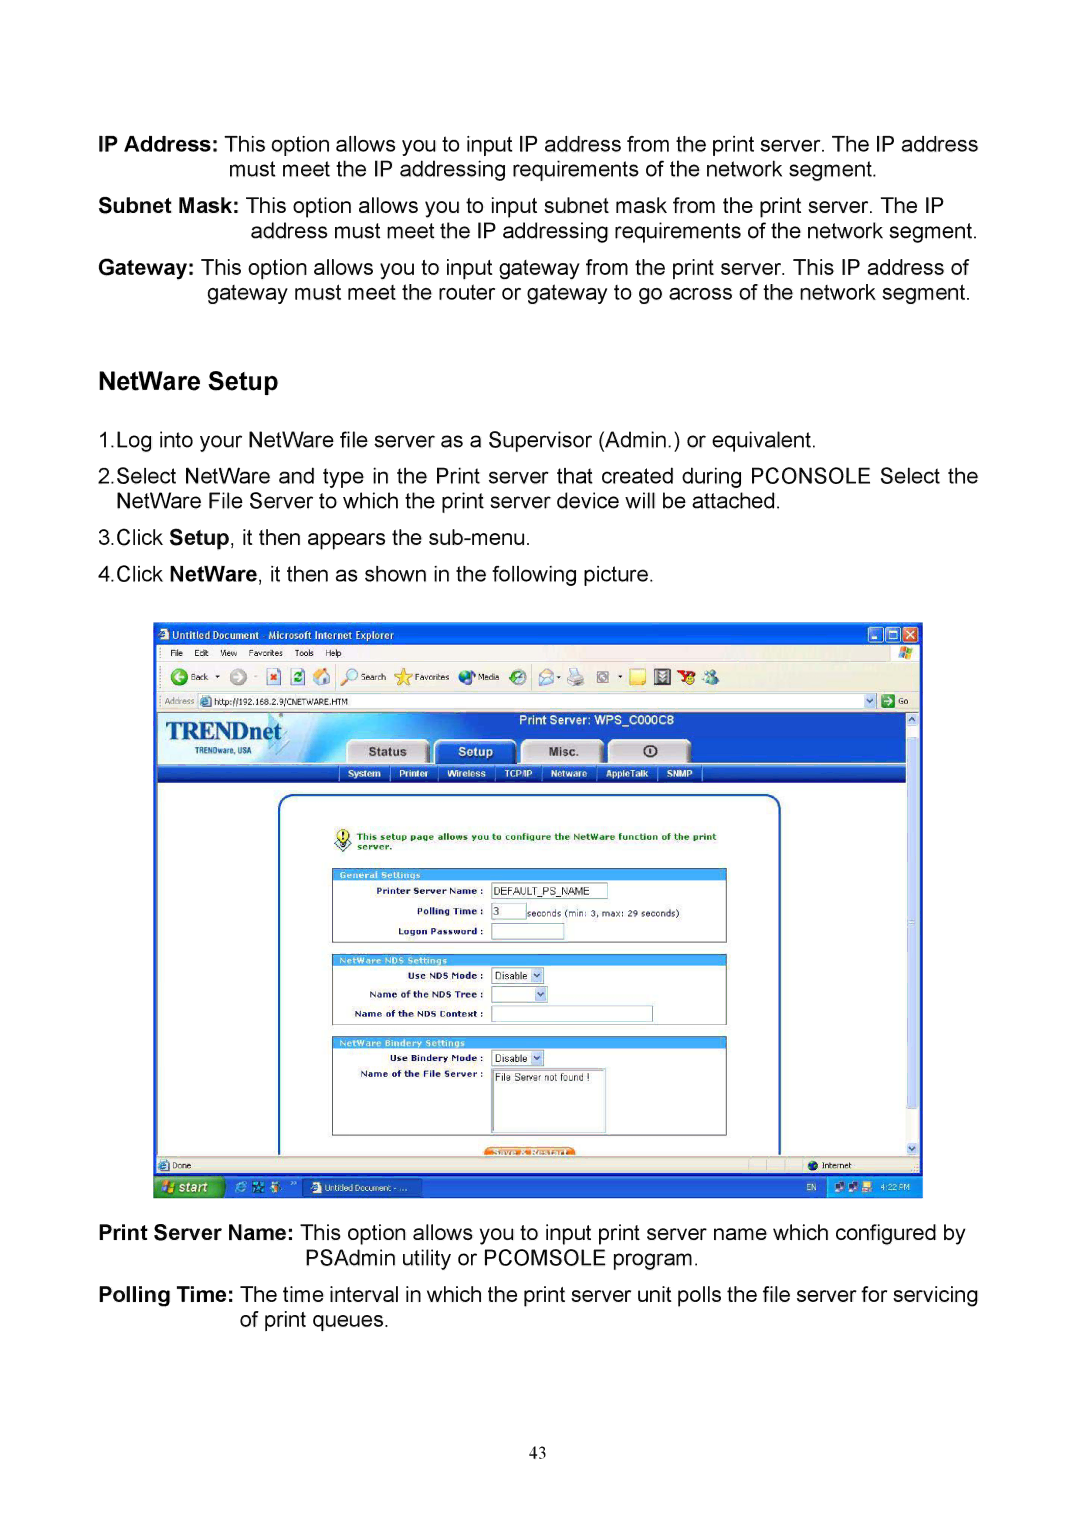
Logon Password: This option allows you to input encrypted password from the print server. The print server login to NetWare server that administrator set password from selected print server.

NDS Mode: To Enable NDS Mode, if you want to setup NDS environment. To select Tree

Name of NetWare then input context name in the Context box.

Bindery Mode: To Enable Bindery Mode, if you want to setup Bindery environment. To select File Server Name of NetWare.

Installing Print Server on NetWare 4.x/5.x

Due to its architecture and functionality, the print server must work under NetWare 4.x/5.x NDS Bindery Emulation. When you install the NetWare file server for the first time, by default, the installation program will automatically set up the Bindery Emulation function for you by adding “SET BINDERY CONTEXT =” in the AUTOEXEC.NCF file. By default, the bindery context will only be set on your organization (O) object.

If you have ever modified this line, or if you have ever added any organization units (OU) to your NDS tree after the NetWare system was installed, please read the following section before you install the print server.

For the purpose of illustration, we assume the NDS tress structure is as follows:

[ROOT]

(O)ABC

(OU)ABC-USA

Admin

FileServer-1

(OU)Sales

(OU) Tech

44

Image 46
Contents Page Page Network Print Monitor Overview Upgrading the Print Server from Psadmin FCC Compliance Notice Radio Frequency Notice TrademarksCopyright Important Note FCC Radiation Exposure StatementProduct Overview Network configurationWireless Specifications Network ManagementComponents and Features Wireless Print server Before you start, you should prepareHardware Installation Wireless Network Environment Ad-hoc PEER-to-PEER ModePreparation Configuration Solution TableSetup Operating Function Remarks System Supported NetworksSetup Utility for Windows-based CommentInstalling the Setup Wizard To install Wizard, please follow the directions listed belowPage Page Page Page Page Page Page Page Using PSAdmin Wizard TCP/IP WizardNetWare Wizard Manual Setup Obtain an IP address from a Dhcp server Properties -TCP/IP OptionsSpecify an IP address Upgrade Multiple Print Queues Configuration ResetRefresh Uninstalling the PSAdmin on Windows PC ProcedureIPP Overview Windows NT/2000/XP/2003Page HP Web JetAdmin Overview System RequirementsConfirming Installation and Supply Access Installing HP Web JetAdminConfiguring and Modifying a Device Removing HP Web JetAdmin Utility Overview Using Embedded Web ServerStatus Menu System Status Wireless Status Printer StatusTCP/IP Status Netware Status NetWare Bindery Setting General SettingsNetWare NDS Setting Snmp StatusAppleTalk Status Setup Menu System Setup Re-type PasswordWireless Setup Basic SettingsWEP Settings NetWare Setup Installing Print Server on NetWare 4.x/5.x Snmp Setup Installation ProcedureSelect NCF files options Select Edit AUTOEXEC.NCF file System.sysName Snmp.snmpEnableAuthenTrapsSystem.sysContact System.sysLocationAppleTalk Setup Recommended Setting Up a Macintosh Computer Network Print MonitorTCP/IP Protocol Installation Restart the computerIPX/SPX-compatible Protocol Installation NetBEUI Protocol InstallationWindows 95/98/Me/NT/2000/XP Installation Procedure Select Printer and PropertiesPage TCP/IP LPR Port Printing Installation Basic TCP/IP Installation OverviewUse the Network Print Monitor utility Windows NT LPR Port Printing InstallationAssigning an IP Address Run Add PrinterWindows 2000/XP Standard TCP/IP Port Printing Installation Run Add Printer, Click Next Page Page SCO Unix OpenServer Unix InstallationLogin root Type arp -s IP address Print server‘s node ID Type tftp Print server‘s IP addressSUN Solaris Is xxxx a remote printer or a local printer r/l --------- rType enable printer-1 For example enable printer-1 Type lpadmin -pprinter-1 -s Print server‘s IP addressIBM AIX Redhat Linux Open Printer ConfigurationSelect Standard Process Click New button Click Forward button Queue Type field, choose Networked Unix Printer field, choose Postscript Printer UnixWare Printer Connection Type, select On Remote ServerUpgrading the print server from PSAdmin Type tftp -i print server’s IP address put mpsXX.binUpgrading the print server from Browser Upgrading the print server from Unix Through TCP/IPType tftp print server’s IP address Click Upgrade form Browser and select the firmware file Done Power Related Problems General Troubleshooting OverviewPrint Port Related Problems Select Control Panel Windows 95/98/Me/NT/2000/XP TroubleshootingMulti-Segment Frame Type 802.2 Installation Frame Type field, select EthernetPrint server Reconfiguration Procedure on Windows NT Print Server Reconfiguration Procedure on Windows 95/98/MeMoving the print server to a New Segment TCP/IP Troubleshooting Novell NetWare TroubleshootingMoving Your Computer to a New Segment Page Page Diagnostic Mode AppendixLoad Default Value Question B Frequently Asked QuestionsQuestion C Question E Question DQuestion F Additional Installation Instructions Panasonic KX-P6100/6300/6500
Related manuals
Manual 9 pages 59.8 Kb