Canon LV-7325U owner manual Preparation Mounting Lens Cover, Moving the Projector

Page 9

PREPARATION

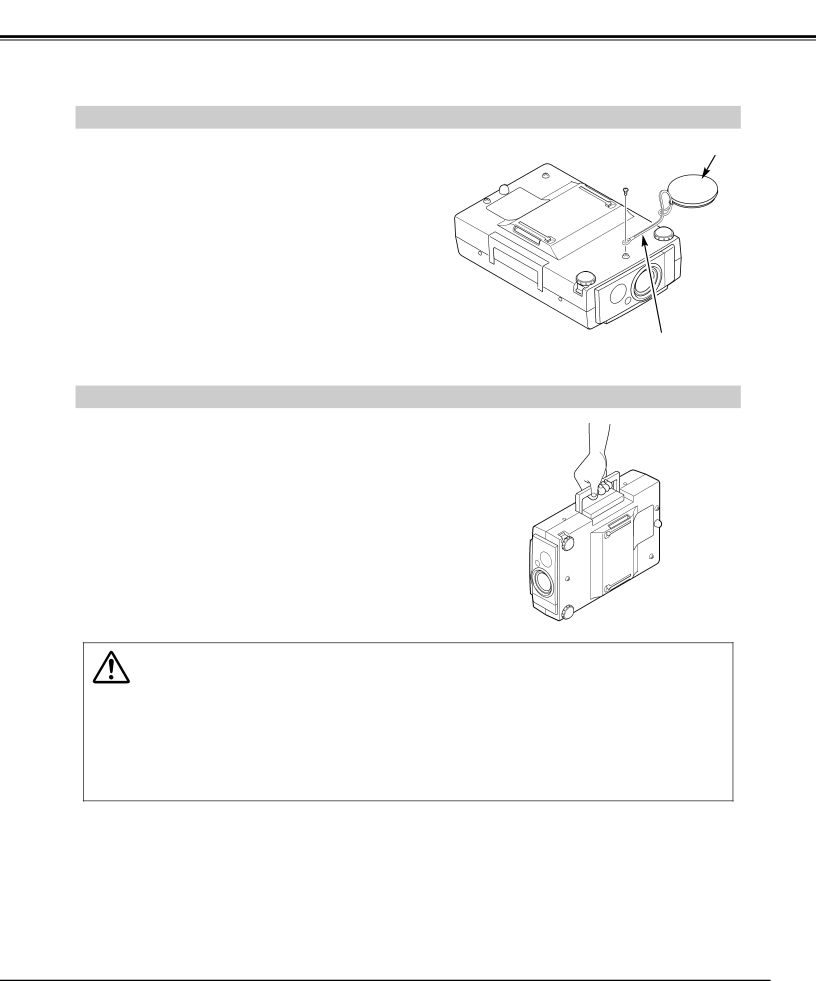
MOUNTING LENS COVER

When moving this projector, or when it is not used for an extended period, replace the lens cover.

LENS COVER

1

Secure the Strap for Lens Cover through the hole of the

Lens Cover.

2

Turn the power off, and disconnect the AC power cord

from the AC outlet.

3

Turn the projector upside down. Secure the Strap for

Lens Cover to the hole on the bottom of the projector

with the screw.

STRAP FOR LENS COVER (Secure to the hole with the screw.)

MOVING THE PROJECTOR

Use the Carry Handle when moving the Projector. When moving the projector, replace the lens cover and retract the feet to prevent damage to the lens and the cabinet.

When this projector is not in use for an extended period, replace the Lens Cover, retract the Adjustable Feet and cover the unit with the Dust Cover supplied with this projector.

CAUTION IN CARRYING OR TRANSPORTING THE PROJECTOR

Do not drop or bump the projector, otherwise damages or malfunctions may result.

When transporting the projector, use a carrying case recommended by Canon.

Do not transport the projector by using a courier or transport service in an unsuitable transport case. This may cause damage to the projector. To transport the projector through a courier or transport service, use a case recommended by Canon.

For carrying or transportation cases, contact a Canon authorized dealer.

9

Image 9
Contents LV-7325U Safety Precautions To the OwnerRisk of Electric Shock Do not Open Ground Important Safety InstructionsTable of Contents Compatibility Features and DesignPreparation Power Cord ConnectorName of Each Part of the Projector Exhaust VentSETTING-UP the Projector Adjustable FeetPositioning the Projector Preparation Connecting the AC Power Cord VentilationProjector side Female AC outlet side Male Moving the Projector Preparation Mounting Lens CoverTerminals of the Projector Connecting the ProjectorConnecting the Projector Connecting to the Video EquipmentCables used for connection Video CableConnecting to the Computer VGA Cable Control Cable for PS/2 PortMAC Adapter Monitor Cable MAC Adapter Not supplied Computer Monitor Control Audio OUT PortOperation of the Remote Control Before OperationLaser Pointer Function Operating Range Remote Control Battery InstallationTOP Controls and Indicators HOW to Operate ON-SCREEN Menu Operating ON-SCREEN MenuFlow of ON-SCREEN Menu Before Operation Menu BAR View Menu Turning on / OFF the Projector Basic OperationsTurning on the Projector Turning OFF the ProjectorZoom Adjustment Adjusting the ImageFocus Adjustment Keystone AdjustmentSound Adjustment Computer Mode Selecting Computer ModeSelecting Computer System Adjust PC AdjustmentTotal dots Total linesHorizontal / Vertical ClampResolution Computer Mode Compatible Computer SpecificationsFreq KHzNormal Function Adjust Picture Image ManuallyPicture Position Adjustment Computer Mode Auto Image FunctionPosition Expand function Picture Screen AdjustmentCompress function Panning functionSelecting Video Mode Video ModeSelecting Color System AutoQuit Closes the Picture Image Adjustment Menu Adjusting the Picture ImageColor TintHOW to Load the Memory Card Into the Projector MCI ModeOperating the PC Card Slot LoadSelecting MCI Mode MCI Mode Available DataAvailable Card Show the Data in the Memory Card Index SelectionSelection Write Data Into the Memory Card Access to the Memory Card Through the ProjectorPicture Image Adjustment Adjust the Picture Image ManuallyImage Picture Screen Adjustment Inserting / Removing the CF Card CF Card and Pcmcia AdapterHandling CF Card and Pcmcia Adapter Setting Setting MenuSelecting Language Installation Operating Wireless MouseOperating Wireless Mouse AppendixTemperature Warning Indicator MaintenanceAIR Filter Care and Cleaning Cleaning the Projection LensAppendix Lamp Replacement Indicator Lamp ReplacementLamp Replacement Monitor Timer Troubleshooting Wireless Mouse Remote Control UnitDoes not work Function does notTechnical Specifications Appendix Optional Parts Canon U.S.A., INC. NEW York Office