BenQ SH940 user manual Using the preset and user modes, Selecting a preset mode

Page 27

Using the preset and user modes

Selecting a preset mode

The projector is preset with several pre-defined picture modes so that you can choose one to suit your operating environment and input source picture type.

To select a picture mode that suits your need:
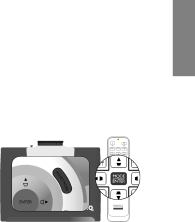
Using the remote control

Press PRESET MODE on the projector or MODE/ENTER on the remote control repeatedly until your desired mode is selected.

• Using the OSD menu

1. Press MENU on the projector or MENU/EXIT on the remote control and then press / until the Picture -- Basic menu is highlighted.

2.Press to highlight Picture Mode.

3.Press / until your desired mode is selected.

These modes consist of preset values suitable for various projection situations as described below:

Cinema: Is appropriate for playing colorful movies, video clips from digital cameras or DVs through the PC input for best viewing in a blackened (little light) environment.

Dynamic: Maximizes the brightness of the projected image. This mode is suitable for environments where extra-high brightness is required, such as using the projector in well lit rooms.

Presentation: Is designed for presentations. The brightness is emphasized in this mode to match PC and notebook coloring.

sRGB: Maximizes the purity of RGB colors to provide true-to-life images regardless of brightness setting. It is most suitable for viewing photos taken with an sRGB compatible and properly calibrated camera, and for viewing PC graphic and drawing applications such as AutoCAD.

User 1/User 2: Recalls the customized settings. See "Setting the User 1/User 2 mode" on page 28 for details.

Fine-tuning the selected picture mode

The pre-defined picture mode settings can be altered via the available items shown in the Picture -- Basic and Picture -- Advanced menus.

To fine-tune the picture mode:

1.Press MENU on the projector or MENU/EXIT on the remote control, and then press / until the Picture -- Basic or Picture -- Advanced menu is highlighted.

2.Press to highlight the item you want to adjust and press / to set your desired value. Your selection is automatically stored in the projector and associated with that input source.

See "Fine-tuning the picture quality" on page 29 and "Advanced picture quality controls" on page 30 for details.

Each time you change the picture mode, the projector also changes the setting to the one which was last set for that particular picture mode on that particular input. If you change the input source, the most recently used picture mode and settings for that input and resolution will be restored.

English

Using the projector

27

Image 27
Contents SH940 Digital Projector Table of contents Important safety instructions Important safety instructions Moisture condensation Avoid volatile liquidsDisposal Overview Shipping contentsRemote control batteries Remote control operationCeiling mounting the projector Projector features Under view Projector exterior viewFront and upper side view Rear viewControl panel Controls and functionsRemote control Choosing a location Positioning your projectorObtaining a preferred projected image size Installation for a 169 ratio screen Projection dimensionsScreen aspect ratio is 43 and the projected picture is Installation for a 43 ratio screenFloor Installation Ceiling Installation Screen dimensions Projection distance D Lowest HighestTo use the lens shift lever Shifting the projection lensConnecting with video equipment Connecting Hdmi devicesPreparations Connecting video devices Connecting component-video/RGB devicesConnecting a monitor Connecting a computerUsing the projector Turning the projector onPreparations Using the OSD menu Selecting an input sourceChanging Color Space Using the menus Using a security cable lockSecuring the projector Utilizing the password function Setting a passwordIf you forget the password Entering the password recall procedure Changing the passwordDisabling the password function Fine-tuning the image size and clarity Adjusting the projected imageAdjusting the projection angle Auto-adjusting the imageCorrecting picture distortion To fine-tune the picture mode Using the preset and user modesSelecting a preset mode Fine-tuning the selected picture modeRenaming user modes Setting the User 1/User 2 modeResetting the picture mode To reset the picture mode to the preset factory valuesFine-tuning the picture quality Controlling image clarity Setting Black LevelSelecting a color temperature Advanced picture quality controlsTo set a preferred color temperature Setting a preferred color temperatureSelecting a Gamma setting Adjusting Brilliant ColorColor Management Setting Film ModeSetting 3D Comb Filter Selecting the aspect ratioAbout the aspect ratio Using Panamorph lenses optional Freezing the image Hiding the imageMuting the sound Adjusting the soundAdjusting the sound quality Turning off the Power On/Off Ring ToneIf you are in a Dhcp environment Configuring the Lan Control SettingsControlling the projector through a Lan environment Controlling the projector remotely through a web browserEnter Operating in a high altitude environment To activate High Altitude ModeTo display the PIP window Displaying more than one image source simultaneouslyTurning the projector off Power II or OFF againBasic On-Screen Display OSD menusOn-Screen Display OSD structure PictureSetup DisplaySystem Dhcp Information ResolutionSettings Picture ModeLoad Settings Reset PictureDisplay menu AdjustmentYPbPr Tuning Blank TimerSplash Screen System Setup menuMenu Settings LanguageOut Closed Caption EnableClosed Caption Standby MonitorAudio Settings Advanced Setup menuLamp Settings Hdmi SettingsEquivalent Lamp ResolutionInformation menu SourceCare of the projector Additional informationGetting to know the lamp hour Setting Lamp Power as EconomicSetting Auto Power Off Lamp informationTiming of replacing the lamp Replacing the lampStatus Message English Resetting the lamp timer Indicators Power eventsLight Status & Description Problem Cause Remedy TroubleshootingElectrical SpecificationsGeneral characteristics OpticalCeiling mount installation DimensionsRefresh rate Timing chartSupported timing for PC input FormatSupported timing for Edtv and Hdtv via Component inputs Format Resolution Refresh rate Hz Freq. KHz Pixel Freq. MHzFormat Resolution Refresh rate Freq. KHz Pixel Freq MHz Supported timing for Hdmi Hdcp inputDisclaimer Warranty and Copyright informationWarranty Copyright