English
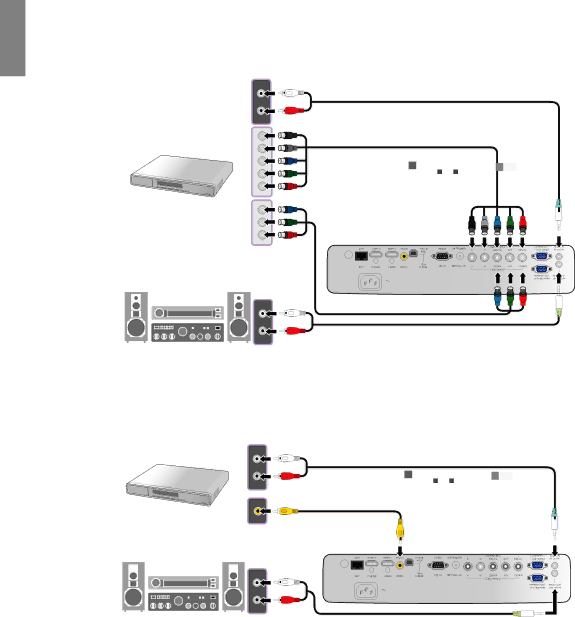
Connecting component-video/RGB devices
Connect your RGB source (DVD player or HD set top box) to the RBGHV inputs. You can also use a BNC- type component cable to connect your video devices. The audio connections are provided for informational purposes only. You can also connect the separate audio cable to a suitable audio amplifier.
Audio cable
AV equipment: DVD player, digital tuner, etc.
RGBHV cable
Speakers
Component video cable
Audio cable
Connecting video devices
You need only connect a composite Video cable from the same device. The audio connections are provided for informational purposes only. You can also connect the separate audio cable to a suitable audio amplifier.
AV equipment
Audio cable
Video cable
Speakers
Audio cable
![]() • If you have already made a Component Video connection between the projector and the video source device, you need not connect to this device again using a composite Video connection as this makes an unnecessary second connection of poorer picture quality. You need only connect using a composite Video connection if Component Video is not supplied on the video source device (for example, with some analog video cameras).
• If you have already made a Component Video connection between the projector and the video source device, you need not connect to this device again using a composite Video connection as this makes an unnecessary second connection of poorer picture quality. You need only connect using a composite Video connection if Component Video is not supplied on the video source device (for example, with some analog video cameras).
•If the selected video image is not displayed after the projector is turned on and the correct video source has been selected, please check that the video source device is turned on and operating correctly. Also check that the signal cables have been connected correctly.
18 Connecting with video equipment