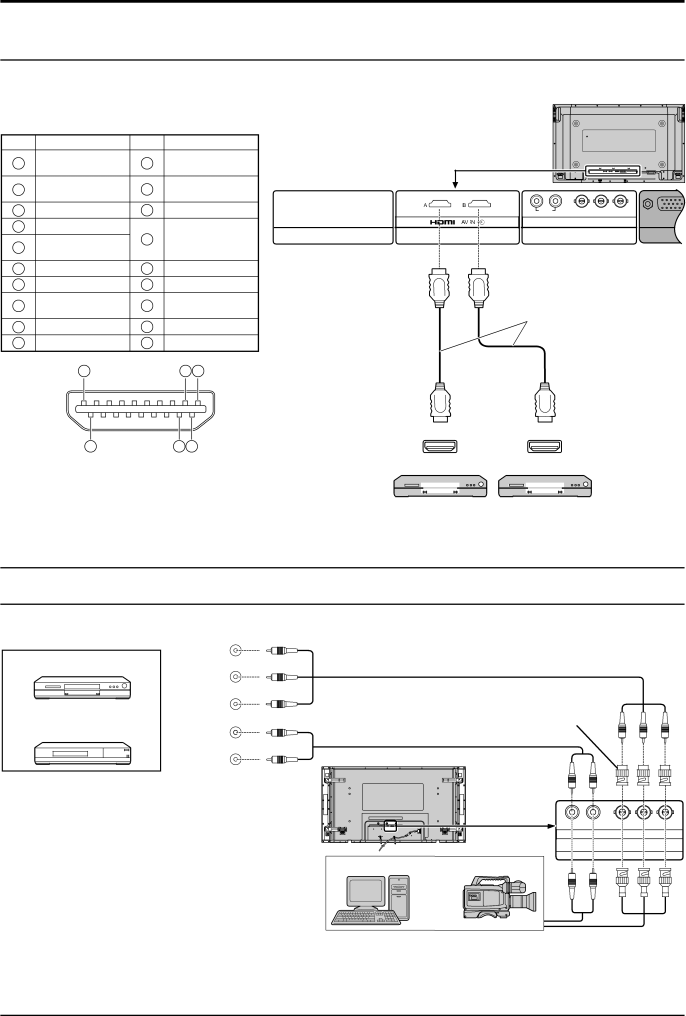
Panasonic TH-65PF10WK, TH-50PF10WK manual Hdmi connection, Component / RGB connection

Page 12

Connections

HDMI connection

This unit has terminal boards equivalent to Dual HDMI Terminal Board (TY-FB10HMD) and BNC Component Video Terminal Board (TY-42TM6A) as standard equipment.

[Pin assignments and signal names]

Pin No.

Signal

Pin No.


Signal


1

T.M.D.S Data2+

11

T.M.D.S Clock


T.M.D.S Data2


Shield


2

12

T.M.D.S Clock-


Shield


3

T.M.D.S Data2-

13

CEC


4

T.M.D.S Data1+


Reserved

SLOT1

5

T.M.D.S Data1

14

Shield


(N.C. on device)


6

T.M.D.S Data1-

15

SCL


7

T.M.D.S Data0+

16

SDA


8

T.M.D.S Data0

17

DDC/CEC


Shield

Ground


9

T.M.D.S Data0-

18

+5V Power


10

T.M.D.S Clock+

19

Hot Plug Detect


19


3

1


18

4

2

Note:

Additional equipment and HDMI cables shown are not supplied with this set.

R AUDIO L

PR/CR/R PB/CB/B

Y/G

COMPONENT/RGB IN

SLOT2

SLOT3

PC

HDMI cables

HDMI

HDMI

AV OUT

AV OUT

DVD player


DVD player


COMPONENT / RGB connection

COMPONENT VIDEO OUT

Example of input signal source

PR


DVD

Y, PB, PR,

PB

OUT


Y

Digital TV-SET-TOP-BOX


L

(DTV-STB)

AUDIO

R


OUT

RCA-BNC adapter plug

RAUDIO L PR/CR/R PB/CB/B Y/G

COMPONENT/RGB IN

SLOT3

Computer

RGB Camcorder

or

Notes:

Change the “Component/RGB-in select” setting in the “Setup” menu to “Component”

(when Component signal connection) or “RGB” (when RGB signal connection). (see page 41)

Additional equipment, cables and adapter plugs shown are not supplied with this set.

Sync on G signal is needed. (see page 44)

12

Image 12
Contents High Definition Plasma Display Operating InstructionsModel No. TH-50PF10WK EnglishTable of Contents Important Safety Notice Trademark CreditsSafety Precautions SetupDo not place any objects on top of the Plasma Display Transport only in upright positionSafety Precautions When using the Plasma DisplayIf problems occur during use Clean the power cable regularly to prevent it becoming dusty Electric shocks can result if this is not doneAccessories Accessories SupplyRemote Control Batteries Connections AC cord fixingMonitor terminal SeeConnections Optional TerminalBoard Insert Slot Equivalent of Dual Covered HDMITerminal Board BNC Component VideoSignal Names for Mini D-sub 15P Connector PC Input Terminals connectionCommand Serial Terminals connectionRS-232C Straight cable Communication parametersHdmi connection Component / RGB connectionPower On / Off Connecting the AC cord plug to the Plasma DisplayConnecting the plug to the Wall Outlet Power On / Off Selecting the input signal Initial selectionsSelecting the On-Screen Menu Language Remote control sensor Volume Adjustment Main Power On / Off Switch Power IndicatorBasic Controls Menu Screen on / OFFBasic Controls On-Screen Menu Displays On-Screen Menu Displays Mode Picture Explanation Aspect ControlsAdjusting Pos. /Size NormalisationAdjusting Pos. /Size Multi PIP Normal ViewingAdvanced PIP Options1/3Picture Adjustments NormalDynamic CinemaAdvanced settings Picture AdjustmentsSound Adjustment Sound Adjustment SDI Sound OutputMute On OffDigital Zoom Display the operation guideSelect the area of the image to be enlarged Select the magnification required for the enlarged displayPresent Time Setup / Set up Timer Present Time SetupPress to setup DAY or Present Time Button ForwardSet up Timer Present Time Setup / Set up TimerDisplay the Set up Timer screen Press to select Power on Time / Power OFF TimeMode selection Start settingScreensaver For preventing image retention Reversal / Scroll selectionSetup of Screensaver Time Reduces screen image retentionScreensaver For preventing image retention Side Panel Adjustment Reduces power consumption Customizing the Input labelsAddition sign Selected Input CompositeSetup for Multi Display How to Setup Multi DisplaySetup for Multi Display Display Number locations for each arrangement ExamplesID Remote Control Function ID remote control button operationID Cancellation AI-synchronizationSet up for Portrait How to setup PortraitSet up for Portrait Viewing Area / LocationSetup for Input Signals Component / RGB-in select3D Y/C Filter For Ntsc AV images Setup for Input Signals Press Action button Press to exit from adjust ModeNR / Block NR / Mosquito NR Refresh RateColour system / Panasonic Auto Cinema realitySetting RGB sync signal Press to exit from adjust mode Press Action ButtonSync Freq. kHz / V-Freq. HzOptions Adjustments Effect AdjustmentsOptions Adjustments Options1/3Off-timer Normalization Weekly Command Timer Press to select Time / Command Shipping condition Troubleshooting Plasma Display panelCOMPONENT/RGB/PC/VIDEO input signals COMPONENT/RGB/PC/VIDEO input signals Video input HdmiMHz Active pixels Pixels Active lines Lines Command list of Weekly Command Timer Specifications TH-50PF10WK TH-65PF10WKMemo Memo Memo Customer’s Record