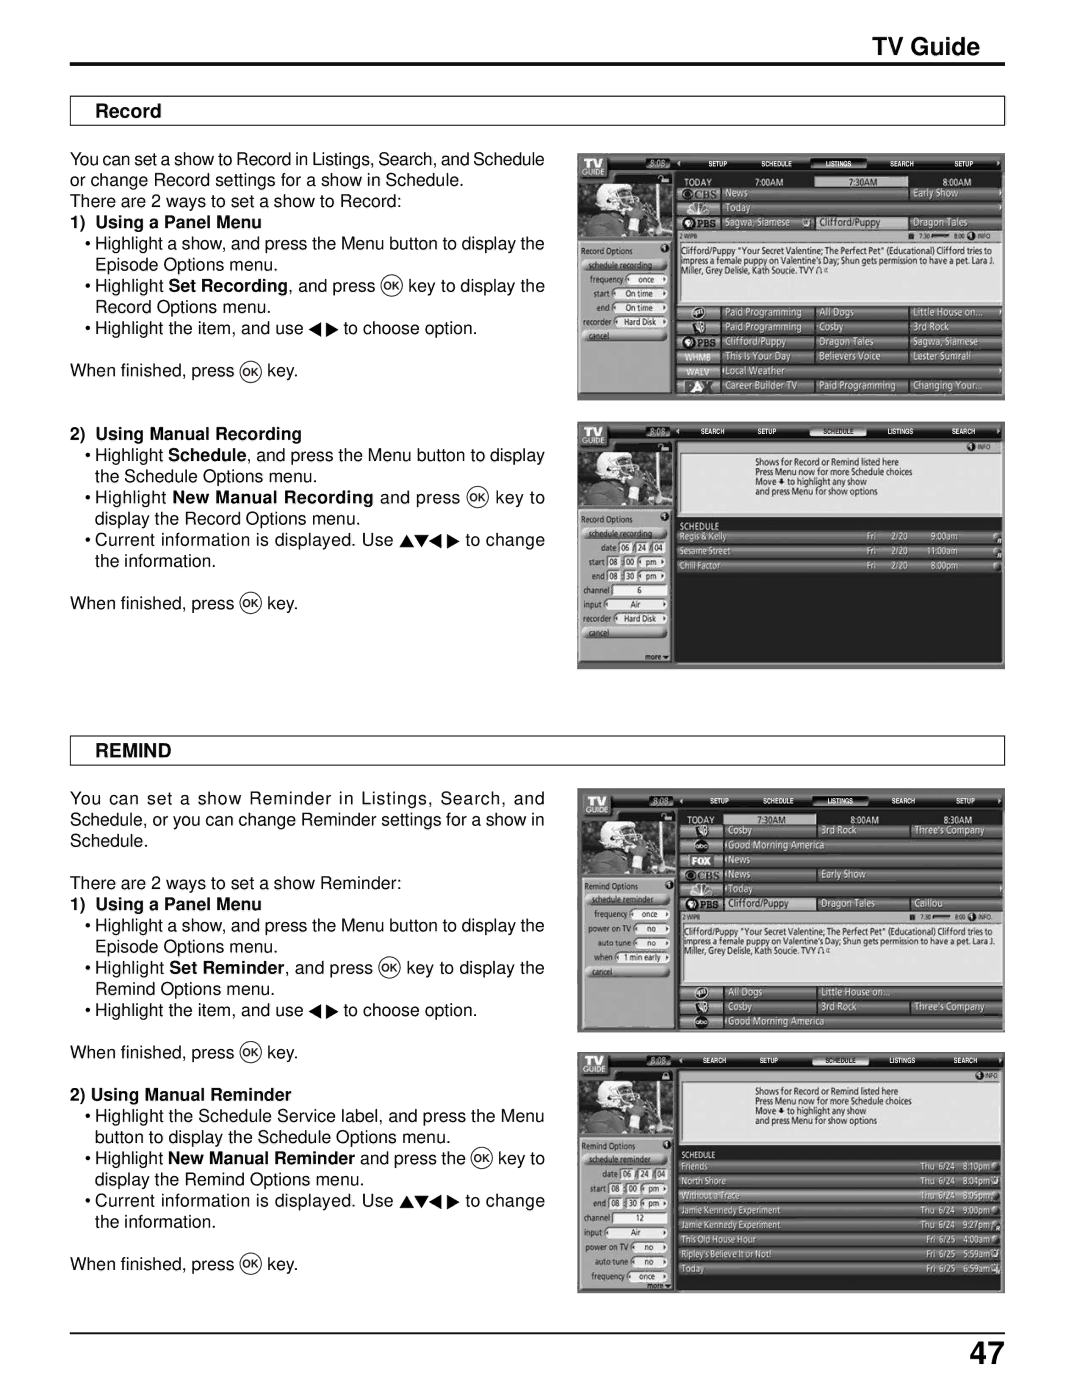
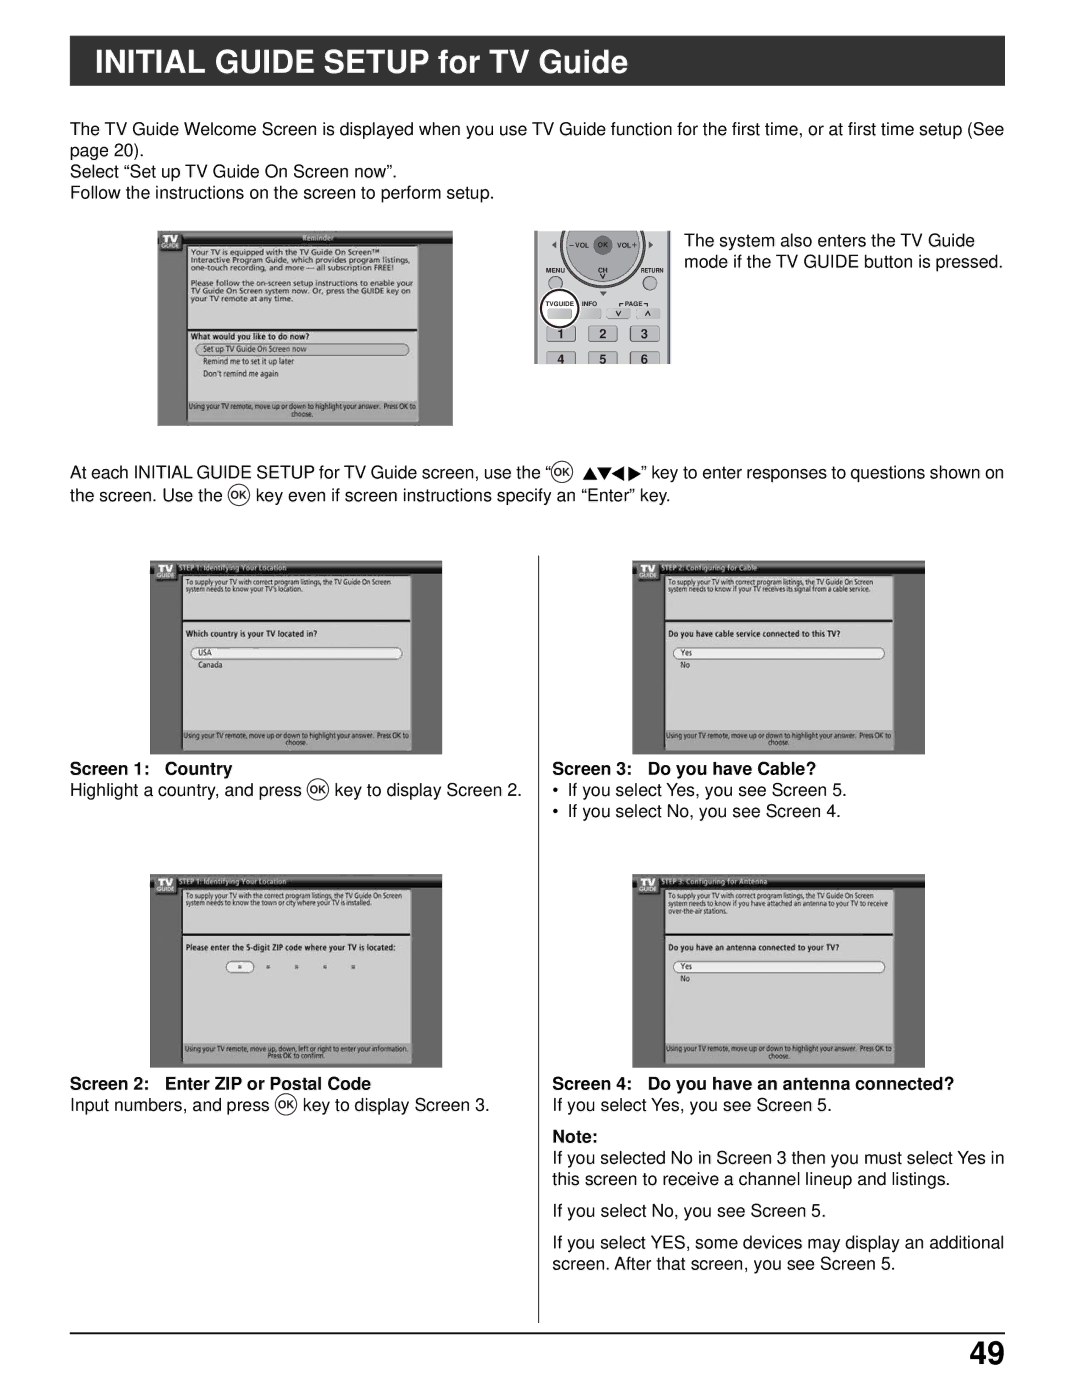
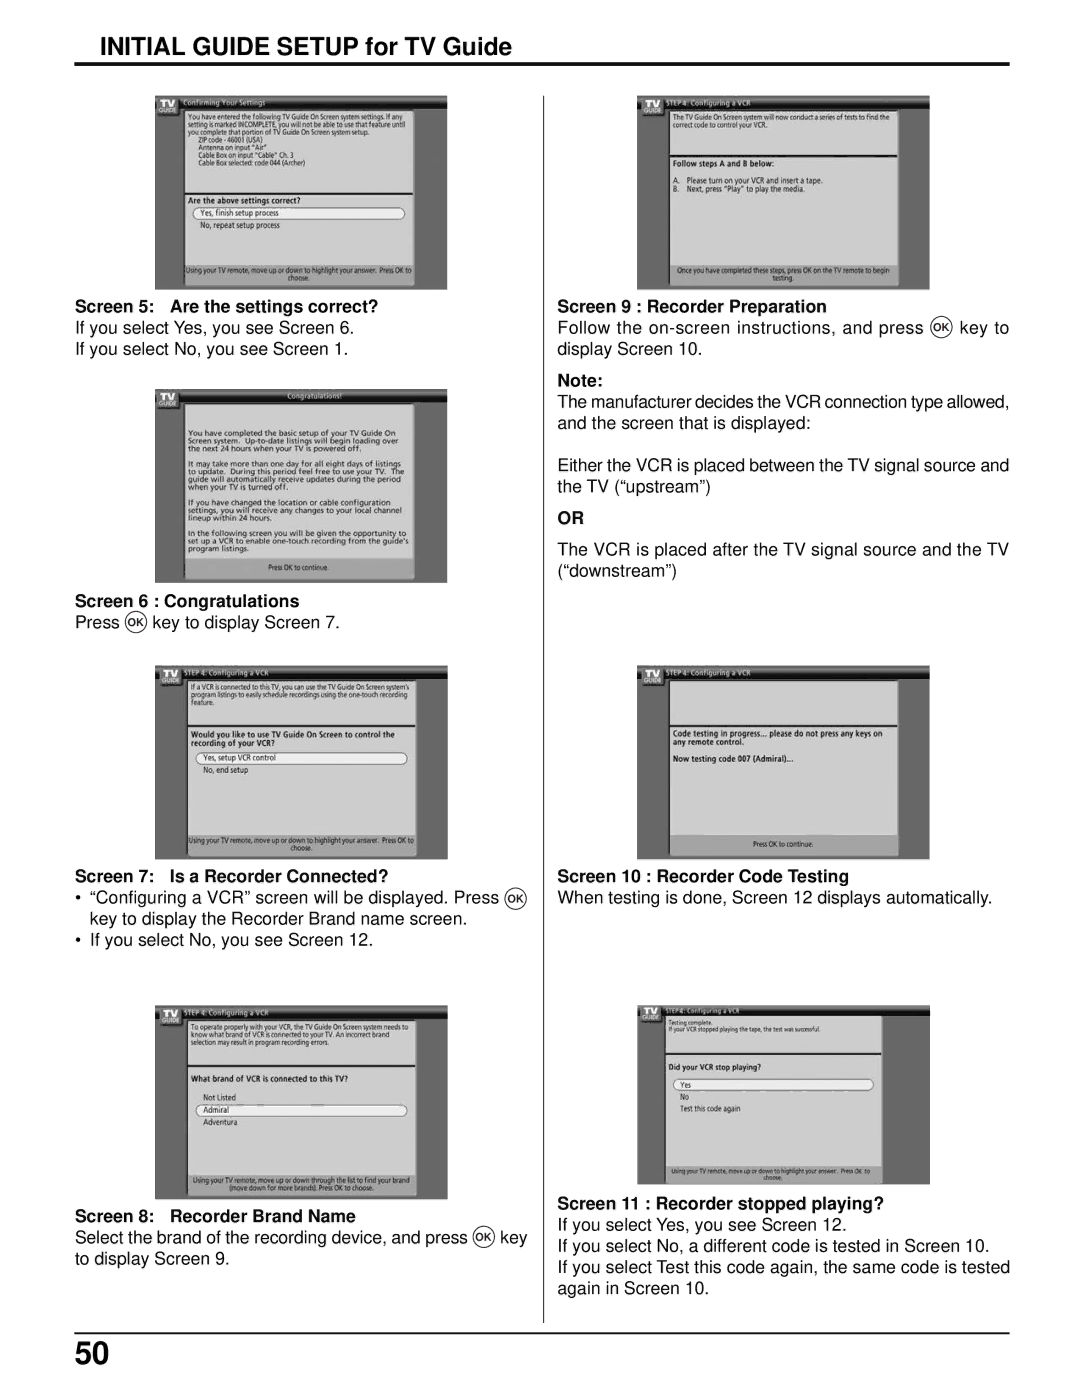
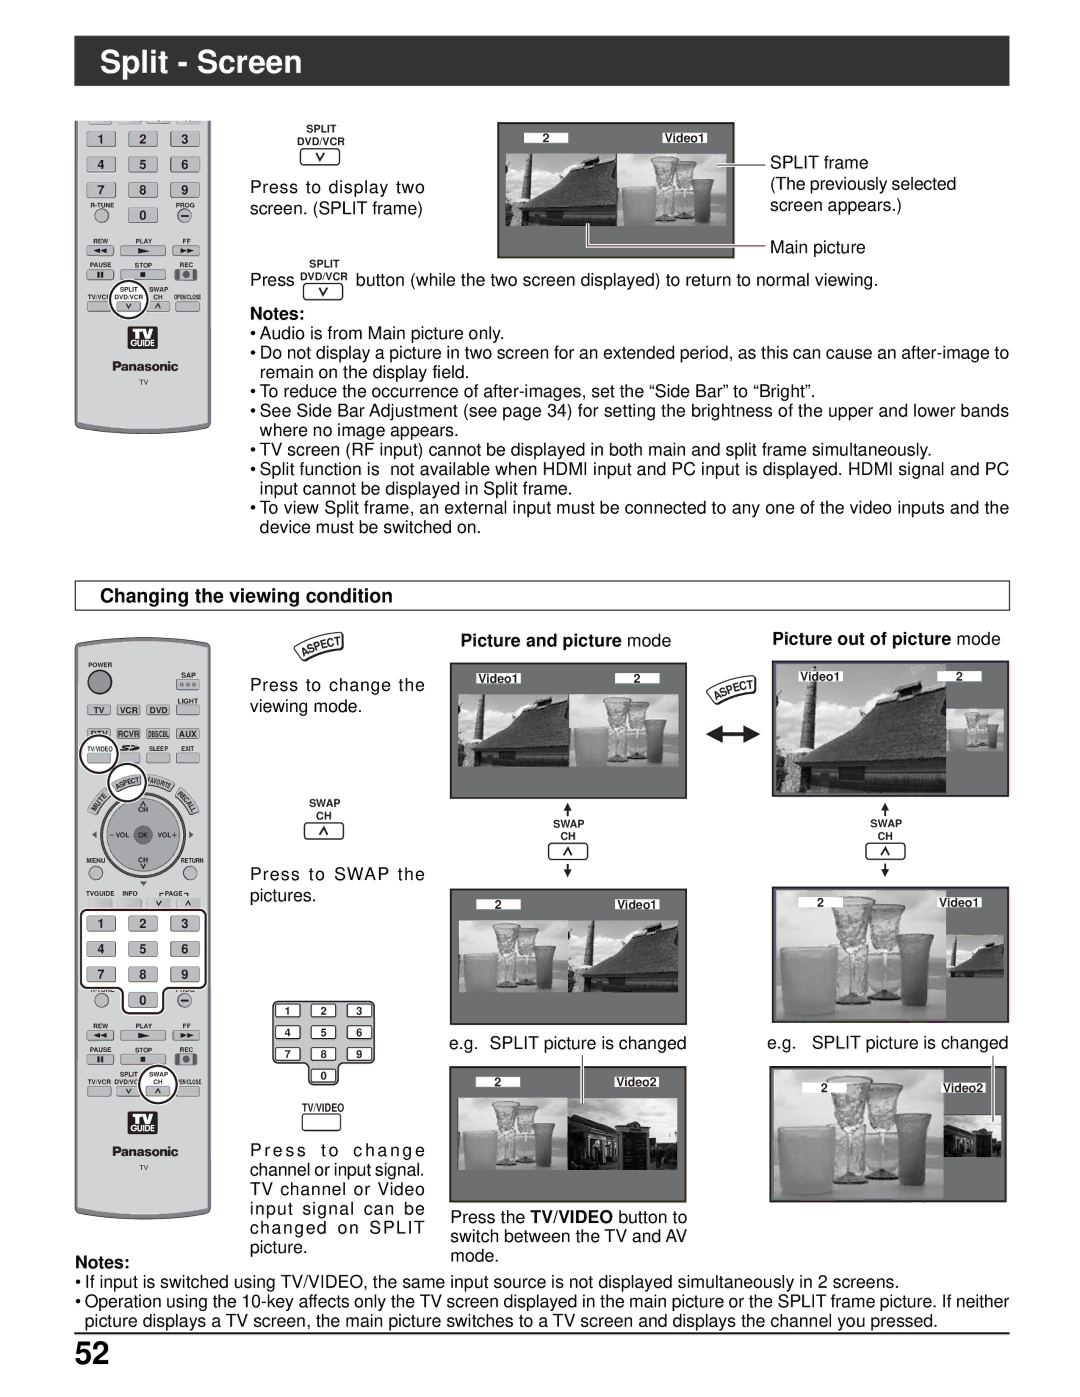
Panasonic TH-42PX500U, TH-50PX500U Plasma Display panel Symptoms Check, TV Guide Symptoms Check

Page 59

Troubleshooting Chart

Plasma Display panel


Symptoms

Check

Page

Some parts of the screen

• The plasma display panel is manufactured using an extremely high level of

-

precision technology; however, sometimes some parts of the screen may be


do not light up.


missing picture elements or have luminous spots. This is not a malfunction.


• Do not allow a still picture to be displayed for an extended period, as this can

34


cause a permanent after-image to remain on the Plasma TV.


Examples of still pictures include logos, video games, computer images,


teletext and images displayed in 4:3 mode.


Note:


The permanent after-image on the Plasma TV resulting from fixed image use is


An after-image appears.

not an operating defect and as such is not covered by the Warranty.


This product is not designed to display fixed images for extended periods of time.


Whirring sounds can be

• The TV is fitted with a cooling fan to dissipate heat generated during normal

-

heard from the display unit.

use. The rotating fan may cause a whirring sound but it is not a malfunction.


TV Guide


Symptoms

Check

Page

I got listings after my initial

After initial setup, it can take up to a week to populate the full 8 days of listings.

-

setup; however, some

Once fully populated, 8 days of program information should always be available.


days say “No Listings.”


M y G u i d e l i s t i n g s

You should begin to receive listings again within 24 hours.

-

disappeared after a power


failure.


Some channel numbers in

You can correct them using Change Channel Display under Setup.

46

the Guide are incorrect.


I have not received any

Listings begin to appear within 24 hours after a successful Setup.


Guide show listings.

• Check the connections between the TV, cable, antenna, and the IR cable if

9, 10


using a cable box.


• Verify Setup information under Change System Settings.

46


• Make sure the cable box is On, if applicable.

-


• Review Screen 4 and Screen 5 in the Initial Guide Setup section.

49, 50


Recording did not occur.

• Make sure your recorder is turned Off before the recording begins.

-


• Make sure there is a tape in the Recorder.

-


• Check the Schedule menu and verify that the show is listed before recording

45


begins.


• Check the placement of the IR cable in front of your recorder.

10


The TV did not tune to a

• Check the Schedule menu and verify that the show is listed.

45

show I scheduled with the

• If you have a cable box, check the IR cable.

10

Reminder feature.


I set a show to Auto-Tune

• Check the Schedule menu and verify that the show is listed as a Reminder.

45, 47

and it did not.

• Highlight the show under Listings and do the following:

47


– Press the Menu button on the remote.


– Use the down arrow to highlight Edit Reminder, and press OK key.


– Verify the Auto-Tune option reads Yes.


• The TV must be On at the scheduled time for Auto-Tune.

-


I set a show with the Power

• Check the Schedule menu and verify that the show is listed as a Reminder.

45, 47

On TV option and it did not.

• Highlight the show under Listings and do the following:

47


– Press the Menu button on the remote.


– Use the down arrow to highlight Edit Reminder, and press OK key.


– Verify the Power On TV option reads Yes.

-


• The TV must be Off at the scheduled time for Power On TV.


59

Image 59
Contents Model No. TH-42PX500U Risk of Electric Shock Do not Open FCC Statement Important Safety InstructionsDear Panasonic Customer Set up Safety PrecautionsAttaching the ferrite core Cleaning and maintenanceAccessories Receiver Location InstallationRemote Control Battery Installation Observe the following precautionsCable binding condition Cable binding instructionsCableCARDTM Connection ProcedureConnection Antenna ConnectionIR Blaster Connection Setting the IR BlasterProgram Out Connection Prog OUT Amplifier Connection to Audio AMPVideo Input Connection Connecting to the front AV terminalsDigital TV Set-Top Box DTV-STB or DVD Connection 480i Hdmi Connection720p 480pTH-50PX500U Signal Names for D-sub 15P ConnectorPC Input Terminals Connection Model Aspect 169 TH-42PX500UPower indicator T.S Power on / OFFPower button Press to turn the TV’s main power on/off Remote control sensorLocation of Controls Direct program number selection buttons Sleep timer minutesAudio Track 1 English Display Main MenuPress and release immediately to change the day press First time setupPress to display the clock adjust screen LanguagePress to select Auto program Auto programWelcome Screen Initial Guide Setup for TV GuideReminder Screen Watching TV programs Press to operate the TV set with the remote controlOn-Screen Menu Displays for Navigation Signal meter See Explanations Pic. modeMenu Navigation PictureScreen Zoom AdjustOther Adjust Size Adjust the vertical sizePress to display the PC Adjust screen PC AdjustPress to select PC Adjust Normal / Bass / Treble / Balance AudioTimer set TimerSleep timer Clock Set upCH scan Program CH Edit Favorite Signal meter For digital channels onlyPress to select Signal meter Edit CaptionSelectable input labels CC ModeInput labels CC Closed CaptionPress to enter the Digital setting menu Primary, Second., Service 3, Service 4, Service 5, ServicePress to select Digital setting Reset Other adjust SetupLock Lock modePassword screen Enter your password By pressingMonitor out On Block programMovies Ratings Chart Message Possible cause Change passwordBlocking Messages Press to enter Photo Viewer Photo ViewerInserting and removing a card Card Warning Messages Compatible card type and card sizeJpeg thumbnail Rotate image Single Play Mode Picture AdjustmentExit Single Play mode Index Area OperationPress to start slide show Slide Show ModeExit Slide Show mode Folders and FilesScreen Components TV GuideCategory Search Example Movies Main ServicesKeyword Search Example ScheduleChange Channel Display Change System SettingsChange Default Options Record Using a Panel MenuUsing Manual Recording Using Manual ReminderName Icon Description Icon DescriptionScreen 3 Do you have Cable? Initial Guide Setup for TV GuideScreen 1 Country Screen 2 Enter ZIP or Postal CodeScreen 7 Is a Recorder Connected? Screen 5 Are the settings correct?Screen 10 Recorder Code Testing Screen 6 CongratulationsAspect Controls Press to change the aspect modeMode Picture Explanation Changing the viewing condition Picture and picture mode Picture out of picture modeSplit Screen To find a code not listed in the index Programming the remote control codeOperating peripheral equipment Codes for CD Infrared Code IndexCodes for VCR Codes for Receivers Codes for DVDCodes for Personal Video Recorders Codes for Cassette DeckDTV Mode Cable Mode DBS Mode Mode Operational Key ChartVideo input Hdmi input VIDEO/COMPONENT/HDMI input signalsSpecifications Applicable input signals MarkSymptoms Solutions Troubleshooting ChartTV Guide Symptoms Check Plasma Display panel Symptoms CheckPanasonic Color Television Limited Warranty Limited Warranty for U.S.A Customer Services Directory for U.S.A Limited Warranty for Canada Page Panasonic Consumer Electronics Panasonic Puerto Rico Inc Page Page Page Page Page Page Page Page Page Page Page Page Page Page Page Page