Weslo E320VA user manual Connecting Your DVD Player, Connecting your DVD Player Best

Page 20

VIZIO 60HZ E SERIES User Manual

Connecting Your DVD Player

You have several options for connecting your DVD player to your HDTV: HDMI, Component and Composite inputs. Based on your home theater configuration, you can decide which option is the right one for you.

Using HDMI

DVD players that have a digital interface such as HDMI (High Definition Multimedia Interface) should be connected to the HDMI input of you HDTV for optimal results.

Note: To maintain the display quality, use a VIZIO certified HDMI cable. Length is available up to 10 meters. See www.VIZIO.com or call 1-888-VIZIOCE (1-888-849-4623) for details.

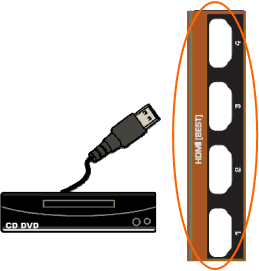
Connecting your DVD Player (Best):

1.Turn off the power to the LCD HDTV and DVD player.

2.Connect a HDMI cable to the HDMI output of your DVD player and the other end to the HDMI Input at the side of the LCD HDTV.

3.Turn on the power to the LCD HDTV and your DVD player.

4.Select HDMI using the INPUT button on the remote or side of the LCD HDTV, or directly by pressing the HDMI button on the Remote Control.

Note:

If you are already using the HDMI1 input for another component, or you do not want to use the HDMI1 input for the DVD player, you can connect the DVD player to the HDMI2, HDMI3 or HDMI4 connection.

Refer to your DVD player user manual for more information about the video output requirements of the product.


20

Version 3/17/2010

www.VIZIO.com

Image 20
Contents Dear Vizio Customer Important Safety Instructions Page External Television Antenna Grounding Television Antenna Connection ProtectionFCC Bulletin for New TV Owners Table of Contents Opening the Package Package ContentsHdtv Accessories and Services To attach the TV stand base Attaching the TV StandTo unpack the TV and stand base E420VA Wall Mounting Specifications Wall Mounting Your HdtvPreparing your LCD Hdtv for Wall Mounting To remove the base standSide Panel Controls Remote Control Sensor and LightFront Panel Rear and Side Panel Connections Connection to attend service of this equipment will void Manufacturer’s warranty of the TVConnection Description AudioRemote Control Buttons Following keys do not function on these modelsRemote Control Range Vizio Remote Control PrecautionsInserting the remote control batteries Using a Cable or Satellite RemoteConnecting Equipment Connecting your Cable or Satellite Box Best Connecting Your Cable or Satellite BoxUsing Hdmi For Cable or Satellite Boxes with DVI Using Component Video Connecting your Cable or Satellite Box BetterConnecting Coaxial RF Using Your Antenna or Cable for TVUsing the Antenna or Cable through your VCR Using Your Antenna or Digital Cable for DTVConnecting Your DVD Player Connecting your DVD Player BestFor DVD Players with DVI Connecting your DVD Player Better Connecting your DVD Player Good Using Composite AV VideoConnecting a USB FAT32 Format Storage Device Connecting an external Receiver/Amp Connecting a PC Computer Initial Setup Basic LCD Hdtv Start UpPage Selecting Inputs Setting the Picture to User’s Preferences Using the Info Guide Using the On-Screen Display OSD Watching a TV ProgramUsing the Navigation Keys Unique TV Features Adjusting Settings Adjusting Timer SettingsAdjusting Wide settings Normal Mode Wide ModeZoom Mode Panoramic ModeAdjusting the Audio Settings Adjusting the TV Settings Adjusting the Picture SettingsPicture Mode Select Home, Movie, Retail, Game, Custom Adjusting the Parental Control settings Control first timeTV Rating Definitions TV Rating Content Definitions Movie Rating Definitions Movie Rating Definitions Movie Rating Definitions Version 3/17/2010 Adjustments on the Help Menu Adjusting the CC Closed Caption settings Cleaning the Screen MaintenanceCleaning the Housing and Remote Control Troubleshooting Guide Or e-mail us at techsupport@vizio.comPage Telephone & Technical Support ComplianceFCC Class B Radio Interference Statement Specifications E321VA E370VA E420VA Preset PC Resolutions E320VA Preset PC ResolutionsGlossary Standard Definitions Limitations and Exclusions Types of ServiceParts and Labor Zero Bright Pixel Defect Guarantee Personal DataIndex RGB Version 3/17/2010