McIntosh UR12 manual System Settings, Clock Setting, Touch Screen Alignment, Systems and Options

Page 15

System Settings

the setting mode by simply pressing the MAIN button or bring the cursor to 8. TO EXIT with the joystick and push the joy- stick down.

Clock Setting

Enter the Clock Setting Mode by moving the cursor on the TOUCH SCREEN to 6. SET DATE & CLOCK by using the joy- stick. Enter this mode by pushing the joy- stick down. Press the selection you wish to change from the TOUCH SCREEN and change them using the UP and DOWN buttons. Once you complete the setting, store them by pressing the SAVE button.

Touch Screen Alignment

Move the cursor on the TOUCH SCREEN to 1. TOUCH PAD ALIGNMENT with the joystick. Press the joystick down to enter the mode. Align the screen by pressing the three points that appear on TOUCH SCREEN one point at a time. Follow the On-Screen instructions.

Note: If a new version of the Normal Modes of Operation Firmware has been uploaded into the UR12, a Touch Screen Aligment Procedure must be performed inorder for the Touch- buttons to become active.
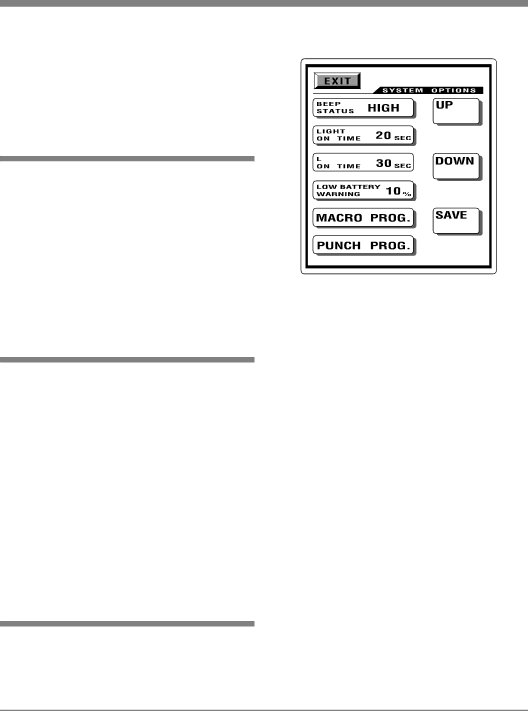
Systems and Options

Move the cursor on the TOUCH SCREEN to 2. SYSTEM & OPTIONS with the joy- stick. Enter this mode by pushing the joy-

C D

Figure 9

stick down and the following can be set. Refer to figure 9.

The TOUCH SCREEN (LCD) will list the following choices:

Settings

Range

Default

Beep Status:

High, Low, Off

High

Light On Time:

0 – 120

20

(in seconds)


LCD On Time:

5 - 120

30

(in seconds)


Low Battery Warning:

10 - 50

10

(in percentage)


Select the button you wish to change from the list first. Press the UP or DOWN but- tons on the TOUCH SCREEN to set them up. Once you set them up, press the SAVE button to store them. You will be in the set- ting mode once again. To return to the main menu, move the cursor to 8. TO EXIT and press the cursor down or simply press the MAIN button to exit to main menu.

15

Image 15
Contents Owner’s Manual UR12 Touch Screen RemoteRepair of Equipment InstallationGeneral Care of EquipmentSerial Number Purchase Date Dealer Name Customer ServiceThank You Please Take a MomentGeneral Notes Table of ContentsIntroduction and Performance Features Performance FeaturesIntroduction Installing Batteries Initial Start-up Touch Screen and Push-buttons How to Operate the Remote Control Input Source Selection Touch Screen MenuTuner Functions MAC Touch Screen Pages Touch Screen MenuEnter HomeMono/Stereo Power On and OffSpeakers 1 ModeEntering the System Settings OverviewTouch Screen Contrast Systems and Options System SettingsClock Setting Touch Screen AlignmentM1, M2 and M3 Buttons Introduction Macro and Punch Through ProgrammingPunch through Functions Device ButtonsFavorite Channel Button Erase FunctionPreprogram Using a three-digit code numberAuto Scan with Brand Names Learning Method Main button to exit to the main menuErasing the Learned Buttons Buttons in the next page by press- ing the page buttonDevice Touch-button, move the cursor to Device Button You desire, push the joystick down to save it Edit Touch-buttonsPress the Main button to exit to the main menu Moving Touch ButtonsCopy Touch Buttons Creating a Favorite DeviceDelete Touch Buttons Inserting Touch-buttons Select Insert button in Editing modeSelect Text Edit button in Edit Press Change button in Editing ModeChanging Touch-buttons Editing Touch-button Text# % & ‘ * + , . / 0 1 2 3 4 5 6 7 8 9 = ? @ Setting the Date and Clock Program LoadingPort on the computer Erasing all the Programs Random When Cable Touch Screen Menu is selected DeleteWhen LV Touch Screen Menu is selected CH Up SearchAlternate Button Functions Audio Devices Manufacturer/Brand Set-Up Code NumberManufacturer/Brand Set-Up Code Number Auxiliary Devices Auxiliary Devices Setup Code Table Manufacturer/Brand Set-Up Code Number Cable DevicesManufacturer/Brand Set-Up Code Number CD Devices CD Devices Manufacturer/Brand Set-Up Code Number LV Devices Manufacturer/Brand Set-Up Code Number DVD DevicesLV Devices Manufacturer/Brand Set-Up Code Number SAT Devices Manufacturer/Brand Set-Up Code Number Tape DevicesManufacturer/Brand Set-Up Code Number TV Devices TV Devices 197 003 024 056 059 060 063 064 164 VCR Devices Setup Code Table Packing Instructions Specifications and Packing InstructionsRemote Control Products ONE Year Limited Warranty Geographical Limitations Scope and Duration of WarrantyWhat McIntosh will do under the Warranty Limitations on McIntosh’s Obligations under the WarrantyWhat the Owner must Pay For Parts and Occurrences that are not Covered by the Warranty