Thecus Technology Using the N7700, Login, Using WebDisk, You via the Access Control List ACL

Page 80

Chapter 6: Using the N7700

Overview

Once the N7700 is setup and operating, users on the network may manage all varieties of digital music, photos, or files by simply using their web browsers. To manage your personal files or access public files on the N7700, just enter its IP address into your browser (default IP address is http://192.168.1.100), and you will be taken to the N7700 Login page.

NOTE

Before proceeding, make sure that WebDisk Support or Secure WebDisk Support is enabled in the Service Support screen in the system’s Network menu. See Service Support in Chapter 4: System Management > Network Management > Web Services Configuration.
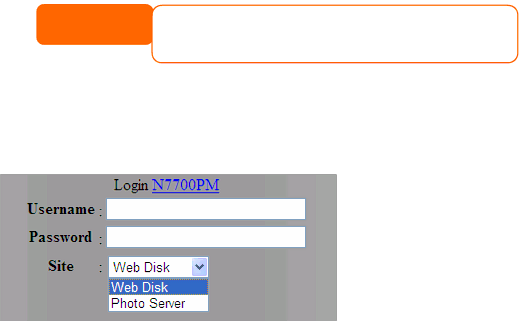
Login Page

To login to the system, enter your user name and password, and select Web Disk or Photo server then click Login to log into the system. You will be taken to the selected interface.

Using WebDisk

The N7700 provides a WebDisk function that allows you to access the system over the Internet from any browser.

1.

In the Login page, type in the User ID and password that were previously


set for you in the Accounts menu. See Chapter 4: System Management


> User and Group Management > Local User Configuration.

2.

The WebDisk page appears showing folders made currently available to


you via the Access Control List (ACL).

3.

Click on a folder name to enter the folder.

4.

The folder’s page appears displaying files and folders. Click on a file to


download the file.


Folder Page


Item


Description

Name


Displays the names of folders and files.

Size


Shows the size of folders and files.

Type


Displays the type of folders and files.

Modified Date

Shows the time of most recent modification of folders and files.

5.

Buttons on the folder page allow you to create a new folder, upload files


and delete files in the folder.


80

Image 80
Contents Thecus N7700 About This Manual Limited WarrantyCopyright and Trademark Notice Safety Warnings Table of Contents System Settings Storage ManagementNetwork Management User and Group ManagementOverview Login Using WebDisk Photo Server File BackupOverview FTP Server ITunes Server Media Server Printer ServerProblems with Time and Date Settings 102 104107 108Product Highlights IntroductionOverview Package Contents Front Panel Front PanelDescription Solid green network linkHard Disk Trays Rear PanelHard Disk Trays HDDBack Panel Before You Begin Hardware InstallationHard Disk Installation Cable Connections System Trouble Checking System StatusSystem Status Normal First Time Setup Thecus Setup WizardPage Display Mode Display ModeLCD Operation LCD ControlsTypical Setup Procedure Management ModeManagement Mode USB CopyNetwork Setup Create Local Users or Setup AuthenticationCreate Folders and Set Up ACLs Start ServicesPage Web Administration Interface System ManagementMenu Bar Menu BarProduct Information Language SelectionStatus Menu System/Service Status Service StatusSystem Information Product InformationUPS Settings Printer StatusSystem Information Printer StatusPower Management Enable Schedule Power On/Off checkboxUPS Settings Wake-up On Lan ConfigurationStorage Management Disks InformationExample Monday On 800 Off Example Monday OnA.R.T. Information A.R.T. InformationFailed RAID Configuration Configuration screenRAID Information RAID InformationRAID Configuration RAID ConfigurationsRAID Level RAID LevelsPress Apply to build the RAID storage volume Creating a RAIDExpanding a RAID Migrating a RAIDAllocating Space for iSCSI Volume Under the Volume Allocation List, click iSCSI TargetVolume Allocation List Space AllocationCreate iSCSI Volume screen appears Create iSCSI VolumeRAID ID IQNStackable NAS SnapshotFolder Management Adding FoldersFolder ACLEditing Folders Deleting FoldersAdd Folder Edit FolderNFS Share Snap Snapshot configurationNFS Share Clicking on Snap then screen appears as following SnapshotFolder Access Control List ACL Access Control ListFile System Check Page File Access Cache Advance OptionISCSI Block Size Samba Anonymous Login AuthenticationSamba Recycle Bin WAN Configuration WAN ConfigurationNetwork Management ISCSI CRC/ChecksumN7700 only LAN ConfigurationLAN Configuration Dhcp Configuration Wlan ConfigurationDhcp Configuration Wlan ConfigurationWeb Services Configuration Wlan Dhcp ConfigurationWAN LAN Exchange WEP KEYAFP Apple Network Setup NFS SetupWeb Service Apple Network ConfigurationLocal User Configuration NFS Server SettingLocal User Configuration User and Group ManagementLocal Groups Configuration Local Groups ConfigurationModifying Users Deleting UsersLocal Group Setting screen appears Enter a Group Name Batch User and Group CreationAdding Groups Modifying GroupsADS/NT Configuration ADS/NT SupportSystem Settings Notification ConfigurationSystem Notifications AD Domain Example InformationError System LogsSystem Logs InfoTime and Date Settings System Configuration Backup and RestoreSystem Configuration Download/Upload TimeModule Management Reset to Factory Default SettingsModule Management Change Administrator Password Firmware Upgrade screen appearsChange Administrator Password Upgrading System FirmwareReboot and Shutdown System LogoutAdditional Feature Setup FTP ServerSelections include Unlimited, 1, 2, 4, 8, 16 and 32 MB/s MB/sMedia Server ITunes ConfigurationITunes Server Connecting DMAs to the Media Server Media Manager SettingsAdding Media Share Folders Go to My MediaClick on File Add Printer Printer ServerWindows XP SP2 Windows Vista Select or install a printer and then press OK Page Completed / Total download size Download ManagerDownload Tasks Adding an Http Task Page Page Adding an FTP Task Page Page Page Adding a BT Task Page Page Deleting Tasks Scheduling DownloadsDownload Schedule ItemDescriptionUnder Download Schedule, set Scheduler to Enable Using the N7700 LoginUsing WebDisk User and Group Management Local User ConfigurationPhoto Server Windows XP Publishing WizardFolder Page Buttons Button DescriptionPage Page Page Page Page Password Protecting Albums Managing Albums and PhotosCreating Albums PhotoSlide Shows Uploading Pictures to AlbumsExif Information Apple OS Mapping a Client PC to the N7700Windows Mapping the N7700 as an iSCSI Drive Windows 2000/XPPage Page Page Page File Backup NsyncAdding an Nsync Task NsyncThecus Backup Utility Setting Up an Nsync Target on an Nsync DeviceSetting Up an Nsync Target on Another Device Nsync Target Server SettingAdd New Task Windows XP Data Backup Apple OS X Backup UtilitiesRemote Administration Tips and TricksUSB and eSATA Storage Expansion Adding a Spare DiskFirewall Software Configuration Part I Setup a DynDNS AccountPart II Enable Ddns on the Router Part III Setting up Virtual Servers HttpsReplacing Damaged Hard Drives Hard Drive DamageReplacing a Hard Drive RAID Auto-RebuildTroubleshooting Restoring Factory DefaultsProblems with Time and Date Settings Forgot My Network IP AddressPage Appendix a Product Specifications Hardware SpecificationsSoftware Specifications Product Model N7700LCD Thank you for choosing Thecus Appendix B Customer SupportAppendix C RAID Basics BenefitsRAID Levels Improved PerformanceStripe Size JbodDisk Usage RAID Level Percentage UsedADS Benefits What is Active Directory?Appendix D Active Directory Basics Appendix E UPS Compatibility List Brand Series Model112 113 Copyrights Appendix F Licensing InformationSource Code Availability Cgic License Terms GNU General Public LicensePage Page Page 119