Onkyo DR-S501 Before Making Any Connections, Basic Setup, RCA AV Connection Color Coding

Page 23

Connecting the DVD receiver—Continued

Before Making Any Connections

Read the manuals supplied with your AV components.

Don’t connect the power cord until you’ve completed all audio and video connections.

RCA AV Connection Color Coding

RCA AV connections are usually color coded: red, white, and yellow. Use red plugs to connect right-chan- nel audio inputs and outputs (typically labeled “R”). Use white plugs to connect left-channel audio inputs and out- puts (typically labeled “L”). And use yellow plugs to connect composite video inputs and outputs.

Right (red)

Analog audio

Right (red)

Left (white)

Left (white)

Composite video (Supplied)

(Yellow) (Yellow)

• Push each plug in all the way to


Right!


make a good connection (loose


connections can cause noise or


malfunctions).


• To prevent interference, keep


Wrong!


audio and video cables away from


power cords and speaker cables.


Optical Digital Jacks

The DVD receiver’s optical digital connectors have a shutter-type cover that opens when an optical plug is inserted, and closes when it’s removed. Push the plug in all the way.

Caution: To prevent shutter damage, hold the optical plug straight when inserting and removing.
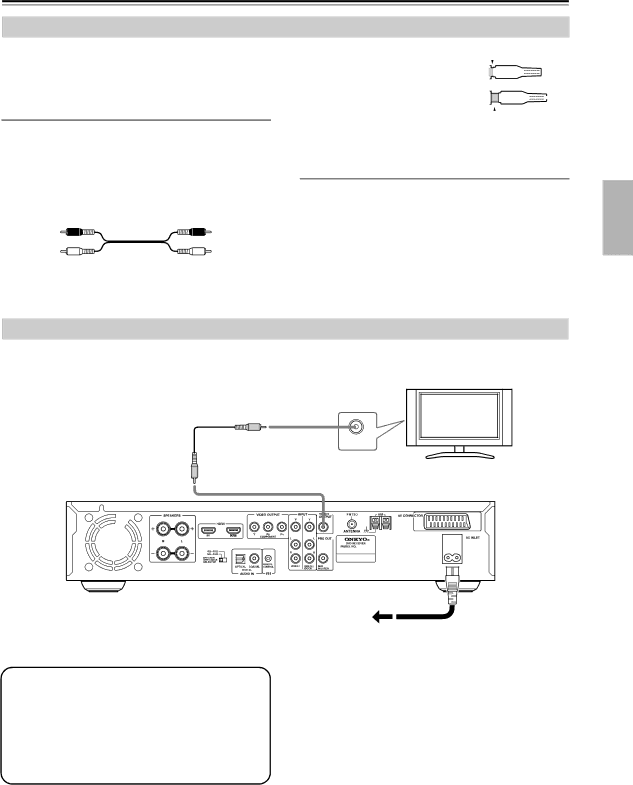
Basic Setup

The setup described here is a basic setup that allows you to play discs using just the cables supplied with the receiver.

Video cable

TV

(Supplied)

VIDEO IN

Power cord

To power outlet

(Supplied)

This receiver is equipped with copy protection tech- nology. Do not connect this receiver to your TV via a VCR using Video cable, as the picture from this receiver will not appear properly on your TV. (This receiver may also not be compatible with some com- bination TV/VCRs for the same reason; refer to the manufacturer for more information.)

1.Connect the VIDEO OUTPUT jack to the com- posite video input on your TV.

Use the supplied Video cable (RCA), connecting the yellow plug to the video output.

See the following page if you want to use other cable for the video connection.

2.Connect the supplied AC power cord to the AC INLET, then plug into a power outlet.

23

Image 23
Contents Overview Connections DR-S501Batteries Important Safety InstructionsInstalling this Unit PrecautionsPower For European Models PrecautionsMake sure you have the following accessories Supplied AccessoriesIntroduction FeaturesContents Function Support IntroductionDisc Notes Supported DiscsDivX video compatibility MP3/WMA/JPEG CompatibilityAbout WMA About DivXCopyright Cleaning DiscsHandling Discs Storing DiscsUsing the Remote Controller Before Using the DVD receiverInstalling the Batteries Front Panel Front & Rear PanelsDisplay Front & Rear PanelsVideo 1 Input AV Connector European model onlyRear Panel  Hdmi IN/OUTRemote Controller Mode button Resolution buttonTuner buttons Tuning / button Preset / buttonsPlacing the Speakers Connecting the DVD receiverConnecting Your Speakers Speaker Impedance Connecting the DVD receiverConnecting the Speaker Cables Connecting a Powered SubwooferAttach the FM antenna, as shown Connecting AntennaConnecting the Indoor FM Antenna Connecting the AM Loop AntennaUsing a TV/FM Antenna Splitter Connecting an Outdoor FM AntennaConnecting an Outdoor AM Antenna AV Cables & Connectors Video Signal Flow Chart Video Output/Video Setting MatrixOptical Digital Jacks Basic SetupBefore Making Any Connections RCA AV Connection Color CodingCompatibility of this unit with progressive-scan TVs Connecting Your TV video connectionUsing Component Video Using Scart European model onlyRecorder Connecting Other AV ComponentSet top box Digital Audio Connection Connecting an RI DockVideo What is HDMI?Using Hdmi Hdmi & the DVD receiverStandby indicator Connecting the Power/Turning on the DVD receiverBefore connecting DVD receiver turns on and the Standby indicator turns offButtons to select TV Shape Initial SetupFirst Time Setup Use the Up and DownSelecting Progressive or Interlaced Hdmi and Progressive SettingsSetting the Hdmi Selecting the Input Source Adjusting the VolumeUsing Headphones Understanding Common OperationsUnderstanding Common Operations Using the Sleep TimerAdjusting Subwoofer Level Remote controller Press the Muting buttonPlaying Discs Starting, Pausing & Stopping PlaybackSelect Playing DiscsSelect Next & Previous track/chapter Stop To stop playback, press the StopTo resume normal playback, press Play button This section explains how to fast forward and reverseForward Frame-by-Frame Playback Fast Forward & ReverseNavigating CDs & Super Audio CDs Navigating DVD & VCD Disc MenusNavigating MP3, WMA & DivX Discs Viewing a Slideshow of Jpeg Images Listening to the Radio Using the TunerTuning into Radio Stations Listening to the RadioListening to the Radio Presetting AM/FM StationsSelecting Presets Deleting PresetsRT Radio Text Using RDS European models onlyWhat is RDS? PS Program ServiceAbout the Listening Modes Using the Listening ModesSelecting Pure Audio Listening Mode on the DVD receiver Selecting Listening ModesPress and hold the Setup but Ton for 3 seconds Using the Listening ModesTheater-Dimensional Listening Angle Setting Listening Mode and Receiver SettingsPress the Play or Enter Advanced PlaybackPress the Search button This is what appears for CDsUse the number buttons to enter a time Advanced PlaybackSearching by Time During playback, press the Search button twiceRepeat A- appears onscreen and -RA appears on the display To cancel A-B repeat playback, press the A-B buttonRepeat Playback Random playback may not work with some discs Random PlaybackSACD, VCD, CD Disc Random, Ran- dom Off Adding New Items to the List Memory PlaybackEditing Steps Last MemoryDeleting Items from the List Press the Zoom again repeat- edly to Zoom ZoomingSelecting Camera Angles Zoom x1.0 appears onscreenSelecting Subtitles Selecting SoundtracksInput Information Disc and Input InformationDisplaying Information Disc InformationControlling a TV Entering Remote Control CodesControlling Other Components Controlling a TV connected to the DVD receiverControlling Other Components Setup Menu Configuring the DVD receiverConfiguring the DVD receiver Crossover Frequency AM Frequency Step Setup not European modelsAudio Input Setup Digital Input Signal FormatsLanguage DVD Onscreen Setup MenusMenu Setting Description PicturePress the Enter button to con DVD Onscreen Setup MenusUsing the Onscreen Setup Menus Tons to select the options,TV Shape View ModeHdmi Output Setting Picture MenuVideo Black Level Progressive SettingHD Resolution HD Jpeg ModeDigital/HDMI Audio Out PAL Output SettingScart Output Setting European model only Audio MenuAudio Language Language MenuOn-Screen Language Disc Menu LanguageLanguage Code When you’ve finished, press the Enter buttonUse this list when specifying other languages Selecting Other LanguagesDisplay Menu Tal lock, and then press Operation Setting MenuSetting the Parental Lock Change the Security CodeDivX Registration DVD Priority ContentsSacd Priority Contents DVD-Video regions Resetting the receiverDisc Content Organization Additional informationMP3, WMA, Jpeg & DivX Files GlossaryAdditional information File extension Hdcp High-bandwidth Digital Content ProtectionPAL Phase alternation by line Dynamic rangeAudio TroubleshootingPower Make sure the source material is Dolby Digital TroubleshootingVideo Disc Playback TunerOthers Connection with External DevicesNo sound from the Hdmi connection Hdmi Status ModeNo picture from the Hdmi connection Displayed ID MessageTuner Section SpecificationsAmplifier Section Video SectionAOC Remote Control Codes ListECE Remote Control Codes ListKEC RCA TV/DVD Combination SSSMemo Memo Onkyo Europe UK Office Onkyo Europe Electronics GmbH