Kodak DX4900 manual Charging the Battery Pack

Page 68

Chapter 8

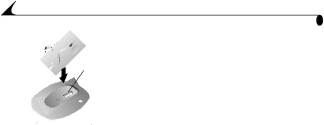
Connector

LocatorLight pin

3Place the camera in the Camera Dock and push down to seat the connectors; the Dock locator pin fits into the camera tripod socket.

The Camera Dock light glows green when the connectors are properly seated. The camera is now powered by the Camera Dock instead of the camera batteries.

NOTE: If the Battery Pack in the camera requires charging, the Camera Dock light turns red after a few seconds and charging begins.

Charging the Battery Pack

The batteries in the Battery Pack are not charged when you receive it.

1Turn off the camera.

2Make sure the Battery Pack is installed in the camera.

3Place the camera in the Camera Dock (see page 57). m Charging begins after a few seconds.

mThe Camera Dock light glows red while charging, then glows green when the Battery Pack is charged.

mCharging takes about 2.5 hours. After the Battery Pack is charged, leave the camera in the Camera Dock. It continually senses battery power and resumes charging whenever necessary. Under these conditions, there is no red light while charging.

mCharging stops if you turn on the camera. If the camera is left in the Camera Dock with the power on, charging resumes when the camera enters automatic power down mode (see page 6).

NOTE: The Camera Dock only charges the KODAK EASYSHARE Ni-MH Rechargeable Battery Pack. If you place the camera in the Camera Dock with any other type of batteries, no charging takes place.

58

Image 68
Contents Kodak Easyshare 6B5921 Front View Top/Back View Status Display Page Table of Contents Selecting Pictures for Automatic Printing Vii Getting Help Getting Started What Can I Do With My Digital Pictures?Camera Package Contents Attaching the Wrist StrapImportant Battery Information Loading the BatteriesUse only certified cards that carry the Compactflash logo Inserting a Compactflash CardTo insert a card Turn off the camera Turning the Camera On and Off Built-in Lens CoverAutomatic Powerdown Saves Batteries Camera Behavior To reactivate Powerdown AfterChecking the Batteries AutomaticPress Select to accept the changes Setting the ClockPress Select Press the arrow buttons to move Mode Dial-Settings and Menus Capture MenusQuality StampProtect Picture Info Review MenusMenu Magnify Slide Show Delete Print Order Setup Menus To access the Setup mode menus Turn the Mode dial to SetupNavigating Through the Menus To navigate and select the menus and optionsPage Taking Pictures Taking a PictureHighlight Yes, then press Select Viewing and Deleting the Last PictureTake a picture Previewing Your Picture Take a Burst Series of Pictures Shooting a Burst Series of PicturesTurn On Burst To choose the setting Set the Mode dial to Capture Close-Up PicturesDistant Pictures Zoom position Close-Up focus distanceSee page 44 for different digital zoom options Using ZoomUsing Optical Zoom Using the Flash Putting Yourself in the Picture Customizing Picture-taking Settings Setting Exposure CompensationSetting White Balance DAYLIGHT-ideal for pictures in natural lightingSetting a Color Mode Black & WHITE-for black and white picturesSetting the Picture Quality Quality Setting Name Resolution File Size approx MegapixelsMP default See page 16 for how to use the 1.0 MP Burst settingSetting Exposure Metering Setting Picture Sharpness Setting the ISO Speed Setting the Shutter Speed To 16 seconds-use a tripod to avoid camera shakePlacing the Date on Pictures Page Turn the Mode dial to Review Reviewing Your PicturesViewing Pictures in Full Size Use the 4-way arrow button to scroll through the picturesViewing Pictures With the Filmstrip Select while holding an arrow buttonMagnifying Pictures Press to magnifyExit default-returns you to the Main screen Deleting PicturesProtecting Pictures Running a Slide Show Digital projectorSelecting Pictures for Automatic Printing EXIT-returns you to the Main screenPress Select to exit Picture Info Viewing Picture InformationPress Select Press Menu to exit the Menu screen Installing the Software Install the SoftwareChapter Software Included With Your Camera Kodak Picture Transfer SoftwareKodak Picture Software Kodak Camera Connection SoftwareMacintosh System Requirements Computer System RequirementsWINDOWS-Based System Requirements Personalizing Your Camera Selecting a Power Save SettingPress Select This setting remains until you change it Setting Digital Zoom Behavior To use the Pause setting, push TelephotoAdjusting the Camera Sounds PAL EUROPE-standard used in European countries Setting Video OutSelecting a Language Cancel default-exits without making a change Formatting a Compactflash CardThen press Select Resetting User SettingsViewing Camera Information Using Pictures on Your Computer Connecting to Your ComputerConnecting With the USB Cable Before You Transfer Your PicturesTransferring on a WINDOWS-based Computer Connecting With the Kodak Easyshare Camera DockTransferring Your Pictures Turning Off Kodak Picture Software Auto-start Working With Your PicturesTransferring on a Macintosh Computer Transferring Your Pictures Manually On a WINDOWS-based ComputerOn a Macintosh Computer Kodak Camera Connection Software Online HelpPrinting Your Pictures From Kodak Picture SoftwareFrom a Compactflash Card Print to your home printer with Kodak Premium Picture PaperPage Using the Kodak Easyshare Camera Dock Camera Dock Package ContentsInstalling the Dock Insert Connecting the Camera DockOpen the battery door on the bottom of the camera Docking the CameraCharging the Battery Pack Important Charging Information When Using a Tripod Transferring PicturesTroubleshooting Problems Troubleshooting-CameraCamera Communications Problem Cause Solution Camera Problem Cause Solution Remove and reinstall Turn on Installed BatteriesFunction Subject is too far An effectMake sure the card access Damaged When the card accessLens is dirty Clean the lens Use the Close-Up settingCamera Status and Messages Camera Viewfinder Light Light Status Cause SolutionCamera Card Access Light Light Status Cause Solution LCD Messages Cause Solution Troubleshooting-EASYSHARE Camera Dock Camera Dock Problem Cause SolutionPictures are not Running on your Computer Camera was Replace the camera onCamera Dock indicator light Light Status Cause Solution Easyshare Camera Dock StatusPage World Wide Web Kodak Fax Support Getting HelpSoftware Help Telephone Numbers Telephone Customer SupportBefore You Call 01 838 53 Taiwan 0080861008 0870 International Toll LinePage Appendix Camera SpecificationsCamera Specifications Wide f/2.8 ApertureTelephoto f/4.0 Wide 2.7 to 27.5 in70 to 700 mmCamera Dock Specifications Original Factory Settings-CameraCamera Dock Specifications Feature Factory SettingPower Save-Camera Performance White Balance AutoCamera Function YesUsing Your Batteries Be usableTips, Safety, Maintenance Camera Accessories Quality Setting Picture Storage CapacitiesLocating Pictures on a Compactflash Card MB cardCard File Naming Conventions FCC Compliance and Advisory Upgrading Your Software and FirmwareRegulatory Information English translation Canadian DOC StatementVcci Class B ITE Page Using power save 43 with Camera Dock Low or exhausted 59 beeps, adjustingCenter-weighted metering Original factory defaultsCommunication problems File name conventionsWith Camera Dock 50 with USB cable Error messages 67 previewing pictures 15 viewing pictures on Camera Dock 69 viewfinder, cameraPackage contents camera 2 Camera Dock OS X, MacintoshCamera Dock 56 checking batteries 6 turning camera on Sharpness, setting 26 storage capacityTransferring manually 52 transferring to computer Fax numbers 71 Kodak web site ISO speed 27 language 46 mode dial menusSlide show 36 running slide show Use with self-timer 20 troubleshooting problems Macintosh WindowsInstalling software 39 system requirements Web site, Kodak 71 white balance 22 wide angle zoomCamera information 48 picture information Zoom