Philips SM30 manual Installation Loudspeaker Zone Template, Adjustments, LED Intensity Preset

Page 22

6.2Installation

Loudspeaker Zone Template

A paper template is provided, on which the names of the loudspeaker zones can be written. The template has a detachable blank section at the bottom, allowing it to be used in a typewriter.

To mount the template in the Call Station, first remove the right hand side cheek (fig.6.1D), by unscrewing the two screws in its side (fig.6.1E), and the one screw located in the bottom. The plastic template cover (fig.6.1C) can now be slid out. Place the (type) written template in position over the zone LEDs (having first torn off its blank perforated panel), and carefully slide the plastic template cover back in place.

Connection to Control Centre Between the Call Station and the Call Station Input Module (see chapter 7.1) the following cabling is needed::

a shielded twisted pair for audio and power transport;

a twisted pair for data transport. When the copper diameter of each wire is not less than 0.75 mm2 the length of the cable can be up to 1000 meters for proper functioning.
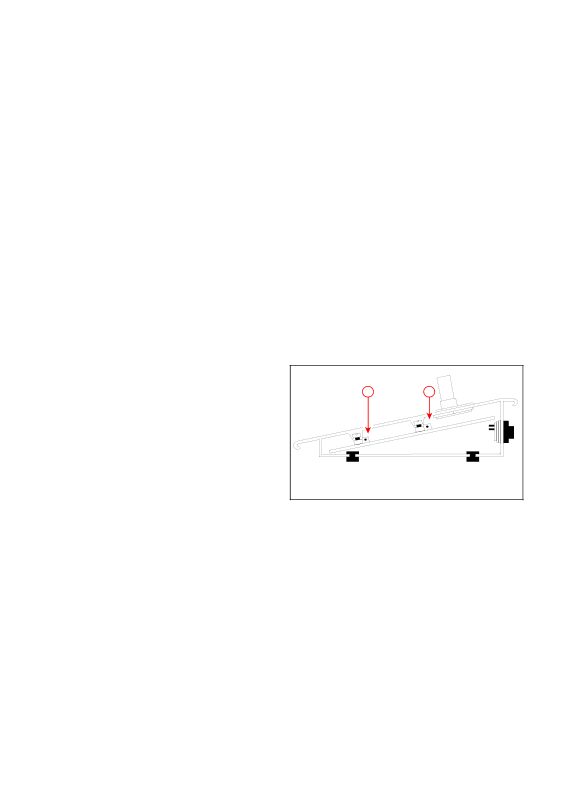
6.3Adjustments

Microphone Pre-amplifier Gain Preset With the right hand side cheek of the Call Station removed, the microphone preamplifier’s gain can be preset. Turning the potentiometer (fig.6.2B) to the right increases the amount of gain. To obtain nominal 1 Volt output level, the gain can be preset from 84 to 114 dB SPL.

NOTE: The Call Station Input Modules also have input gain presets. The

Microphone Preamplifier Gain Preset should only be used for setting the amount of compression, not for lining up the Call Station output with the rest of the SM30 System. See ‘Built-in Compressor’ earlier in this chapter.

LED Intensity Preset

With the right hand side cheek removed, it is possible to gain access to the LED intensity preset.

To compensate for various local lighting conditions, the illumination intensity of the LEDs can be adjusted. Turning the potentiometer (fig.6.2A) to the right increases the intensity.

With the template and its cover in position, and the microphone volume and LED intensity adjusted, replace the right hand side cheek.

A

B

Fig. 6.2 - CST adjustments

6.4Using the Call Station

Using the Keypad to make a Call

1To route a call to one or more loudspeaker zones, simply type in the number of each desired zone using the numeric keypad. Numbers ‘1’ to ‘9’ allow single digit numbers to be entered, number ‘1-’ is for tens, and ‘0’ is the second digit in the number 10. For instance, to route a call to zones 7, 10, and 15, type in: 7, then 1-, then 0; then

20

Image 22
Contents SM30 Contents Control Centre IntroductionProgramming Block diagram Signal generatorEmergency Power Supply +48 VDC SM30 plug-in modulesBlock diagram Typical Operation System OperationActivation of Control Relays Power on delay Volume Control Override RelaysAlarm interrupt Signal description Alarm TonesTime signals Front panel controls ON/OFF Power Switch fig.4.1AProgramming Keys fig.4.1C Alpha-Numeric LCD Display fig.4.1D Music Function Keys fig.4.1ESM30 basic modules Power Supply ModuleLine Output Module Setting UP the Hardware GeneralRemoving Module Blank Panels Opening the housingMounting the Modules Volt Emergency Power Supply Voltage SettingEarth Terminal ground Calculating Required Rack Space Mounting in a 19 rackRemoving Feet General RulesOne Channel System fig.5.5.2 Connecting amplifiersRack Mounting 1 Two channel system 2 One channel system Balanced Line Level output Electret condenser microphoneBuilt-in Compressor Operating controls Numeric Keypad fig.6.1JCall Station ‘Press-To-Talk’ Key fig.6.1HLED Intensity Preset Installation Loudspeaker Zone TemplateAdjustments Using the Call Station Using the Keypad to make a CallPage Call Station Input Module CSM Installation Mounting in the Control CentreAdjustments Volume Level Controls Connection of Call StationsLine Input Facility Operation Remote Switching FunctionMicrophone Input Module MIM Bass Cut FacilityControl Input Module Adjustments Gain Control PotentiometersConnection of Microphones CIMWiring control inputs Direct routingHeadphone Monitoring Adjustments Output Volume ControlAutomatic Gain Control Microphone InputRecording a Message Safety FeaturesNumerical order, commencing with message Recording over an Existing MessageMUM Remote Location RecordingMusic Input Module Music Source InputsProgramming Software routing to zones Display music source statusZRM Zone Relay ModuleTerminations Coupling Zone Relay Modules Multiple Amplifier ConfigurationsControl Relay Module CRMWiring Control Relays Remote Volume Control OverridesInstallation Programming Power-on delayProgramming Program step Selection User passwordSummary SM30 User Programming General User Programming ModeIntroduction User ProgramCall Stations Call Station number selection Signal number selectionMain menu selection Key Pad SelectionKey programming selection Key Signal number selectionFunction Key number selection Key Priority selectionKey Relay switching selection Key Music volume upKey Music volume down Key Music on/offMicrophone number selection MicrophonesCall Routing to Zones Microphones Programming next microphoneControl input Control InputsControl input number selection Priority level selection inputControl Inputs Programming Control RelaysSM30 System Specification GeneralMains Supply Audio signal level diagram DL LMusic Routing Return to ‘RUN’ modeError Messages Music RoutingPage Supplement Instructions for installation Contents Installer programming stepsselection Extended Call Station ProgrammingSetup Language selection Installer modeSystem down Store hardwareDelay time Power-on DelayPOWER-ON Delay Music Input TextInput number selection Select LanguageAlternative Music Input Text Alternative text selectionConfiguration display Storing Hardware Selecting Amplifier ConfigurationStore Hardware Amplifier Configuration Altering selectionRemote Volume Control Music Volume Step/RepeatMode display Relay selection Volume Control Routing Limits Call Override Relays StationOverride Relays Call Station selectionDirect Routing Routing settingRouting Limits Current zone displayClearing Memory Clear Memory Control Alarm ModePower-on delay System down 14.2 ConfirmationFlexible F-keys Selection Call Station input number Extended Call StationExtended Call Station Programming 17.3 ConfirmationMPL if IE R C ONF IG Xxxxxx R MA N Singl E AMP LIF IE RS MU SIC Z on ES SE T ROU TIN G VIA Inst AL LE R P Rogr AM EL ECT PR Ogram CT L AL AR M MOD E SEL ECT FUN Ction MIC ROP Hone Priority Page Page 3922 988 33415 20/97