Blaupunkt MP75 Theft Protection Switching ON/OFF, Switching on/off, Attaching the control panel

Page 9

THEFT PROTECTION

SWITCHING ON/OFF

The control panel latch mechanism opens.
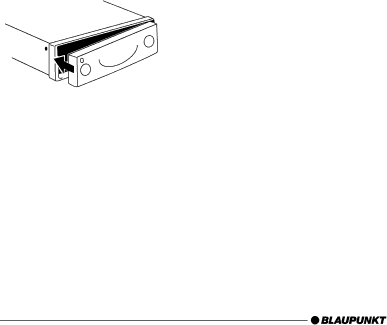
First, pull the control panel straight off the device and then out to- wards the left.

The device switches off after the control panel is detached.

All the current settings are saved.

Any CD already inserted in the de- vice remains there.

Attaching the control panel

Slide the control panel from left to right into the deviceÕs guide.

Press the left edge of the control panel into the device until it clicks into place.

Note:

When attaching the control panel, make sure you do not press the display.

Switching on/off

There are various ways of switching the device on/off.

Switching on/off using button

1

To switch on the device, press button 1.

The device switches on.

To switch off the device, press and hold down button 1 for longer than two seconds.

The device switches off.

Switching on/off using the vehicle ignition

The device will switch on and off si- multaneously with the ignition if it is connected correctly to the vehicleÕs ig- nition and if it was not previously switched off using button 1.

You can switch the device on even if the ignition is off.

Press button 1.

Note:

To protect the vehicle battery, the device will switch off automatically after one hour if the ignition is off.

50

Image 9
Contents Bronx MP75 Open here Page Controls Contents Entering the power-on Safety notice Road safetyInstallation AccessoriesTheft protection Activating / deactivating demo modeDetachable control panel Detaching the control panelSwitching on/off Theft Protection Switching ON/OFFSwitching on/off using button Switching on/off using the vehicle ignitionAdjusting the volume Adjusting the VolumeSetting the power-on volume Volume muteAutomatic sound Gation announcement using the volume controlSound and volume distribution settings Sound and Volume Distribution SettingsAdjusting the display settings Bass Adjusting Display SettingsAdjusting the viewing angle Adjusting the display brightnessAdjusting the Display Settings Setting the button illumination colourSetting the display illumination colour Configuring the spectrum analyser Radio mode Adjusting Radio Mode Display SettingsInverting the appearance of the display content Adjusting the tuner settingsConvenient RDS functions AF, REG Switching to radio modeTuning into a station Selecting the waveband / memory bankBanks AM1, AM2 and AMT by pressing the Next 4 button Scanning receivable stations Scan Setting the sensitivity of station seek tuningStoring stations Setting the scanning timeStoring stations automatically Travelstore Listening to stored stationsFor example, the programme types can be Programme type PTYActivating/deactivating the radio text display Optimising radio receptionSetting the volume for traffic announcements Switching traffic information priority on/offTraffic Information Traffic informationCD mode CD ModeSwitching to CD mode and inserting a CD Ejecting a CDRandom track play MIX Fast searching audibleRepeating tracks Repeat Scanning tracks ScanMP3 mode CD Mode MP3 ModeSetting scrolling text Traffic announcements in CD modeSwitching to MP3 mode Selecting a directory Press the joystick 8up or down to browse through the listVery beginning of the top line of the display Repeating individual tracks or whole directories Repeat Selecting information in the info line Configuring the displayCD-changer mode optional CD-CHANGER ModeSwitching to CD-changer mode Selecting CDsRepeating individual tracks or whole CDs Repeat Naming CDs Clock Time Setting the clock timeClock time Set the month by moving the joy- stick 8 up or downEqualizer Clock Time EqualizerDisplaying the clock time continuously Following bands are availableAutomatically calibrating the equalizer Switching the equalizer on/offPress the softkey 5assigned to the Òoffó display item GerManually adjusting the equalizer Selecting sound presetsYou can select sound presets for the following music types Selecting an equalizerEqualizer Sound Impression / problem Measures Help adjusting the equalizerTMC AMPLIFIER/SUB-OUT Switching the internal amplifier on/offTMC for dynamic navigation systems Amplifier/sub-outExternal Audio Sources Switching the AUX input on/offExternal audio sources Naming the AUX inputEntering the power-on message External Audio Sources POWER-ON MessageResetting the device Serial NumberDisplaying the serial number Specifications Specifications389 GerŠtepass